
Managing employees
Everything about the people who work for you lives on the Employees screen: who they are, their PIN, what they can do on the POS, which parts of BREW POS Admin they can open, which locations they work at, and a record of every change anyone makes. This guide covers setting someone up, changing them later, and removing them when they leave.
Time cards, job codes and pay rates are set up on the Timecards screen and have their own guide, Setting up and managing time cards. This guide only covers ticking which job codes a person can clock in as.
Contents
Before you start
How an employee record is built
Step 1. Open a new employee
Step 2. Enter their details
Step 3. Choose their login level
Step 4. Set what they can do on the POS
Step 5. Give them access to BREW POS Admin
Step 6. Job codes and locations
Step 7. Email notifications
Step 8. Save, and check it saved
Step 9. Change their PIN
Setting up the next person: Copy
Changing someone later
When someone leaves: Disabled or Delete
Checking what someone has been doing: History
Seeing who changed what: the Audit Trail
Reference
Troubleshooting
About this guide
Before you start
This guide is for owners and managers who set up staff. It assumes you already use BREW POS Admin day to day.
You need Employees access. If Employees is missing from the dark menu on the left, you do not have it. Ask whoever manages staff records. If they look for it, the same permission is sometimes called Security.
Have these to hand before you start: the person's first and last name, a phone number or email address, the location or locations they work at, and what they will do (serve, run the bar, cook, manage).
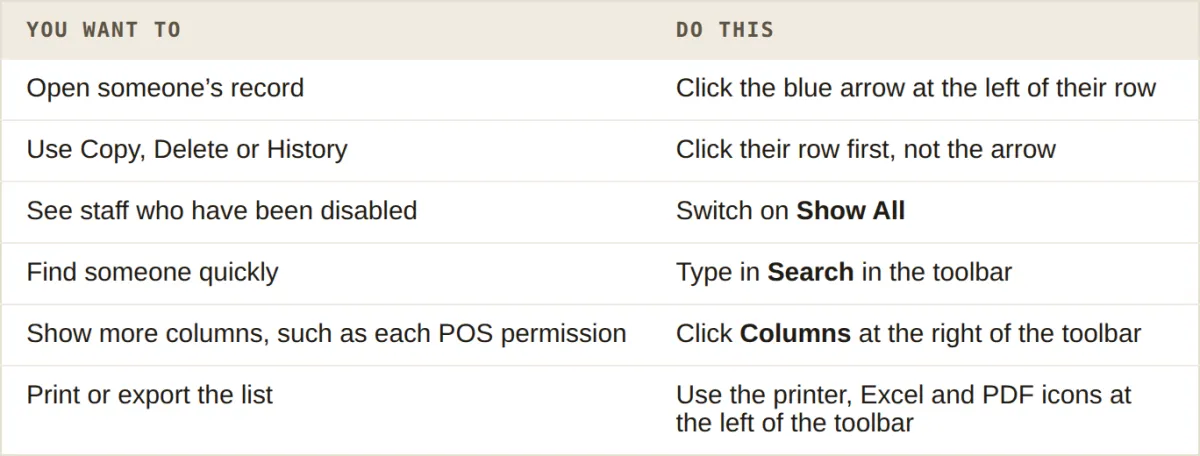
The blue arrow at the left of any row opens that record. Clicking the row itself only selects it, and there is no Edit button anywhere in the system.
Employees access is the most powerful access there is: whoever has it can give anyone, including themselves, access to everything else. Give it to as few people as you can.
How an employee record is built
Three separate things decide what a person can do, and you set all three on the same record:
Their login level: User, Manager, Timecard or Disabled. This decides whether they can sign in to the POS at all, and how much of the rest of the record applies to them.
Their POS permissions: a block of tick boxes for what they may do on the POS, such as comps, discounts and voids.
Their admin permissions: which parts of BREW POS Admin appear in their menu.
On top of those sit their job codes, their locations and their email notifications.
There are no ready-made job profiles to pick from. You do not make someone "a server" and have that settle everything. The fastest way to set up several people the same way is to set up one and copy them.
Step 1. Open a new employee
New or Copy?
There are two ways to add someone. New starts a blank record and you set everything yourself. Copy starts from someone who already does the same job, with all of their settings carried across.
Copy is usually the better choice. If you already have a server set up the way you like, copying them gives the new server exactly the same POS permissions, admin access, job codes and locations in one click, instead of going through thirty-odd boxes and hoping you set them all the same way. You only fill in the new person's name and contact details.
To copy someone instead, go to setting up the next person: Copy. The steps below start from a blank record.
Start a blank record
In the dark menu on the left, click Employees.
The Employees tab is already selected and shows your staff list (Figure 1).
In the toolbar, click New.
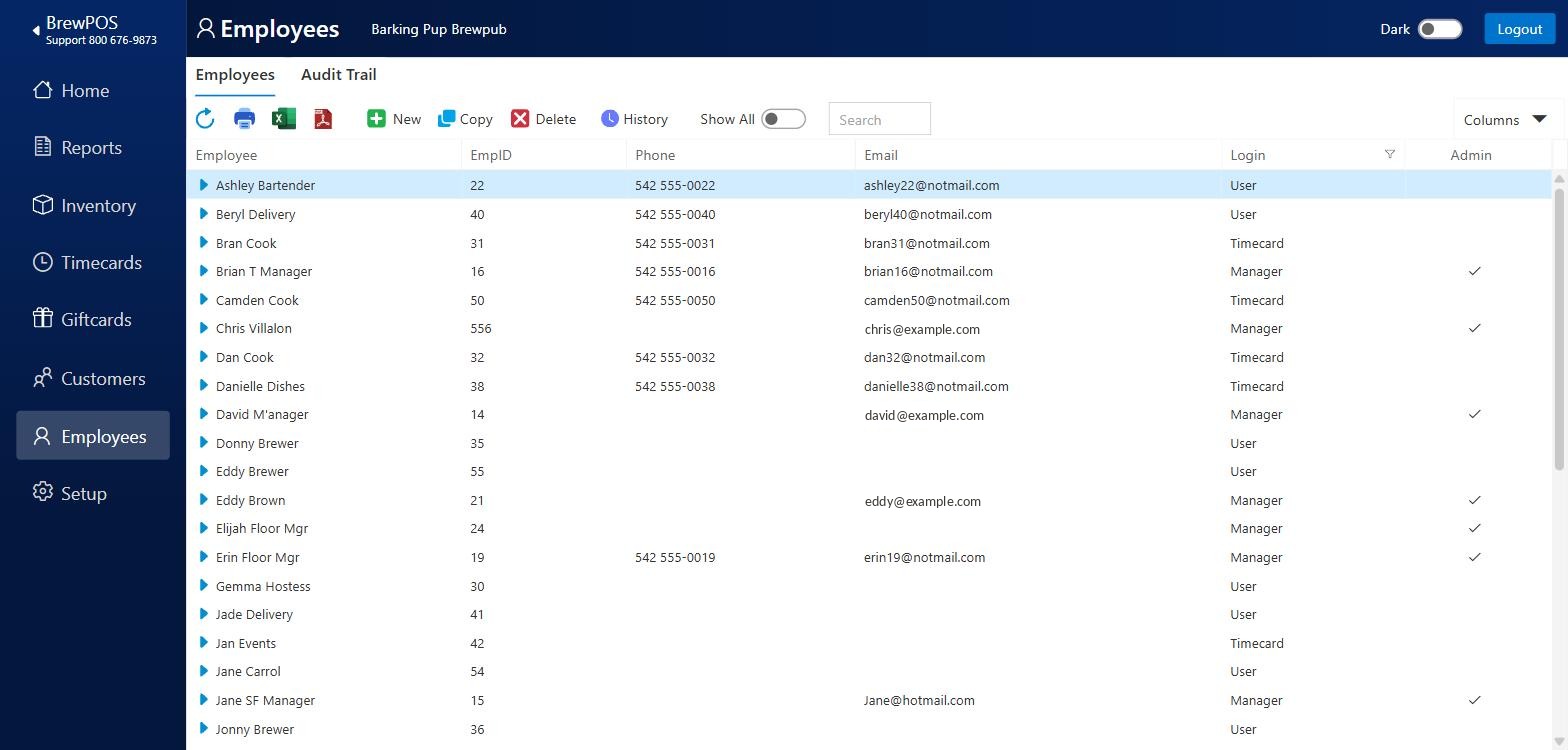
Figure 1. The Employees screen. The blue arrow at the left of each row opens that person's record
A blank record opens, headed Employee (new) (Figure 2). Three things on it are worth knowing before you type anything:
The note across the top: a matching Customer record will be automatically created when saved. Every employee also becomes a customer, so staff purchases and tabs can be put on their name. You will see them in Customers afterwards.
PIN is 1111. Every new employee starts with the PIN 1111. They can change it themselves at the POS, or you can change it here after the first save: see changing their PIN.
Role is set to Disabled, so nearly everything on the record is grey. It unlocks when you choose their login level.
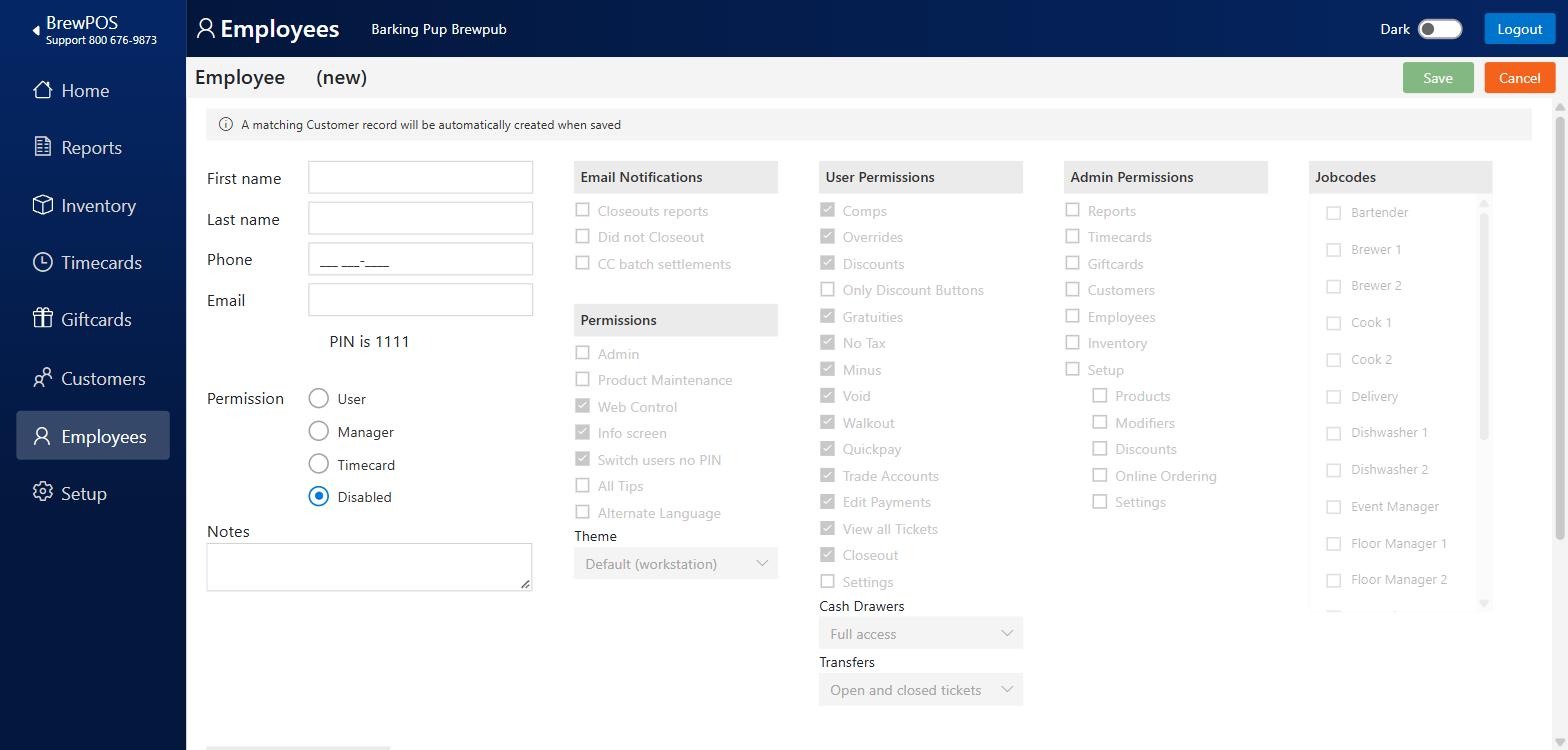
Figure 2. A new employee, before anything is entered
You do not choose the employee number. The system gives each new employee the next number up from the highest one in use.
Step 2. Enter their details
Click First name and type their first name: Riley.
Click Last name and type their last name: Barback.
Optional: click Phone and type the ten digits without spaces or dashes: 5055550142. The box adds the spacing itself.
Optional, unless they will use BREW POS Admin: click Email and type their email address: [email protected].
First and last name are required; both boxes are outlined in red until they are filled in, and Save stays pale until they are.
If another employee already has the same phone number or email, the record says Duplicate Phone or Duplicate Email in red under the box and will not save. Each person needs their own.
If you need to clear a phone number, delete the digits one at a time. Selecting the whole box and deleting it can leave the box refusing to take any more typing, and the record then saves with no phone number and no warning.
Step 3. Choose their login level
Next to Role, click one of the four levels.
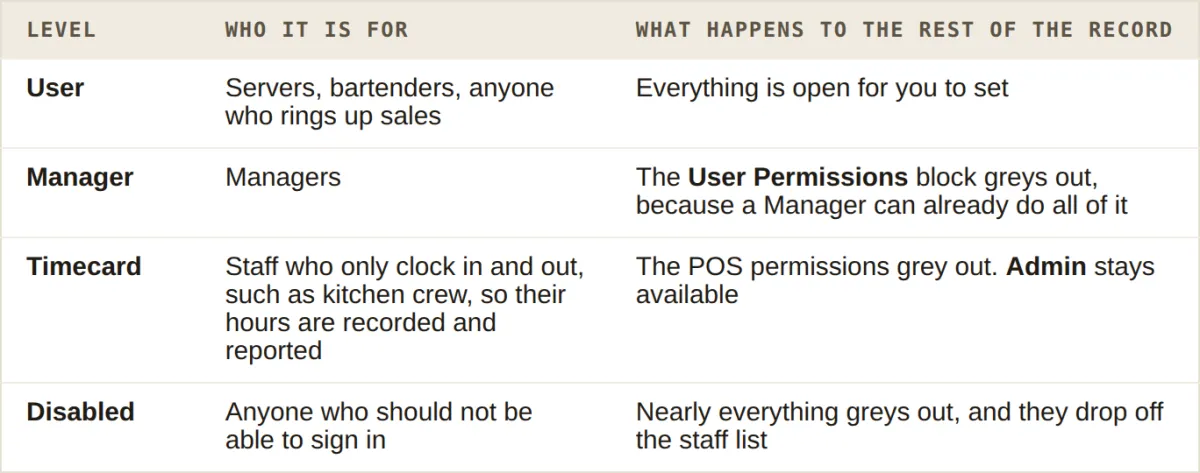
The four login levels, and what each one does to the rest of the record
Figure 3 shows the same new record at Manager and at Timecard. A greyed block is how the screen shows that those boxes do not apply at that level; it is not a fault.
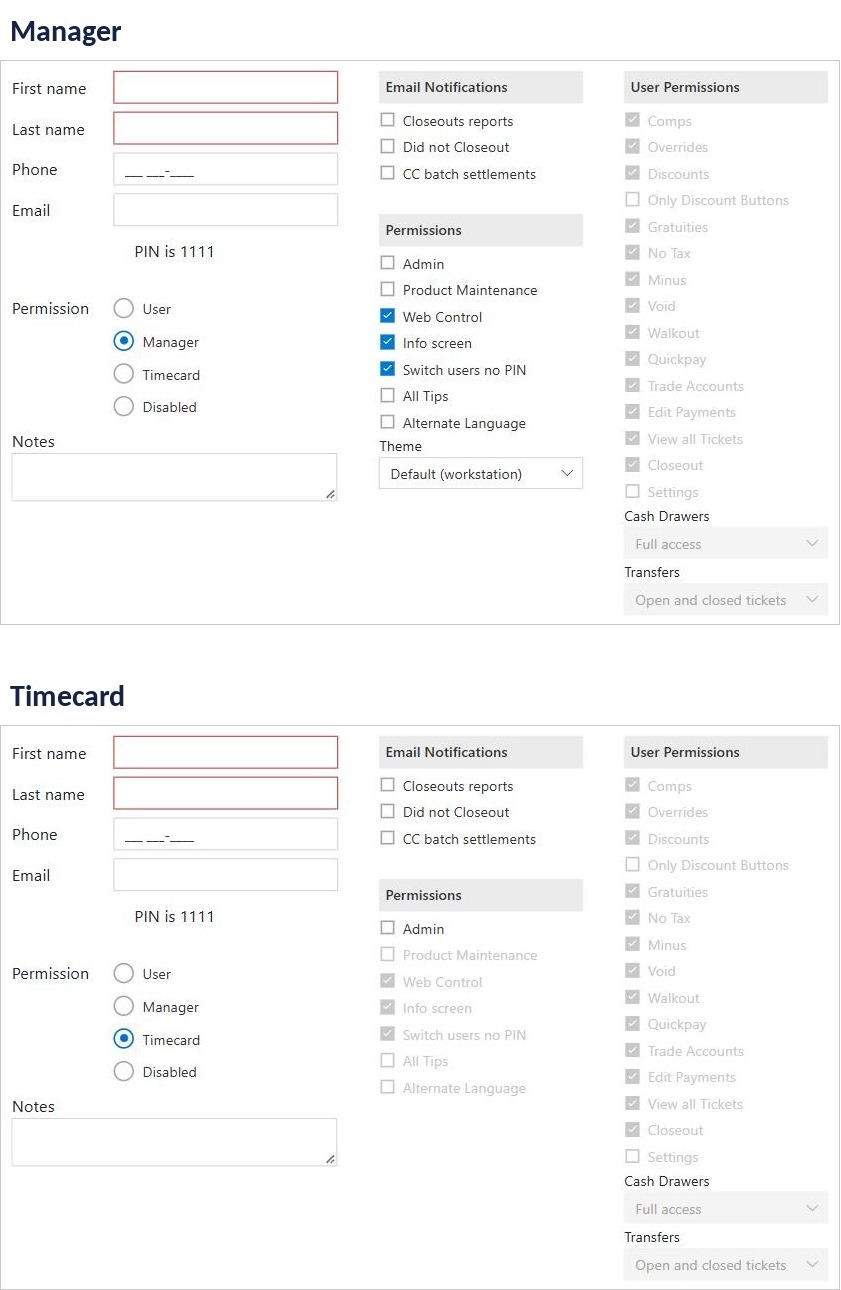
Figure 3. The same record at Manager and at Timecard. Manager greys out the User Permissions; Timecard greys out every POS permission but leaves Admin available
For Riley, click User.
Step 4. Set what they can do on the POS
We encourage you to give your staff full access on the POS, and to trust the system to keep watch for you.
BREW POS records every touch an employee makes on a ticket. If a question ever comes up, you can go back and see exactly what was done, by whom and when. That means you can hand your team voids, comps and discounts without worrying that they will be misused, and your managers are not called over every time a guest needs something put right.
Keeping an eye on it is built in. The Make It Profitable report flags when employees take certain actions, and lets you drill straight down into each one to see what happened. For one person at a time, the History report on this screen does the same.
That is why a new User arrives with almost everything already ticked (Figure 4): comps, overrides, discounts, gratuities, no tax, minus, void, walkout, quickpay, trade accounts, edit payments, view all tickets and closeout, with Cash Drawers at Full access. For most staff you can leave it that way.
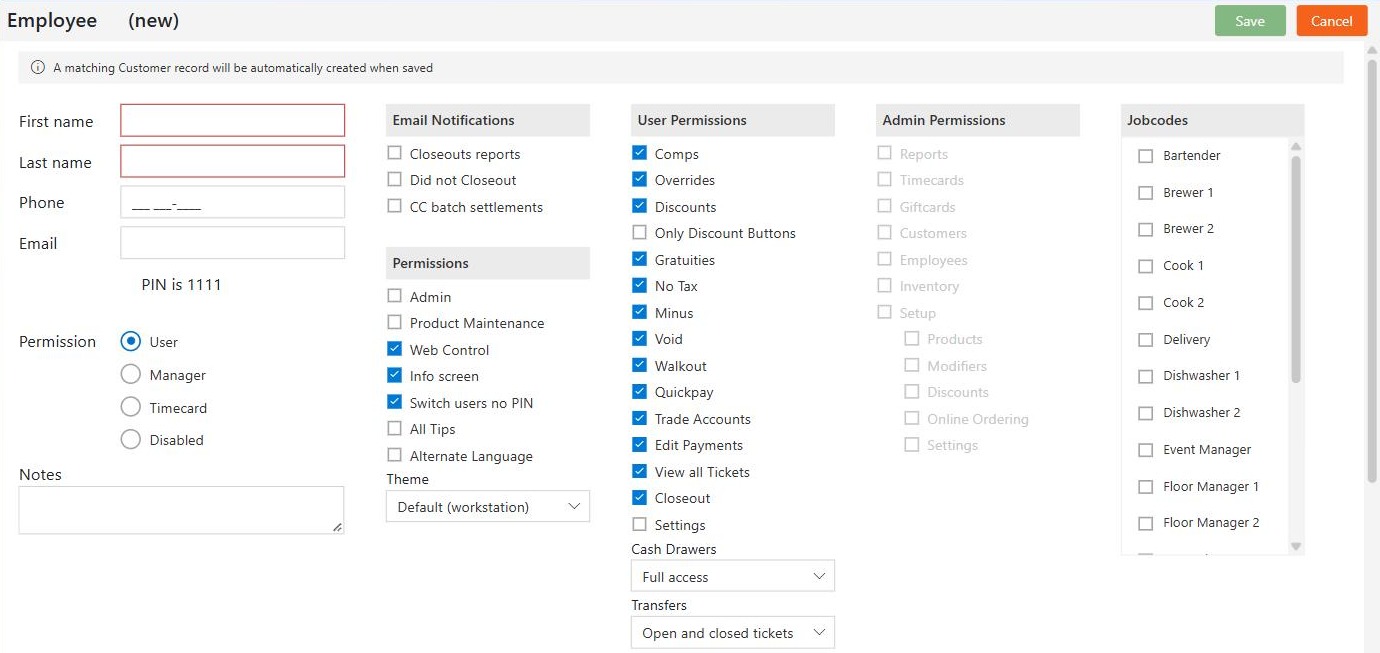
Figure 4. A new record the moment User is chosen, with most of the POS permissions already ticked
If you do want to hold something back from someone, untick it here. There are two blocks of POS settings.
Permissions (the left-hand block):
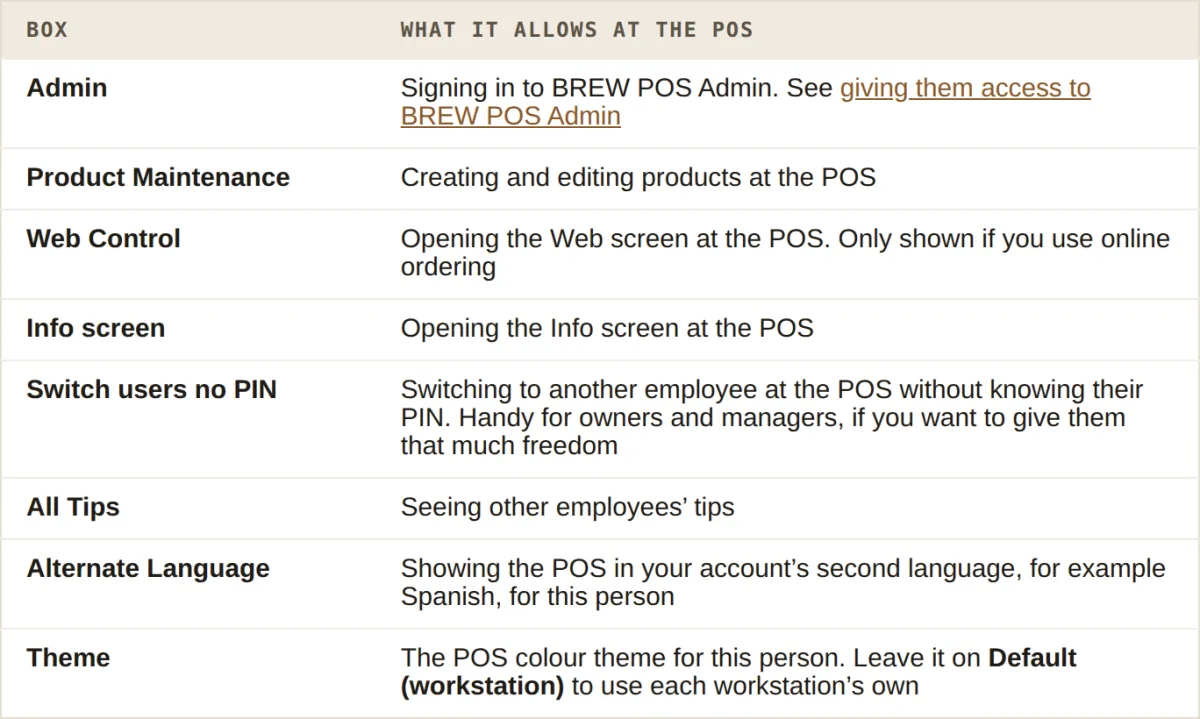
What each box in the Permissions block allows at the POS
User Permissions (User level only):
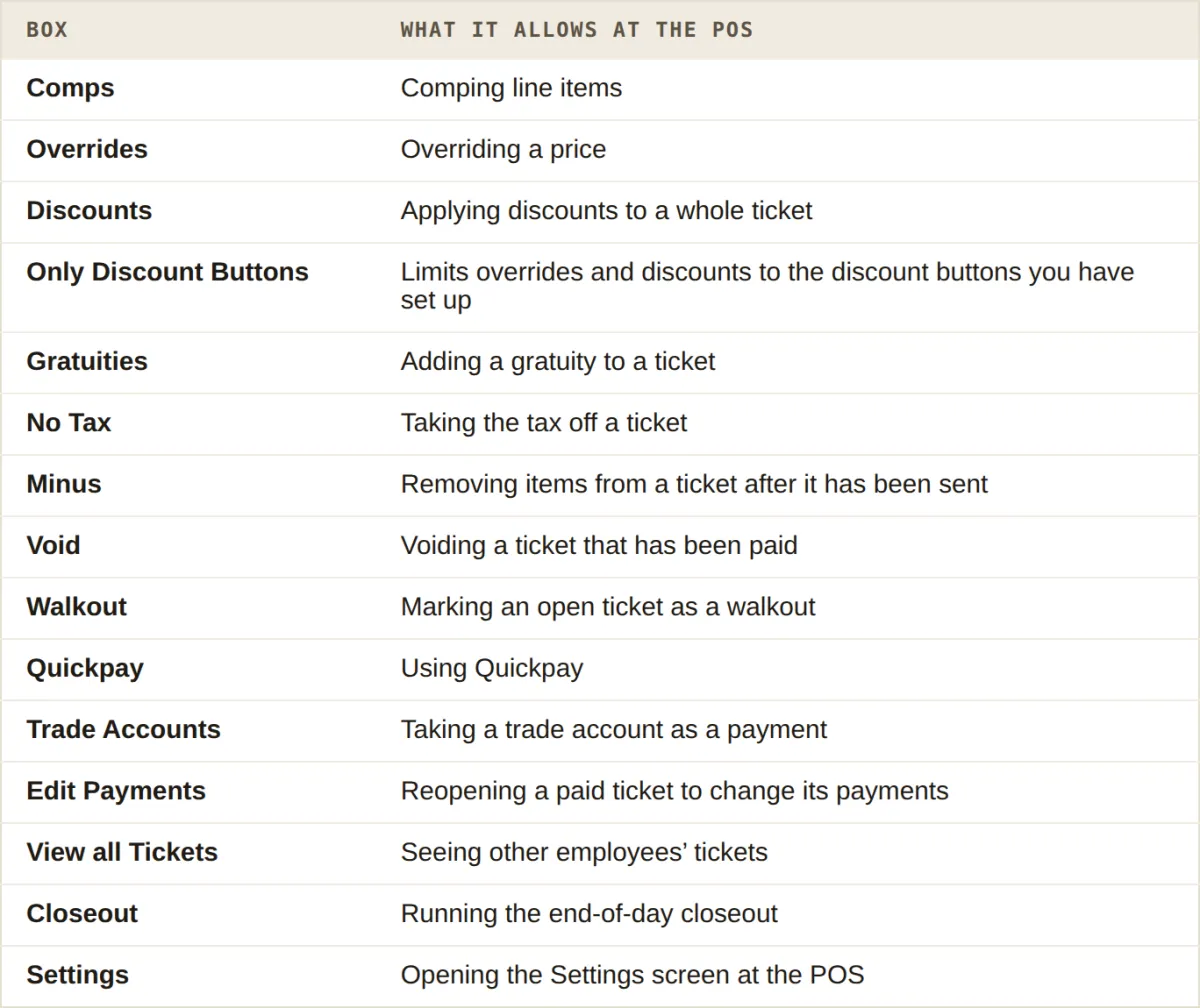
What each User Permissions box allows at the POS
Below them, two drop-down lists:
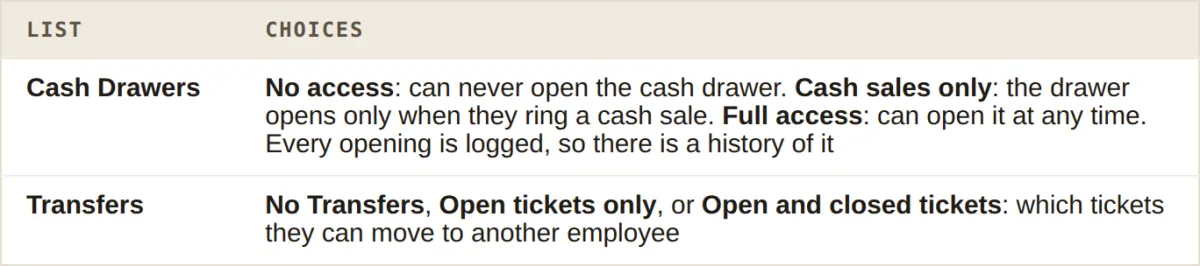
The two drop-down lists below the User Permissions
Watch out: Minus takes sales out of your figures
Minus takes the item off the ticket and out of your sales and stock figures as if it had never been rung. If a drink was poured or a plate went out, use Comp instead, so it still counts. That is why the example below leaves Minus unticked.
Minus is also one of the actions Make It Profitable tracks for possible misuse, so every minus is flagged there for you to review.
Riley is a new barback, so this example holds a few things back to show how it is done: Comps, Discounts and Closeout stay ticked and the rest are unticked, including Web Control, Info screen and Switch users no PIN. Set Cash Drawers to Cash sales only and Transfers to Open tickets only.
Step 5. Give them access to BREW POS Admin
Skip this step for anyone who only uses the POS.
Watch out: Employees and Setup reach everything
Someone with Employees can change anyone's access, including their own. Someone with Setup can change every price you charge. Tick only the areas each person needs today, not the ones they might need one day.
In the Permissions block, tick Admin. Until it is ticked, every box under Admin Permissions is grey.
Under Admin Permissions, tick each area this person needs. For Riley: Reports and Customers.
Each ticked area appears in their dark menu on the left. An unticked area is simply not there: no grey item, no message.
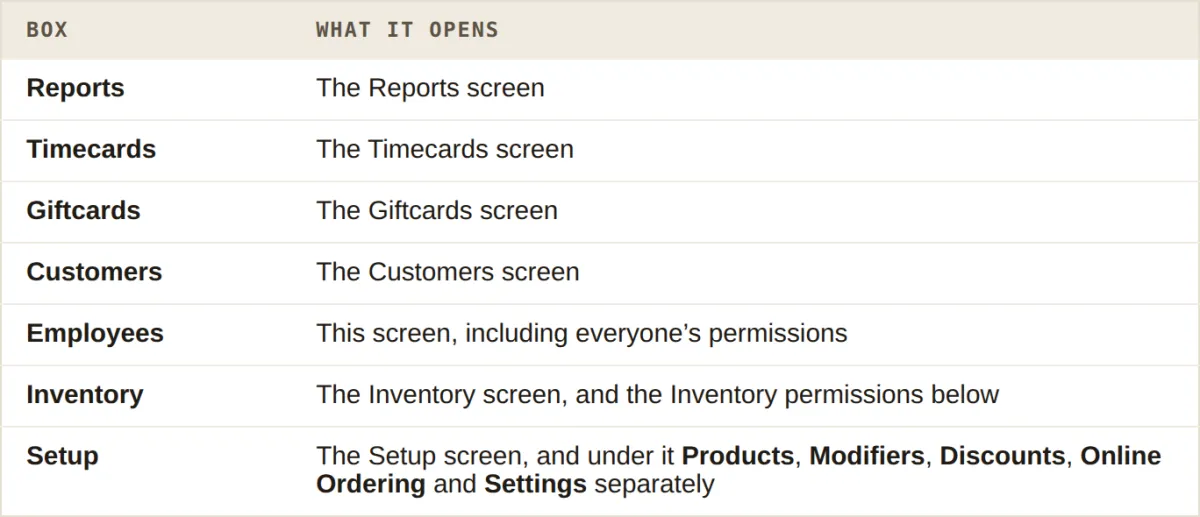
The Admin Permissions boxes, and what each one opens
Some of these boxes only appear if your account uses that feature: Timecards needs time cards switched on, Giftcards needs online gift cards, Inventory needs inventory, and Online Ordering needs online ordering. If a box in this table is not on your screen, your account does not use that feature.
Anyone with Admin ticked needs a working email address on their record. They sign in to BREW POS Admin by typing their email and entering the code emailed to them. If you empty the email box on someone with Admin ticked, the record warns Email required. It does not warn you when you tick Admin on a record that never had an email.
Inventory permissions
If your account uses inventory and you tick Inventory, a fourth block, Inventory Permissions, appears:
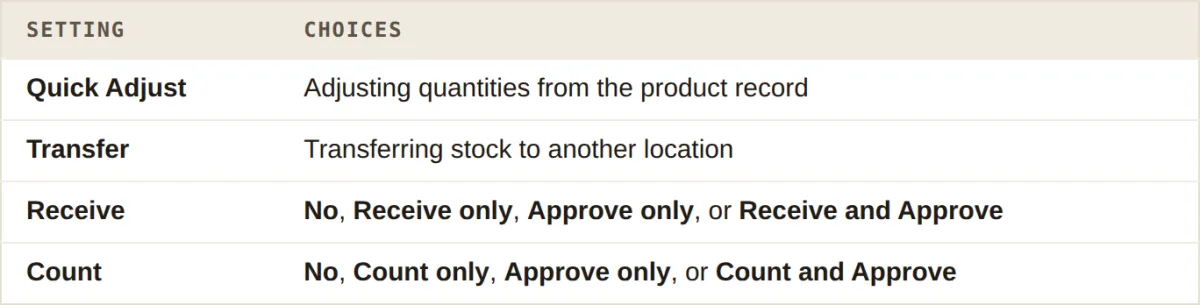
The Inventory Permissions block, which appears only when Inventory is ticked
Step 6. Job codes and locations
Job codes (only shown if your account uses time cards) are the jobs this person can clock in as. Tick each one they work. The job code decides their pay rate, so tick the right ones. For Riley: Bartender.
Creating job codes and setting what each pays is on the Timecards screen. See Setting up and managing time cards.
Location Permissions, below the job codes, has a box for each of your locations. Tick every location this person works at. For Riley: Santa Fe. If you have only one location, it is ticked for you.
Locations also decide what this person sees on their Home screen: someone ticked for one location sees that location's figures, someone ticked for several sees them all. If a manager says their dashboard shows the wrong venue, check this first.
Step 7. Email notifications
Five boxes at the top of the record send this person an email when something happens:
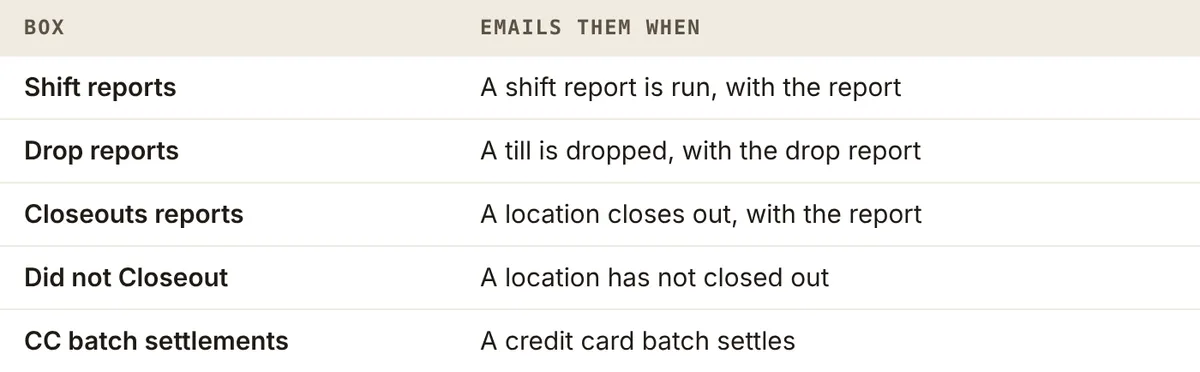
The five email notifications, and when each one is sent
They only work with an email address on the record. Did not Closeout is the one most managers want. For Riley, tick Did not Closeout.
What each email contains, who usually wants which, and how to send the reports to a bookkeeper who never uses the POS, is in Getting end-of-day reports by email.
Step 8. Save, and check it saved
Click Save, at the top right.
The list comes back with the new person in it and their number beside their name (Riley became 557).
Wait for the list to finish reappearing before you open anyone else. Opening the next record too quickly can leave you looking at the previous one, and anything you type then changes the wrong person.
Open the record again with its blue arrow and check it (Figure 5).
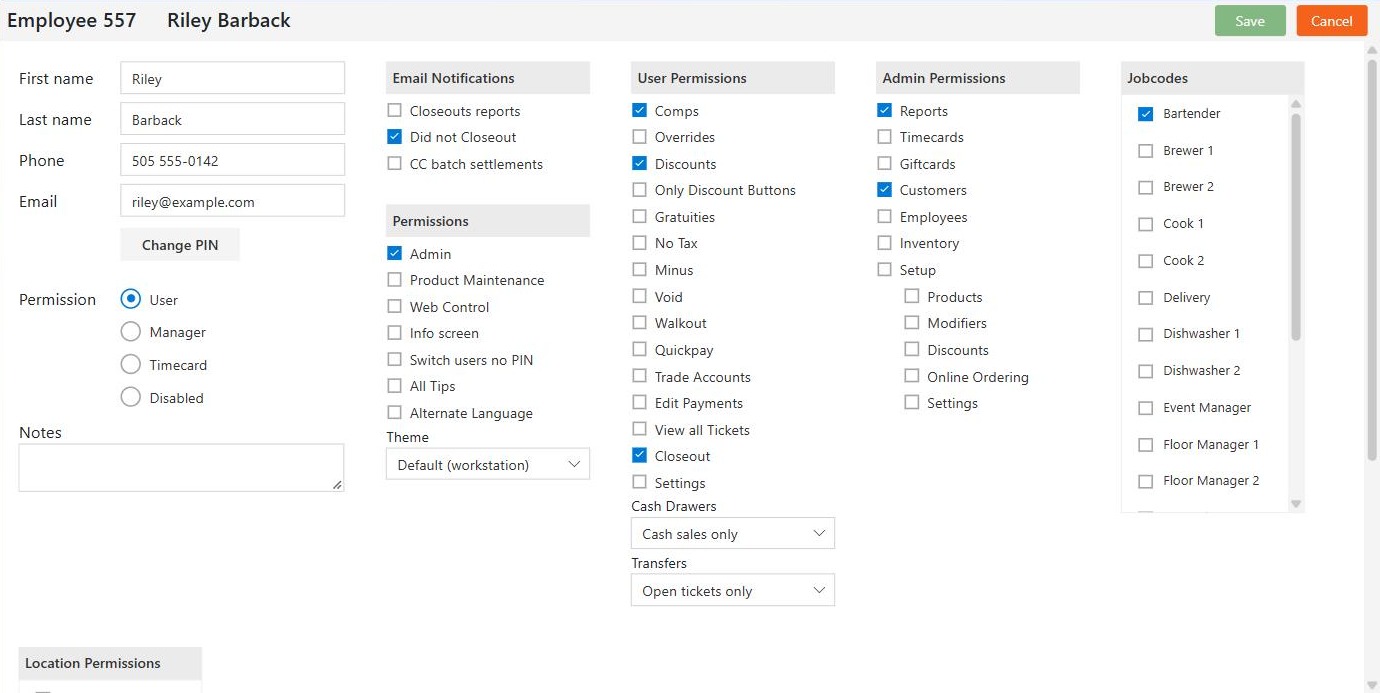
Figure 5. Riley's record after saving
Scroll down the record to check the job codes and locations. At the very bottom is the record's own Audit Trail, listing every change made to this person, when, and by whom (Figure 6).
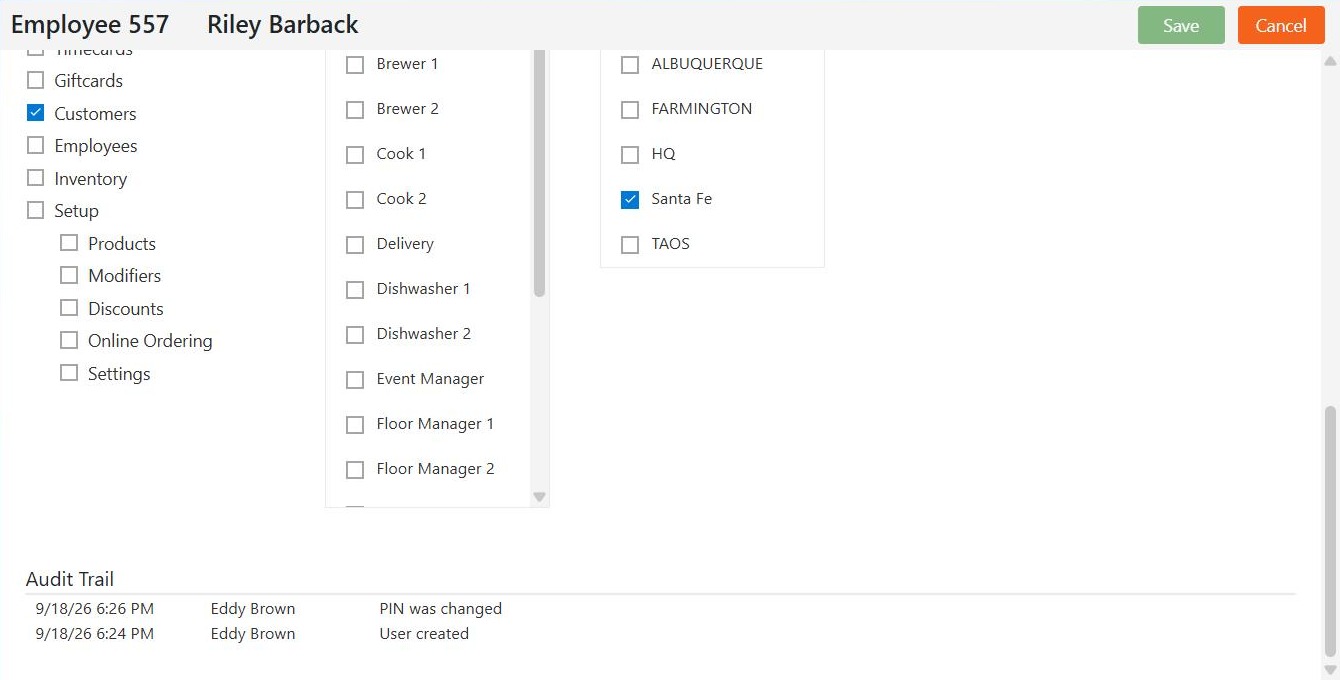
Figure 6. The bottom of the record: job codes, locations, and this person's own audit trail
If you click Cancel with changes you have not saved, the record asks Save your changes? (Figure 7). Yes saves them; No throws them away.
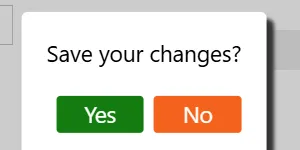
Figure 7. Leaving a record with unsaved changes
Step 9. Change their PIN
The PIN is what they type to sign in at the POS. A new employee starts on 1111.
Staff can change their own PIN at the POS, without you. There they can also set a card to sign in with instead of typing a PIN: swiping or scanning a credit card, a gift card or their driver's license. So the usual pattern is to give a new starter 1111 and let them set their own on their first shift.
Change it here when someone has forgotten theirs, or when you want to set it for them. Change PIN only appears once the record has been saved.
Open the employee with the blue arrow.
Under the email box, click Change PIN.
The box shows 1111 whatever their current PIN is. Replace it with the new PIN.
Click Ok. The message PIN will update when record is saved. appears.
Click Close.
Click Save.
The PIN changes only when you click Save. Leave the record without saving and the old PIN stays.
Once saved, the new PIN reaches the POS on its own, usually within five minutes while the POS is in use. If the POS has been sitting idle, go to its login screen and tap the BREW POS logo to make it pick up the change straight away.
A PIN can be up to 12 digits long when staff set their own at the POS. The Change PIN box here is shorter: it takes a number from 1001 up to nine digits. Anything smaller shows Invalid PIN and greys out Ok (Figure 8). To give someone a longer PIN, let them set it themselves at the POS.
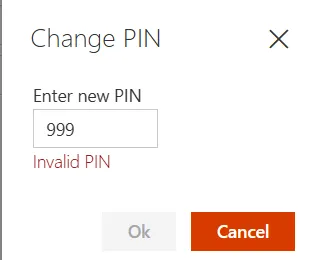
Figure 8. A PIN that is too short
Setting up the next person: Copy
Copy makes a new employee with exactly the same settings as an existing one, which is faster and safer than ticking thirty boxes again.
In the staff list, click the row of the person to copy (not their blue arrow). Copy, Delete and History in the toolbar stop being grey.
Click Copy.
A new record opens, headed Employee (new), with the name, phone, email and notes empty and everything else carried across: level, POS permissions, drawers, transfers, admin permissions, job codes, locations and notifications (Figure 9).
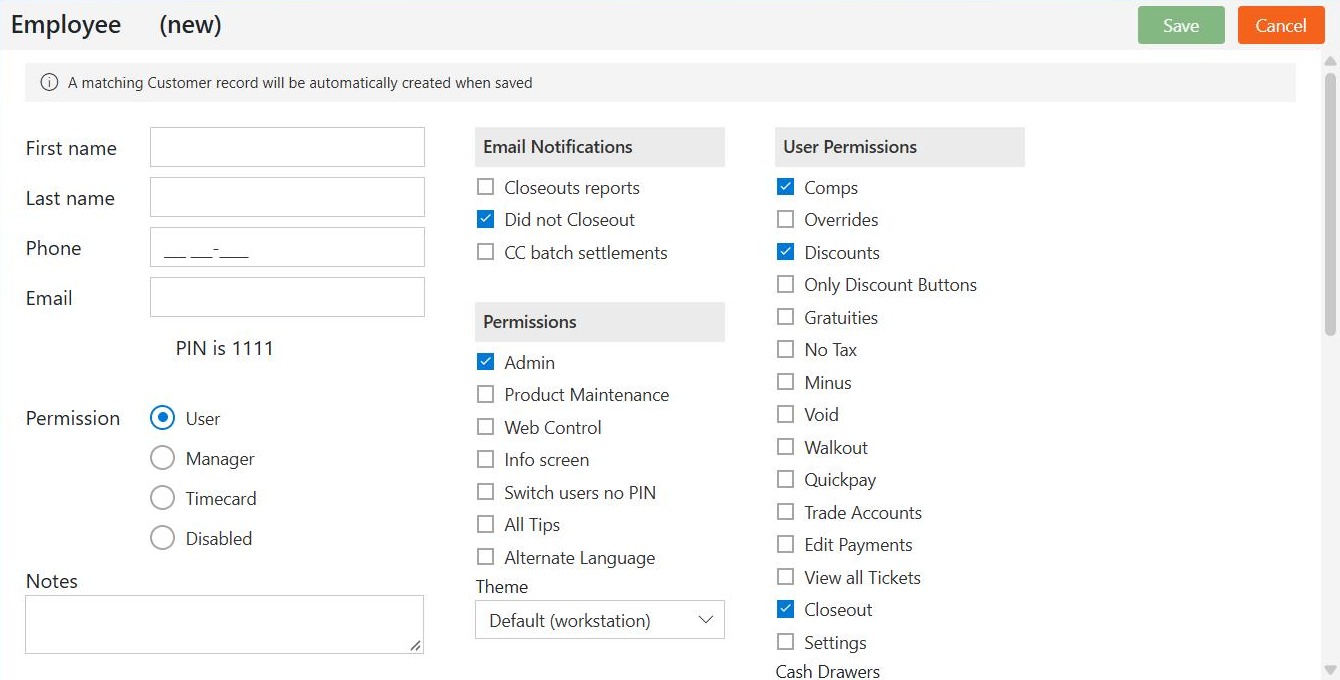
Figure 9. A copy of Riley: empty name and contact boxes, everything else carried across
Fill in the new person's name, phone and email, then click Save.
A copy starts on PIN 1111, like any new employee. They can set their own at the POS, or you can change it here.
Clicking a row that is already selected unselects it, and the toolbar buttons go grey again. So does saving a record. If Copy is grey, click the row once more.
Changing someone later
Open them with the blue arrow.
Change what you need.
Click Save.
Every change is listed in the record's own audit trail at the foot of the record, and in the Audit Trail tab.
When someone leaves: Disabled or Delete
Disabled is the usual choice.
Open them with the blue arrow.
Next to Role, click Disabled.
Click Save.
They can no longer sign in to the POS or to BREW POS Admin. Their settings stay on the record, greyed out (Figure 10), so if they come back you only need to choose their level again.
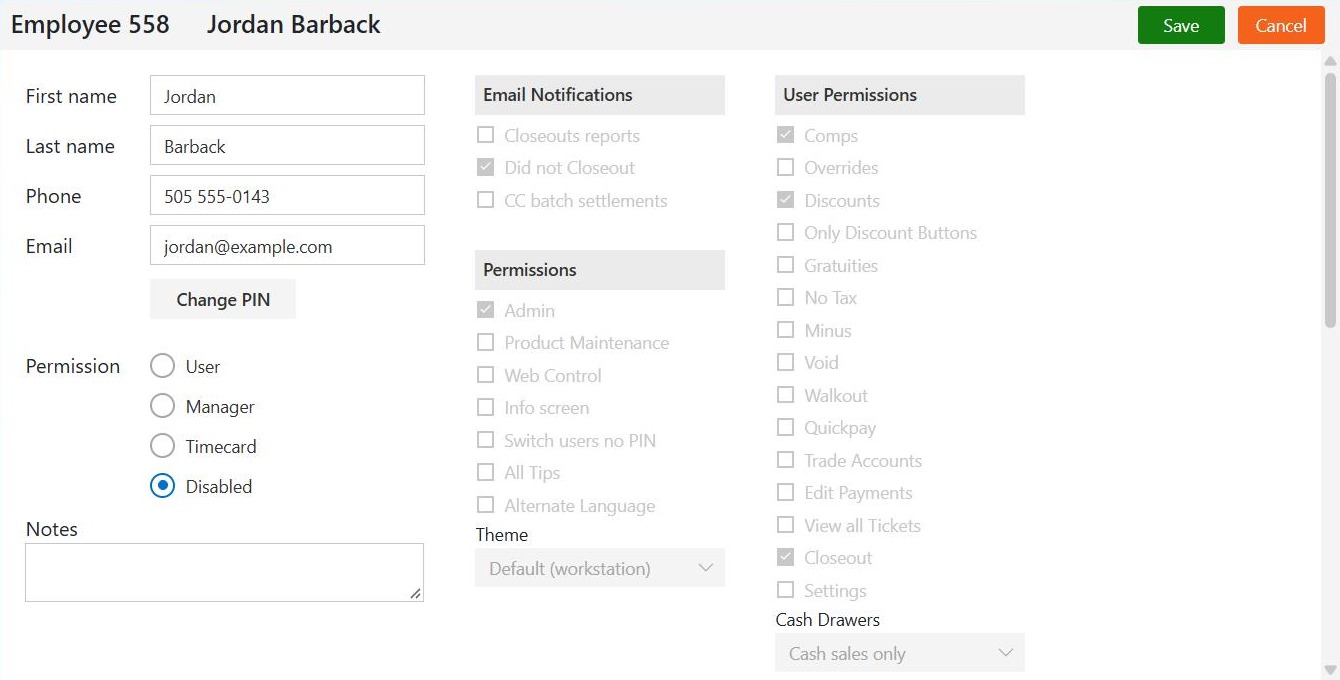
Figure 10. A disabled employee. Their settings are kept, greyed out
A disabled employee disappears from the staff list. To see them, switch on Show All in the toolbar. They are listed with Disabled in the Login column (Figure 11).
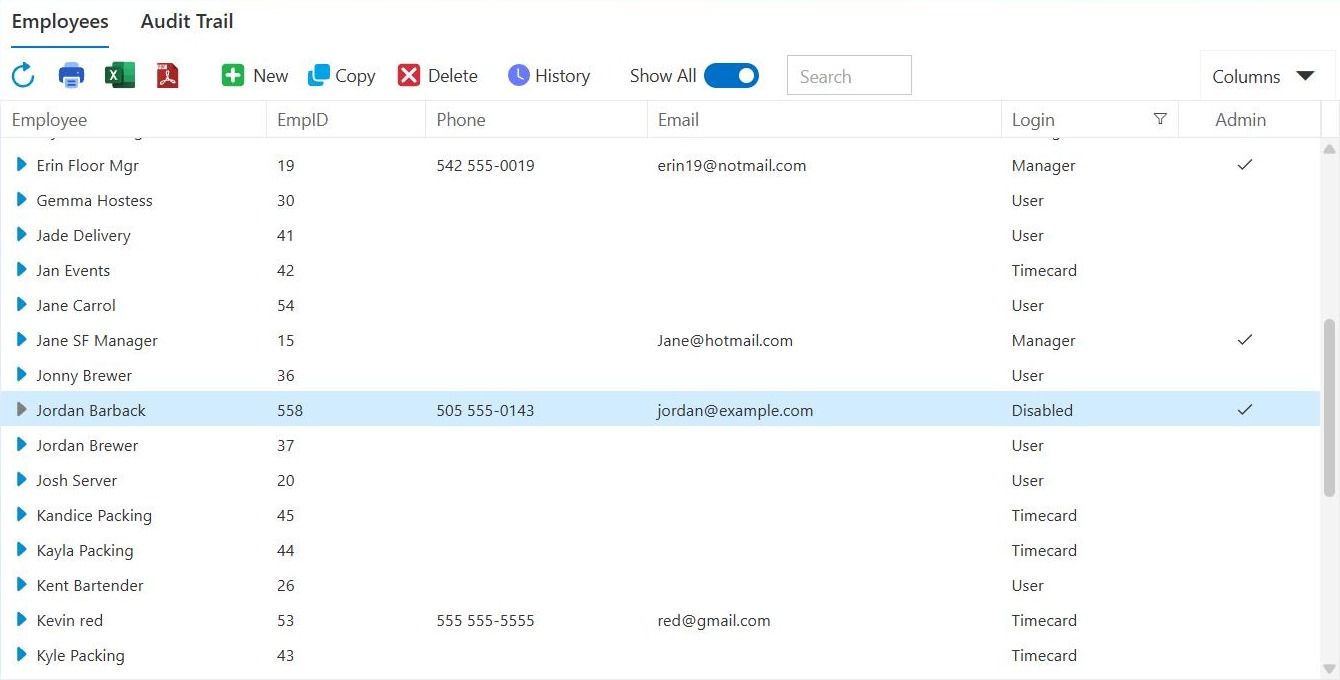
Figure 11. Show All switched on, listing a disabled employee
Delete removes them for good.
Watch out: Delete cannot be undone
There is no message after you click Ok; the person just vanishes from the list, and Show All does not bring them back. Nothing in BREW POS Admin can restore them. The Audit Trail keeps one line, User deleted, with their name. If you might ever want them back, or want to keep seeing them on the list, disable them instead.
Their matching customer record is not deleted. It stays in Customers under their name until you remove it there.
Click their row in the list.
Click Delete. It asks Delete the Employee? (Figure 12).
Click Ok. The employee is deleted, and this cannot be undone.
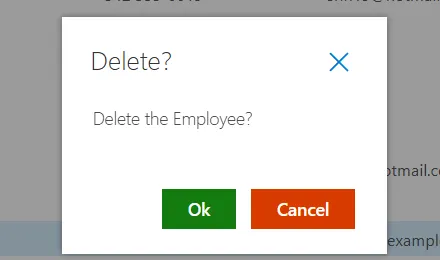
Figure 12. The only confirmation before an employee is deleted
Checking what someone has been doing: History
History is a report of one employee's sales and of everything that took money off a ticket: minuses, comps, voids, walkouts, cancelled tickets and drawers opened with no sale.
In the staff list, click the person's row (not their blue arrow).
Click History.
The report opens on the last seven days. To look at other dates, change the two dates at the top and click the circular Refresh arrow beside them.
The Summary at the top gives their tickets, average ticket, sales, tips, cash and card, and a count of each kind of reduction, with a plain-English line saying what each one means (Figure 13). Below it, a section for each kind of reduction lists the tickets involved.
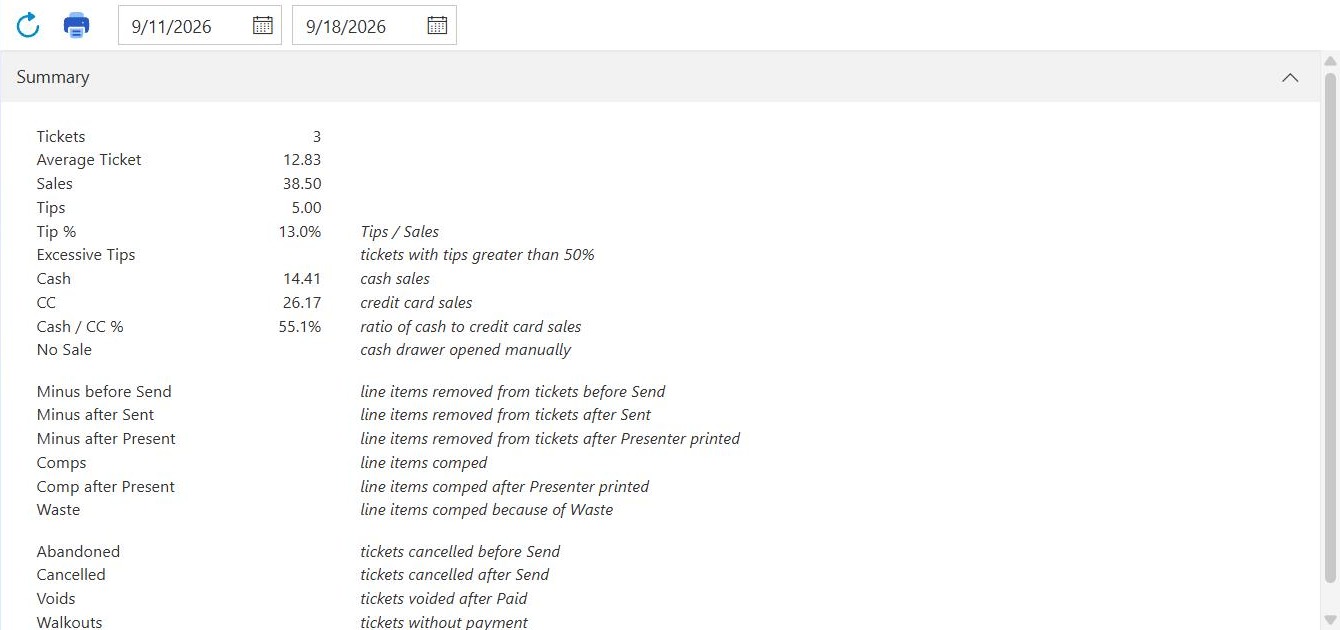
Figure 13. The History summary for one employee
Changing the dates does nothing until you click Refresh. The X at the top right closes the report.
This is where the POS permissions come back to you: whatever you allow someone to do, History lets you check they did it sensibly.
Seeing who changed what: the Audit Trail
The Audit Trail tab, beside Employees at the top of the screen, lists changes made in BREW POS Admin across your whole account, newest first: staff records, products, modifiers, discounts, customers and settings (Figure 14).
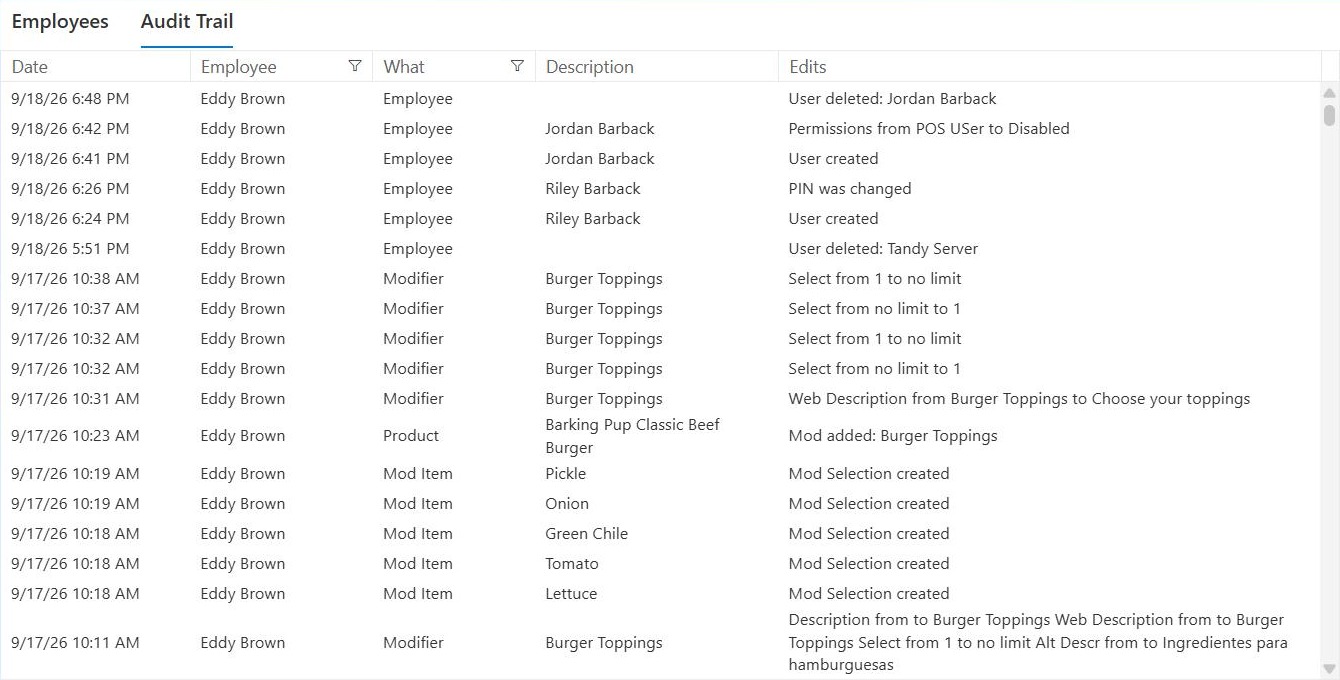
Figure 14. The Audit Trail tab
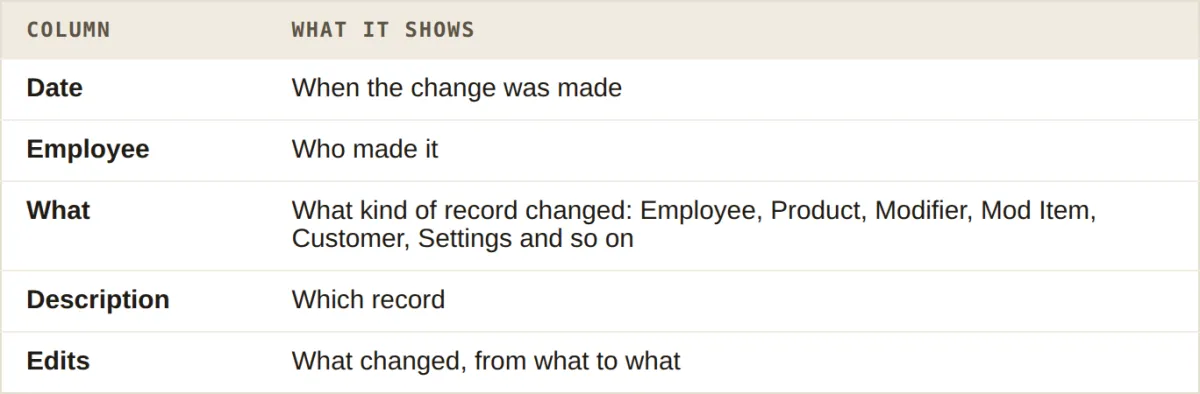
Use the funnel beside Employee or What to show only one person's changes, or only one kind of record.
Use it when a price is wrong and nobody remembers changing it, when someone's access has changed and you need to know who changed it, or when you need the old value back.
Not every change is recorded. Price and cost changes on products do not appear, so a missing line is not proof that nothing changed.
Reference
Troubleshooting
Someone is missing from the staff list. They are disabled. Switch on Show All. If they are still not there, they were deleted; the Audit Trail will have a User deleted line with their name.
Someone cannot find an area of BREW POS Admin in their menu. Tick that area under Admin Permissions on their record, and check Admin is ticked.
A box in this guide is not on my screen. Your account does not use that feature. Timecards, Giftcards, Inventory, Online Ordering and Web Control only appear when the feature is switched on.
The User Permissions are all grey. The person is a Manager, a Timecard employee or Disabled. Only Users have these set individually.
Save stays pale. A first or last name is missing, or a red message is showing under the phone or email box: Duplicate Phone, Duplicate Email or Email required.
Someone has forgotten their PIN. Open their record, change their PIN to one you give them, and save. They can set their own again at the POS.
Someone cannot sign in to BREW POS Admin. Check Admin is ticked and their email address is correct. Their sign-in code goes to that address.
A manager's dashboard shows the wrong location. Check their Location Permissions.
Copy, Delete and History are grey. No row is selected. Click the person's row once. Saving a record clears the selection.
Email notifications are not arriving. Check the email address on the record and that the right box is ticked.
A deleted employee is still in Customers. Deleting an employee leaves their customer record. Remove it on the Customers screen if you no longer need it.
Next: Setting up and managing time cards.
About this guide
BREW POS Admin: merchant how-to guide
Applies to: BREW POS Admin, master branch, 4 September 2026 snapshot.
Last reviewed: 20 October 2026 · Owner: Eddy
Still stuck?
Call BREW POS support on 1-800-676-9874. Tell them which step you reached and what the screen is showing.
Updated 20 October 2026 · BREW POS Admin, master branch, 4 September 2026 snapshot · Admin
BrewPOS How to use
Support 1-800-676-9874
Email [email protected]
© 2026 BREW POS. All rights reserved.
Privacy Policy | Terms and Conditions