Make a product
Everything the system sells is a product: a pint, a burger, a T-shirt, an hour on a pool table. This guide builds one, from an empty record to a working tile on the POS: priced, taxed, routed to the right printer, and on sale at the locations you choose.
Contents
The worked example throughout is a Green Chile Cheeseburger, sold at one location for 18.50, costing 9.35, printing to two stations, Kitchen and Aux1.
Before you start
This guide is written for whoever builds the menu, usually an owner or a manager. It assumes you already use BREW POS Admin day to day and can find your way around it, so it explains what is particular to building a product rather than how the application works in general.
You need Products access. Everything in this guide is under Setup, then Products. If Setup is missing from the menu on the left, or Setup opens with no Products tab, you do not have it. Ask whoever manages staff records.
You need to be assigned to the locations you are pricing. The price grid gives you one row per location, and a row for a location you are not assigned to is read-only. If the site you need is grey, ask whoever manages staff records to assign you before you start.
Set your tax rates first. BREW POS supports more than one rate per location, so food and alcohol, or dine-in and takeout, can be taxed differently. Enter them in Setup, Settings, Locations, per location, before you price anything.
The blue arrow at the left of any grid row opens that record, and nothing on screen tells you so. There is no Edit button anywhere in this application. Clicking the row itself selects it; clicking the arrow opens it.
Watch out: tax rates must exist before you price a product
The Tax % box on a product is not a free list of rates. It offers only what has already been set up for that location. On a location whose rates were never entered, the only option is 0, and the product saves untaxed with no warning. You will not find out until the tax reporting is wrong.
Find the product screens
Four clicks from signing in.
At the bottom of the dark menu on the left, click Setup.
Along the top of the screen, click the Products tab. It is the first of five, and already selected when Setup opens.
In the second row of tabs, click Categories.
Click a category on the left. The right panel fills with the products in it.
There are two sets of buttons and they look almost identical. New, Edit, Delete and Sort above the left panel act on categories. New, Copy, Delete and Sort above the right panel act on products. Check which side you are on before you click.
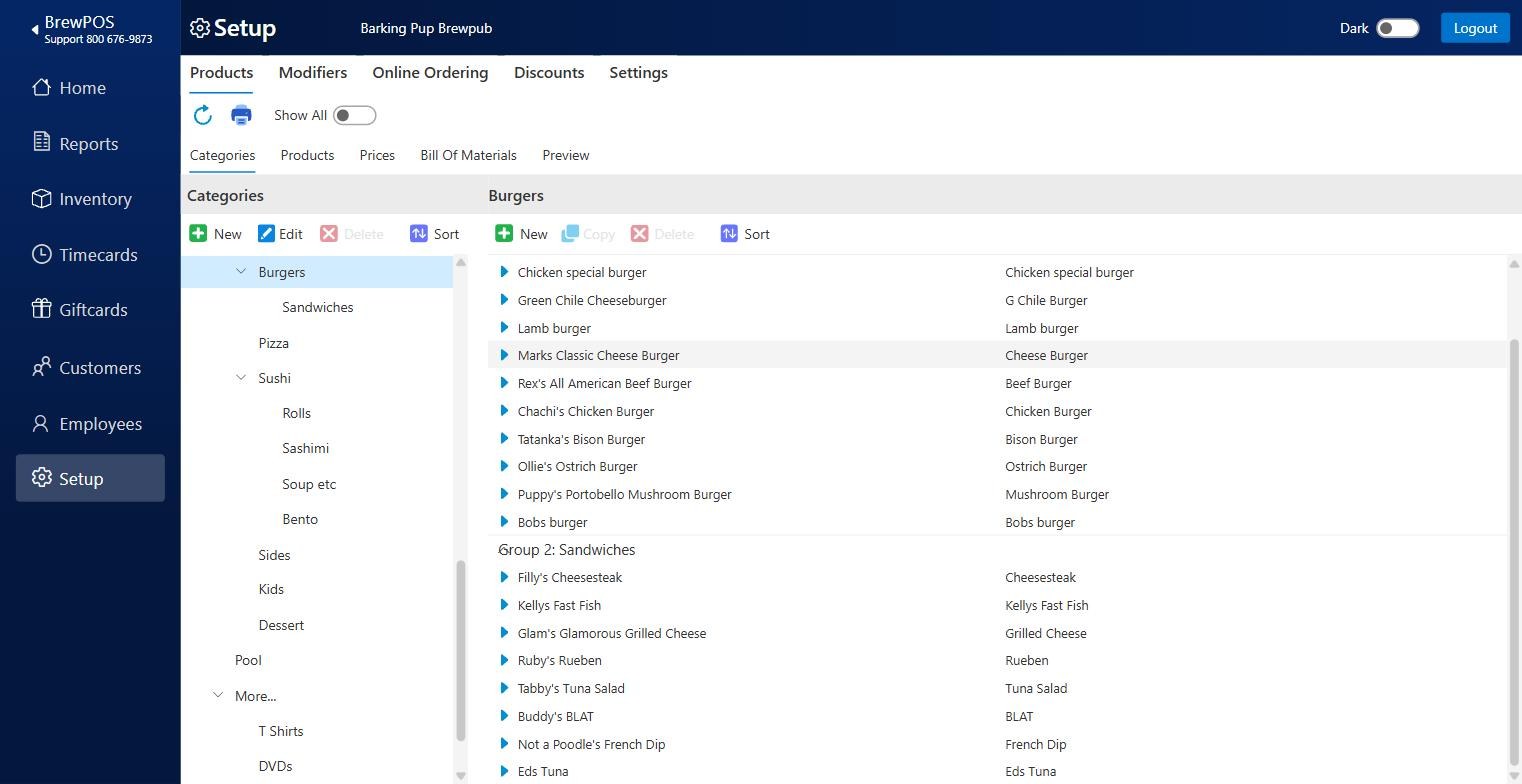
The two toolbars look almost identical. The set above the left panel acts on categories, the set above the right panel acts on products.
New or Copy
Both buttons sit above the right panel.
Copy duplicates an existing product, including every modifier attached to it. Use it whenever you already sell something similar. It is usually the faster route. See Why Copy is usually right.
New starts from an empty record. Use it when nothing similar exists. This guide uses New.
To copy a product
Click the row of the product you want to copy. Click the row itself, not the blue arrow at the left of it.
Click Copy.
Type the new Description and Tile label.
Change the price and anything else that differs.
Save.

Copy and Delete stay grey until a product row is selected.
Copy and Delete are grey until you select a product row in the right panel. Selecting a category on the left is not enough. Clicking a selected row again deselects it. And the blue arrow opens the product for editing rather than selecting it.
Watch out: Delete removes the product from every menu it is on
Delete is the next button along from Copy, and both come alive the moment you select a row. It asks you to confirm first, so a stray click on its own will not remove anything.
Sales history survives. Deleting a product does not erase what it has already sold, and it does not change your reporting. What you lose is the product itself, from every menu and screen it appeared on, and there is no undo: getting it back means building it again.
To stop selling something for a season, untick Sell It on its location rows instead. The product stays in the catalog, keeps its prices and modifiers, and comes back by ticking the box again.
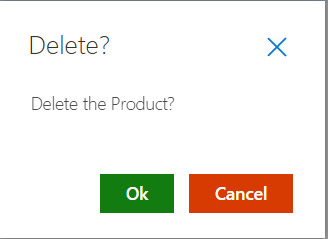
Delete asks first, so a stray click does not lose a product. The sales history stays either way.
The copy opens as Product (new), unsaved and without a number.
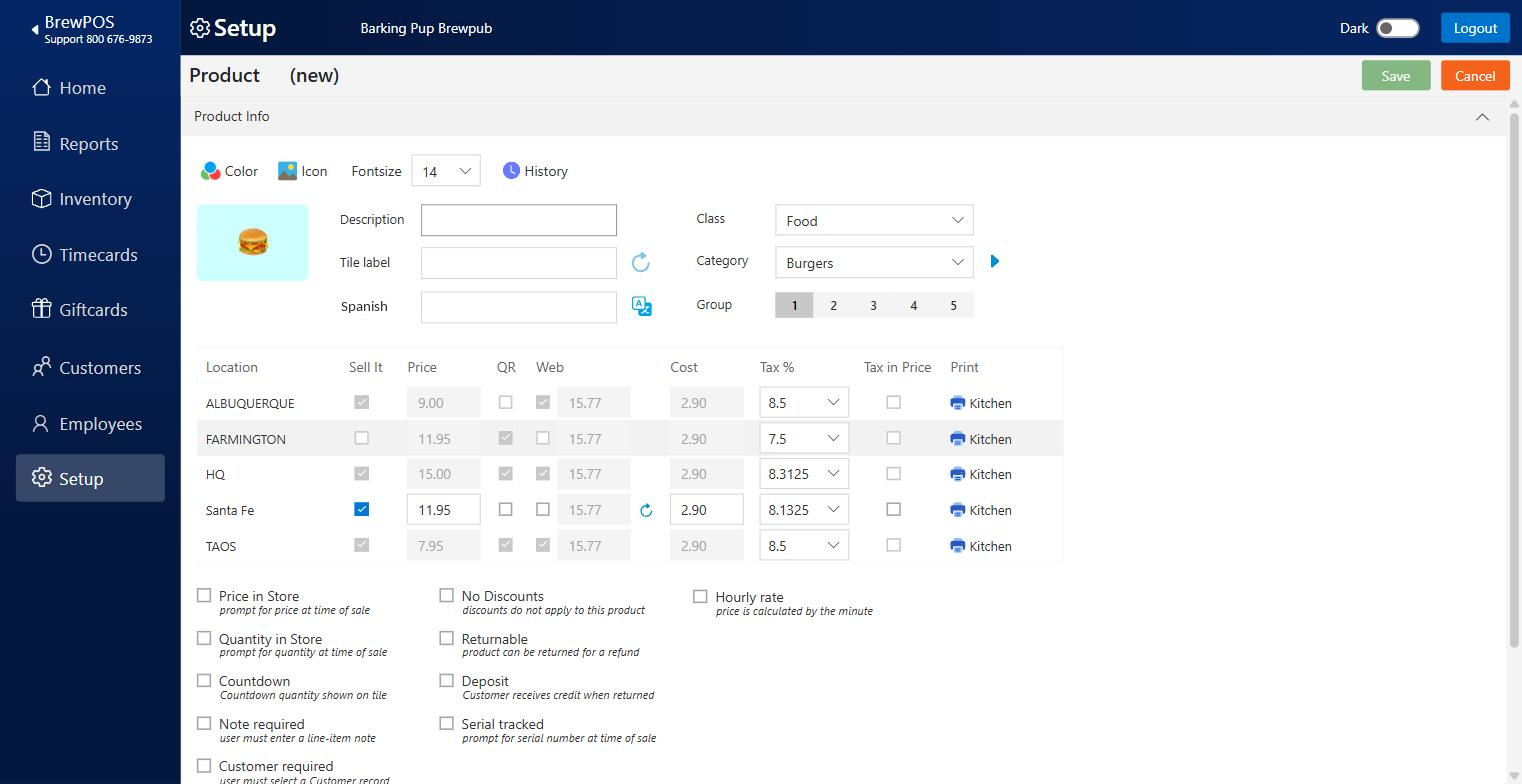
Copy carries across Class, Category, Group, Color, Icon, Fontsize, Price, Cost and Tax % for every location, the Sell It, QR and Web boxes, Print routing, and every modifier attached to the original.
Copy leaves Description, Tile label and the alternate language box blank. The product number is assigned when you save.
Step 1. Open a new product
Create an empty product record.
Click New above the right panel.
The header reads Product (new). The product number is assigned when you save, and you cannot choose it.
New does not inherit the category you had selected. The Category box comes up empty regardless, and you choose it under Set Class, Category and Group. Selecting a category first changes nothing.
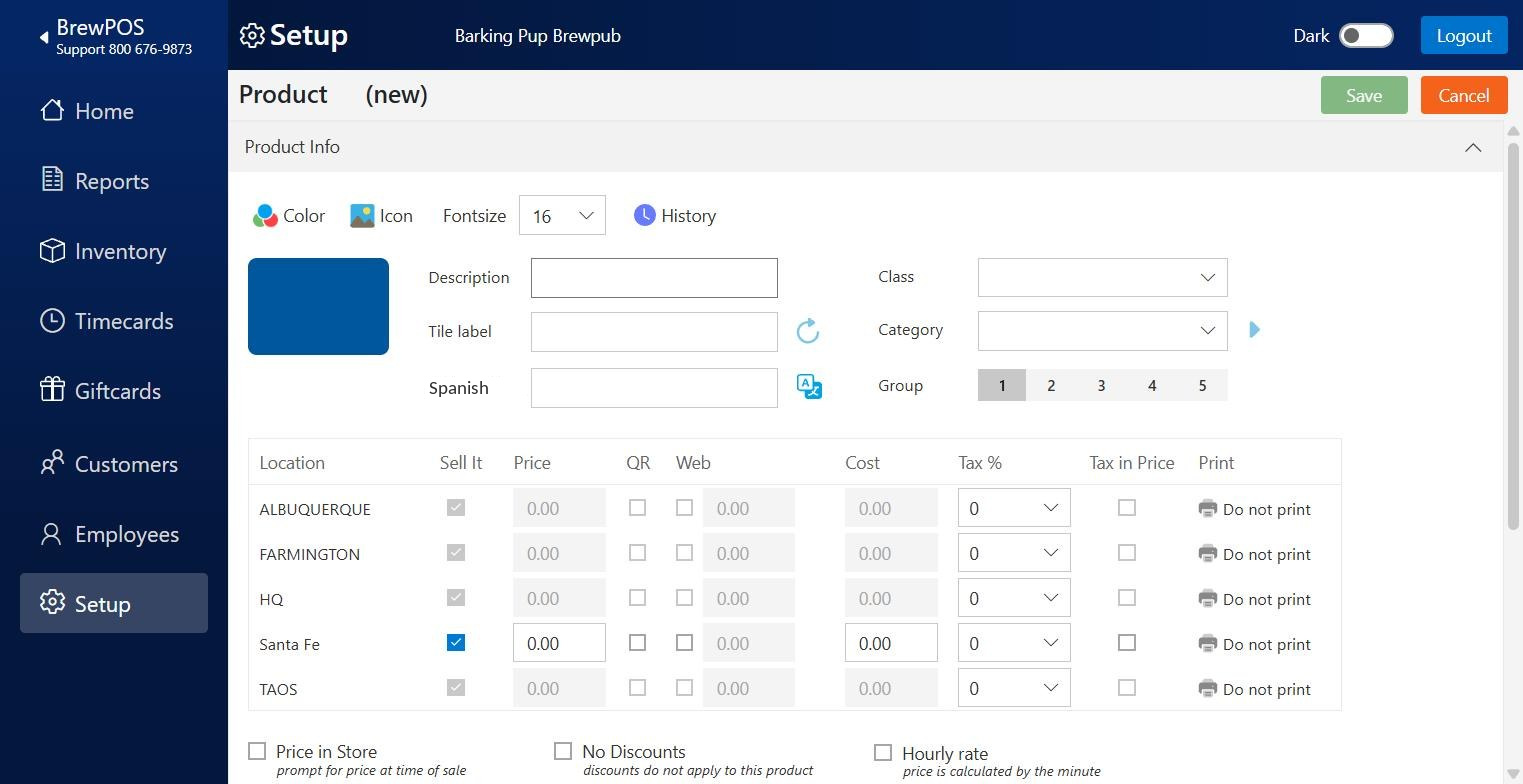
Every default on a new record: price 0.00, cost 0.00, tax 0, and Do not print.
Watch out: a new product is created free, untaxed, and invisible to the kitchen
Every new record starts with Price 0.00, Cost 0.00, Tax % 0, and Print set to Do not print, while Sell It is already ticked at every location you are assigned to.
Save it as-is and it goes live everywhere, rings up as free, collects no tax, and never reaches the kitchen. Nothing warns you. Set prices, per location and Set the printers exist to fix all four.
Step 2. Name it
Give the product a menu name and a shorter name for the POS tile.
Type the full name in Description: Green Chile Cheeseburger.
Shorten Tile label to what fits a button: G Chile Burger.
Tile label and the alternate language box fill in automatically from Description while they are still empty, so on a new product you type once and all three fill. Watch the tile preview on the left as you type: it is the real button, and a name that reads well in a box can wrap badly on a tile.
The alternate language
The second name box is your alternate language, and it is not a fixed one. The language is chosen once for the whole merchant account, from around 250 supported languages, and the box is labelled with whichever you picked. The examples in this guide use Spanish, so the box is labelled Spanish in every figure.
It is used in two places:
On screen. Each user sees the language set against their own login, so staff can work in one language while the catalog carries another.
On the kitchen printer. The alternate language can print as a second line alongside English, or in place of it. Either way the kitchen reads tickets in the language it works in.
Click the translate button beside the box to fill it from the description.
Renaming does not update the Tile label. Auto-fill only ever writes into an empty box. Once a Tile label exists, editing Description leaves it alone, and the POS goes on showing the old name. After any rename: click the refresh arrow beside Tile label to re-copy the description, click the translate button beside the alternate language box, then shorten the tile label again.
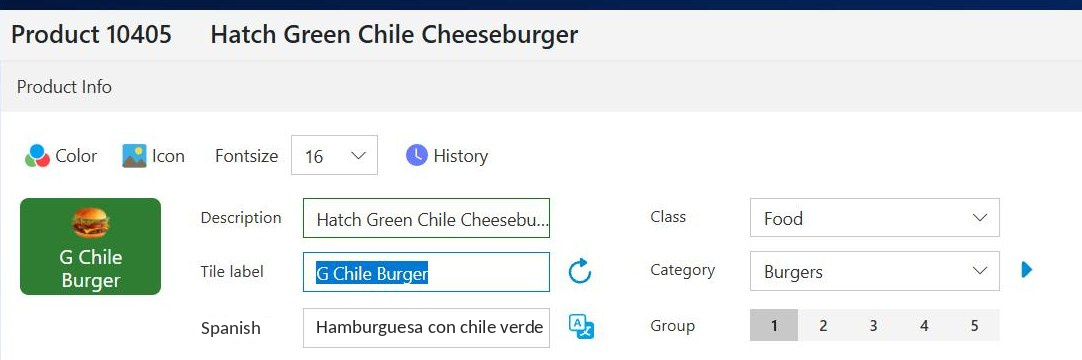
The Description is new. The Tile label and the tile preview still show the old name.
Step 3. Set Class, Category and Group
Class and Category do different jobs, and their names do not tell you which. Class is an accounting grouping: it is what your financial reporting rolls this product up into. Category is what your staff see: it decides where the tile shows up on the POS screen. Every product needs both, and the common mistake is making one of them do the other's job.
Four fields are required before the record will save: Description, Tile label, Class and Category. Description and Tile label are done. Both boxes outline in red while empty.
Choose a Class from the list. If the one you want is not there, type a new one straight into the box.
Choose a Category from the tree. If the one you need is not there, make it first: go back to Categories and use New above the left panel, then reopen the product.
If the category uses named groups, click the Group number for the band this product belongs in. Otherwise leave it at 1.
How to choose between them when a product could plausibly sit in more than one: Class and Category.
The red validation does not clear when you satisfy it. Choose a category and Select a Category stays on screen. It clears on your next action, so click into any other field and it goes.
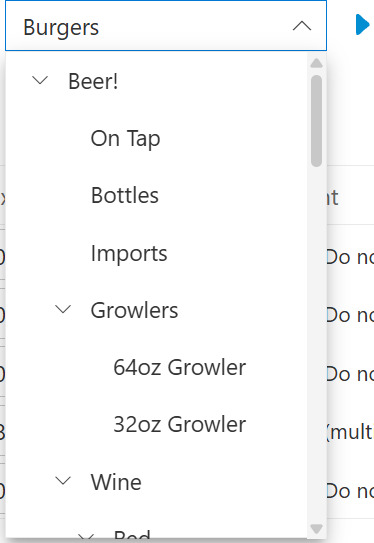
Category comes from the tree, not from whatever was selected before you clicked New.
Step 4. Set prices, per location
Set what the product costs you, what it sells for, and where it is sold. There is one row per location.
Watch out: Cost left at zero makes every margin report wrong
Margin, food cost percentage and every "what is this line earning us?" figure is calculated from Cost against Price. Leave Cost at 0.00 and the system reports a 100% margin on every one you sell. Nothing warns you, and the figures look plausible. Fill Cost in as you go, on every row you price.
On a location's row, single-click the Price cell. The existing value is selected, ready to overtype.
Type the price: 18.50.
Do the same in Cost: 9.35. This is what the product costs you; the system never works it out.
Click the Tax % cell and choose the rate from the list that drops down. Do not use the small up and down arrows on that cell. They change what is displayed without applying it.
If a location does not sell this product, untick Sell It on that row.
Scroll the grid sideways for Countdown, Inventory and Shortcut, which sit off the right edge.
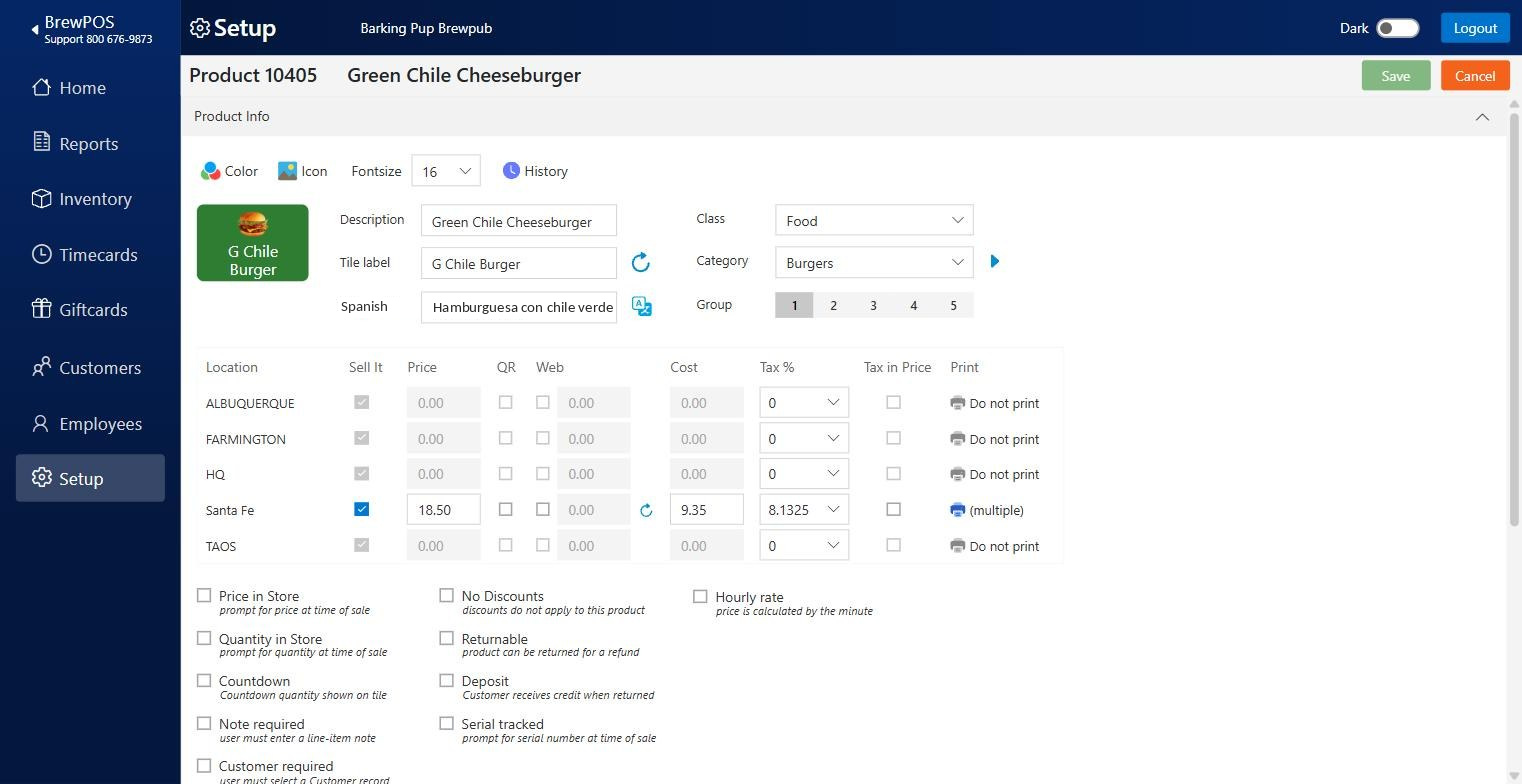
The finished record. Green Chile Cheeseburger at 18.50, cost 9.35, printing to two stations at Santa Fe only.
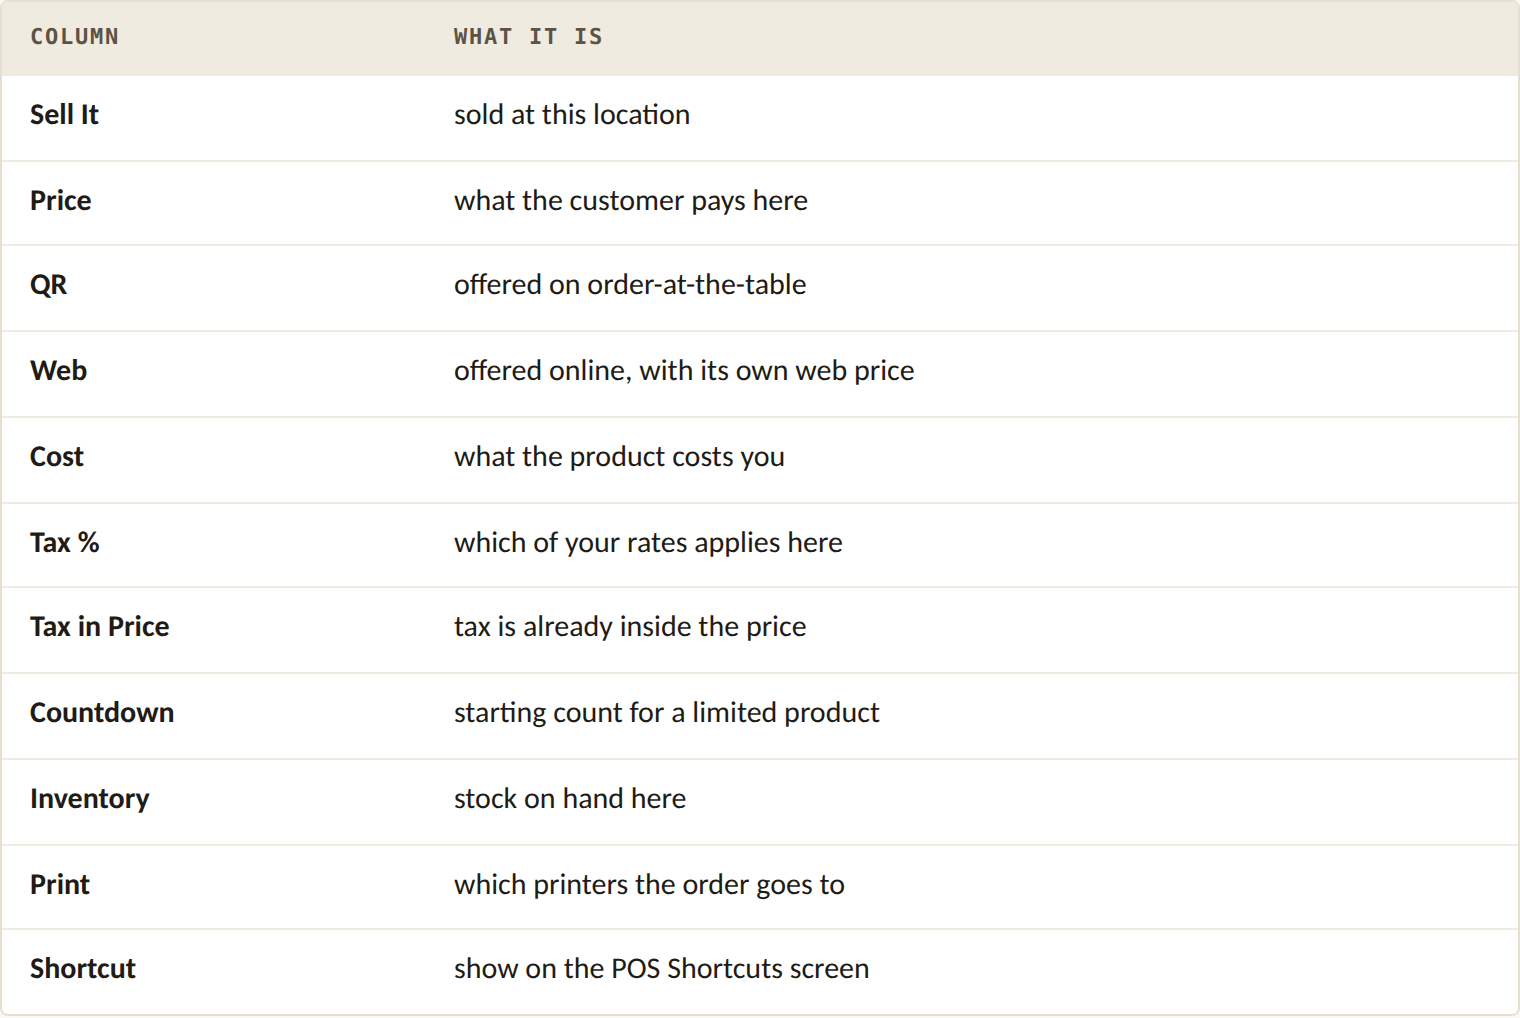
Grey rows are locations you are not assigned to. They are read-only. That is a permission, not a fault. Ask whoever manages staff records to assign you.
To stop selling a product, untick Sell It rather than deleting it. It keeps its sales history and can come back next season.
Step 5. Set the printers
Send the product to the stations that need to see it. This is set per location.
On a location's row, click the Print cell. The Print to dialog opens.
Tick every printer that needs the ticket: Bar, Kitchen, or Aux1 to Aux7.
Click Ok.
These are check boxes, so tick more than one where a ticket needs to appear in two places. A burger might go to the hot line where it is cooked and to the expeditor assembling the table. The cell then reads (multiple).
Watch out: printing is set per location, and defaults to nowhere
The default on every row is Do not print. A product routed to Kitchen at one site prints nowhere at another until you set that row too. Food that never reaches the kitchen is the most expensive mistake on this screen, so work down every row before you leave.
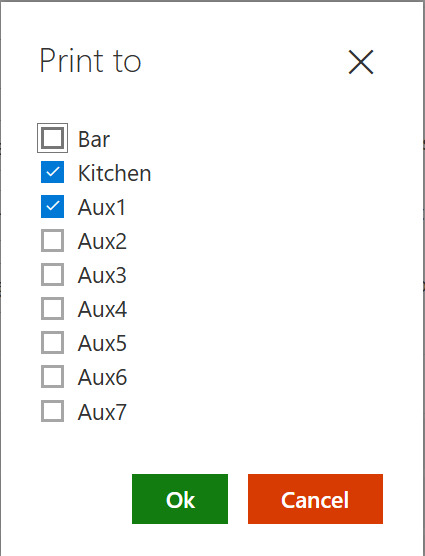
Nine printers, and you tick every one that needs the ticket. It is not a single choice.
Step 6. Set behavior options
Optional. These are tick boxes below the price grid. If one of them applies to your product, tick it; otherwise skip this step.
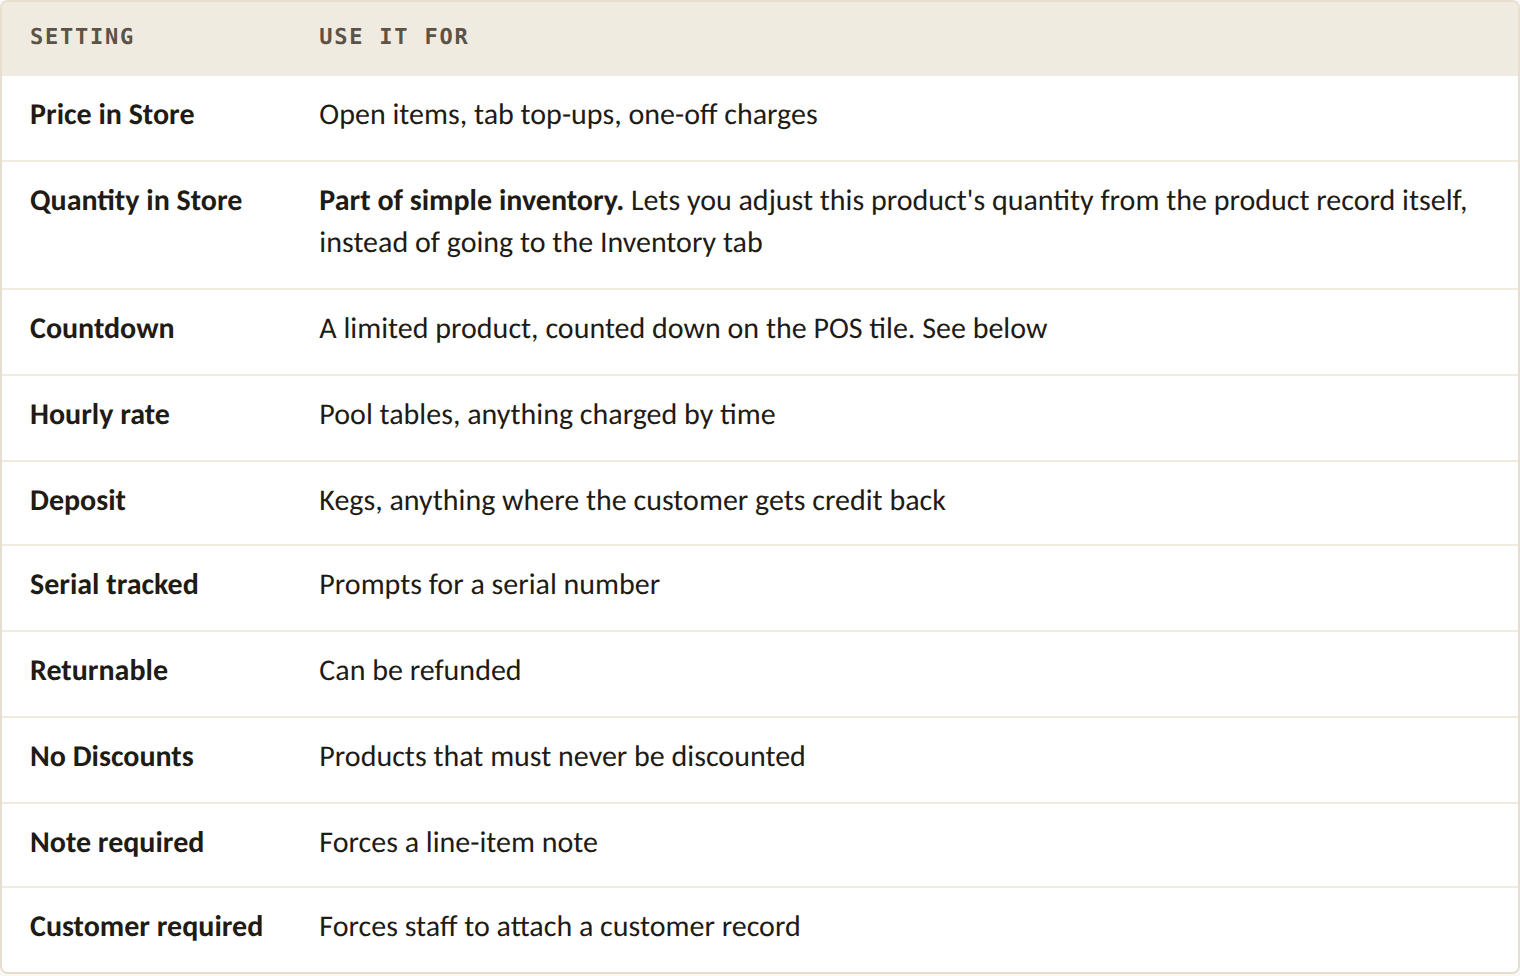
There is a Notes box at the bottom for your own reference.
Countdown
Countdown shows your staff how many are left. Tick it here, then set the starting number in the Countdown column of the price grid. It is per location, off the right edge of the grid.
The number appears on the tile in the POS and drops as the product sells. It does not stop the product being sold. When the count reaches 0, a server adding it to a ticket is asked to confirm, and if they confirm, the sale goes through.
That is deliberate: the last two portions are often still in the kitchen when the count says zero. Treat it as a warning to your staff, not a lock.
Step 7. Set color and icon
Give the tile a color and a picture so staff find it by sight. Both controls are on the toolbar above the record.
Color
Click Color. The picker fills the screen.
Pick from the palette on the right, or type a value into HEX, R, G, B.
Press Tab. Do not press Enter.
Click OK.
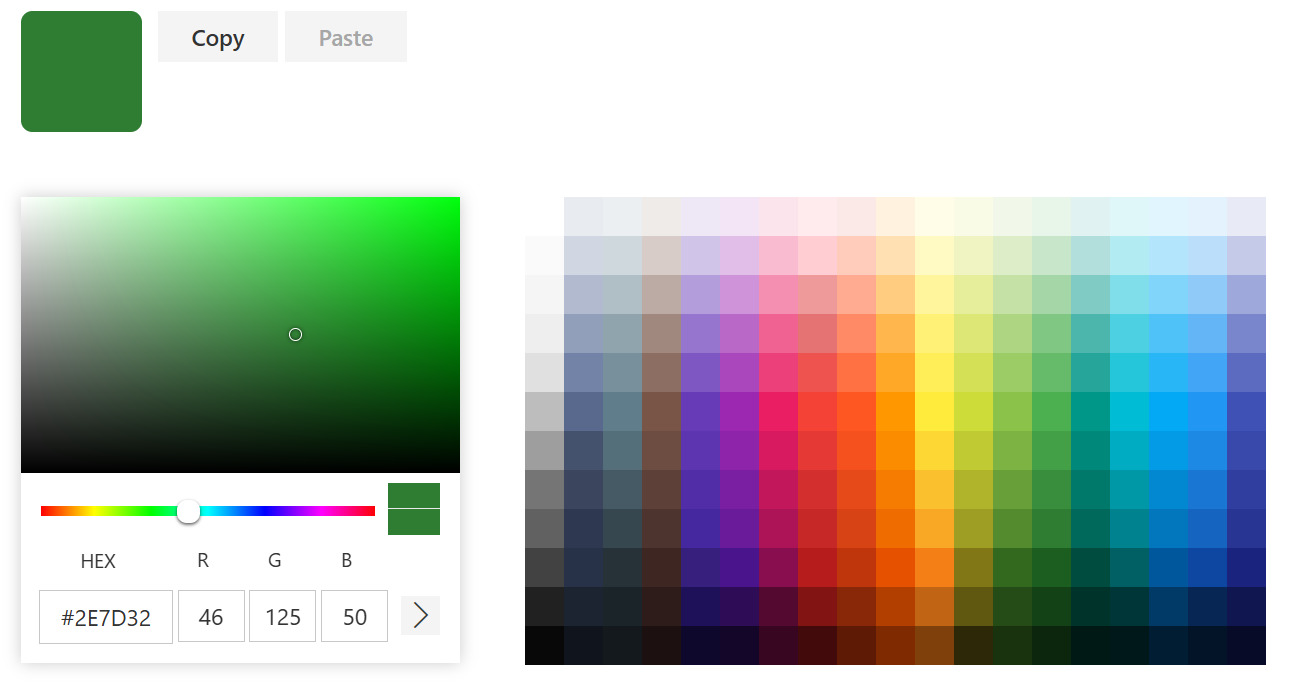
Type a hex value and press Tab. Enter does not commit it.
Enter does not apply a typed color. The box keeps showing what you typed while the swatch, the RGB boxes and the saved color all stay on the old value, so it looks accepted and is not. Tab commits it and the swatch changes.
Copy and Paste lift a color from one product to another, which keeps a category consistent. You do not choose the text color. The system picks black or white to suit the background.
Icon
Click Icon.
Type in Search to filter, or scroll the library.
Click an icon, then click OK.
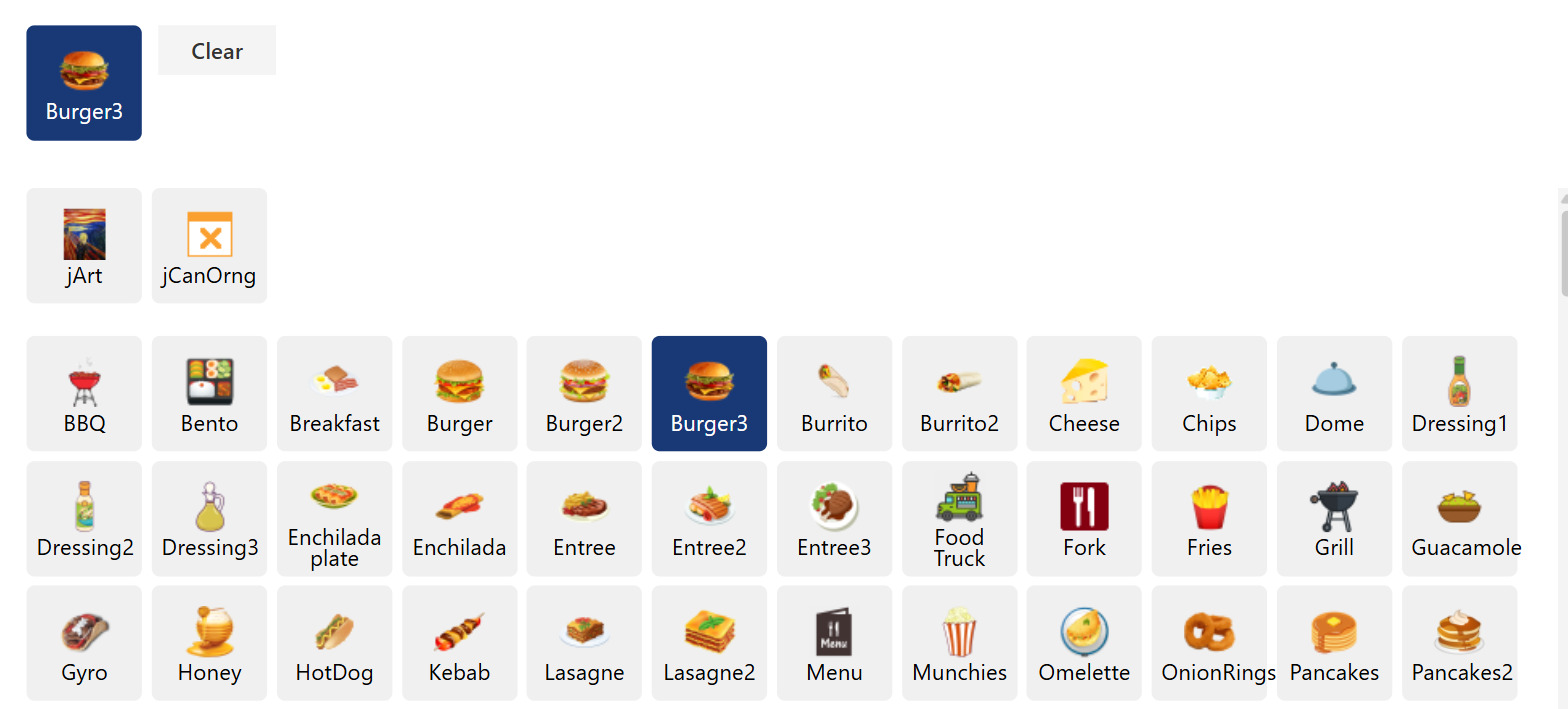
The library opens on everything it has, so search it rather than scrolling.
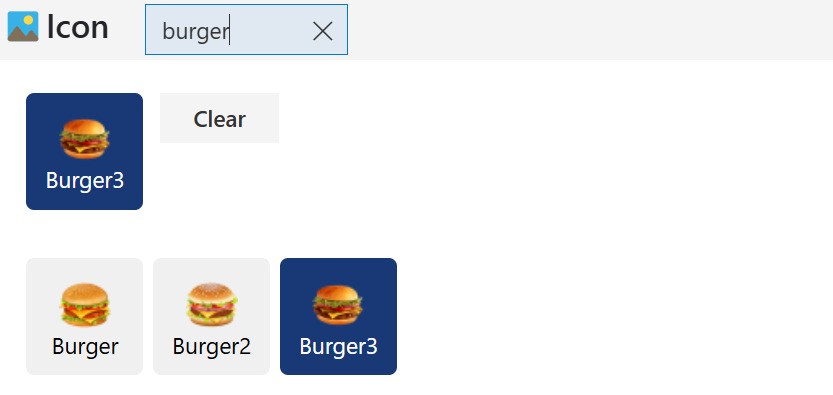
Searching by name narrows the library to a handful of icons.
Any images of your own sit in a band above the standard library. Clear removes the icon.
Fontsize
Choose from the Fontsize dropdown: 8 through 18 and up. Raise it for a short label, lower it for a long one, and watch the tile preview.
Step 8. Add modifiers
Modifiers are the questions the POS asks when someone rings the product up. How the burger is cooked, which bun, which cheese, what side. Each modifier carries its own list of choices.
This step attaches modifiers that already exist to your product. Building a modifier from scratch is a separate job and is covered in Building modifiers.
Modifiers live in the Modifiers section at the foot of the product record. Open it the same way as any other section, by clicking its grey bar.
Attach them
Watch out: OK writes straight away
OK on the Select Modifiers screen saves the list to the product the moment you click it. It does not wait for the product's Save button, and clicking Cancel on the product afterwards will not undo it.
This is the opposite of how the price and cost boxes behave, so do not assume one rule covers the whole record.
If you are only looking, leave by Cancel rather than OK. To undo a list you have already written, come back in and take the modifiers off again.
Click Select Modifiers. The screen splits in two. All Mods on the left is every modifier this business has. Selected Mods on the right is what this product will ask.
Click a modifier in All Mods, then click Add. It crosses to the right and disappears from the left, so the left panel only ever shows what you have not used yet.
Repeat for each one you want.
Put them in order before you leave. See below.
When the list and its order are right, click OK.
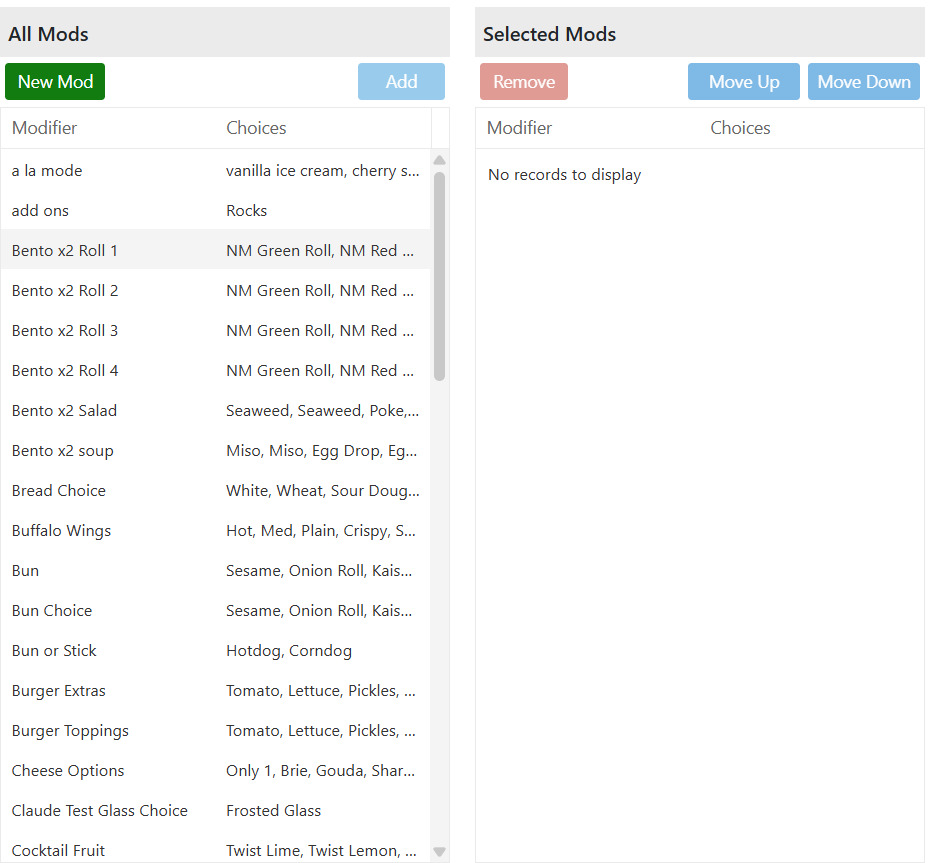
Everything available on the left, everything this product asks on the right.
Put them in serving order
The order here is the order the POS asks the questions. Cook temperature before cheese, cheese before side, extras last: the order a server would work through with a customer.
Select a modifier in Selected Mods and use Move Up and Move Down. Move Up greys out once a modifier is at the top, and Move Down greys out at the bottom.
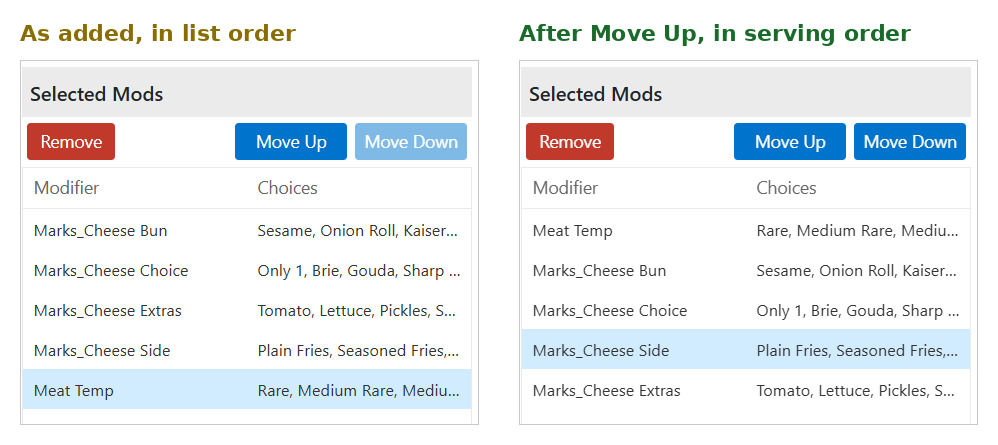
The same five modifiers, moved into the order a server would ask them.
You can also reorder later without reopening the picker. Click Sort on the Modifiers panel, which opens a plain list with the same two buttons.
When you are done the Modifiers panel lists what the product will ask, in order, with each modifier's choices beside it.
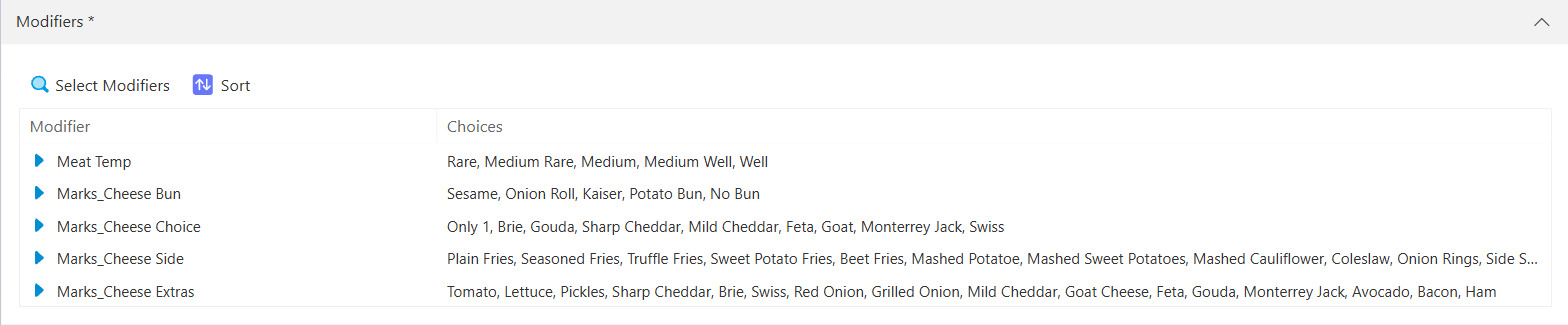
The finished modifier list on the product.
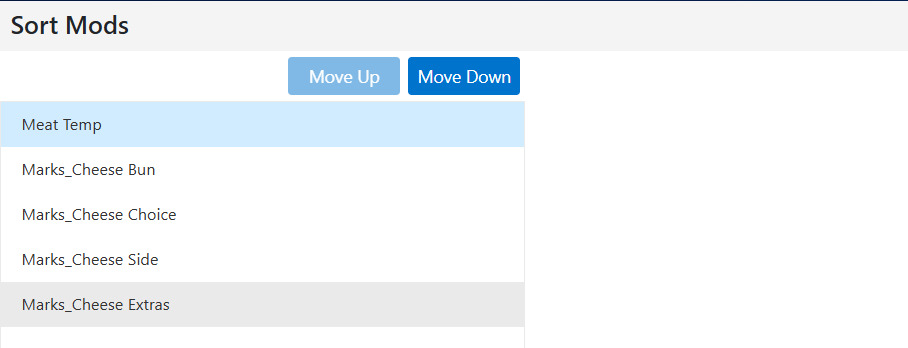
Sort reorders the list later without reopening Select Modifiers.
One modifier, many products
All Mods is one shared library for the whole business, not a list belonging to this product. Adding a modifier here does not make a copy of it. The same Meat Temp sits on every steak and burger you attach it to.
Add a choice to a shared modifier once and every product carrying it offers the new choice from the next ticket.
Watch out: editing a shared modifier changes every product using it
Because the modifier is shared rather than copied, editing its choices changes them everywhere it is attached. Removing a choice removes it from every product at once.
If you need a different set of choices for one product, make a separate modifier for it rather than editing the shared one.
Name modifiers for what they ask, not for the product you first put them on. Several in this catalog are named after a single burger, which is why the worked example below attaches modifiers with another product's name in them. They work perfectly well, and they read badly on every other product that uses them.
Making one that does not exist yet
New Mod, at the top of All Mods, starts a new modifier. The blue arrow beside a modifier opens the existing one for editing.
Both are covered in Building modifiers, not here. That guide deals with choices, pricing per choice, and how a modifier decides whether an answer is required or optional.
The worked example
The Green Chile Cheeseburger takes the same five modifiers as the Marks Classic Cheese Burger, in this order:
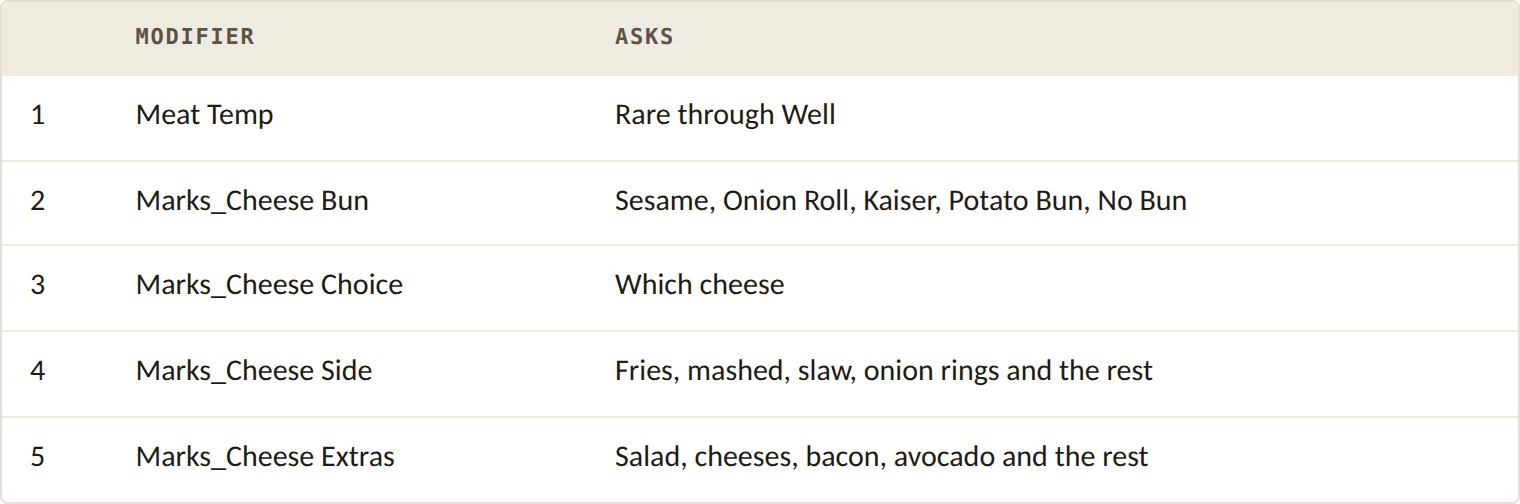
Step 9. Save
Click Save. The product is written and given its number, which appears in the header.
You can click Save with the cursor still sitting in a box you have just typed in. The value is taken as it stands.
Where you land afterwards varies. Sometimes the record stays open with its new number, sometimes you are returned to the list. Both are normal.
If you leave without saving, the system asks first. Yes saves and leaves. No discards what you changed and leaves.
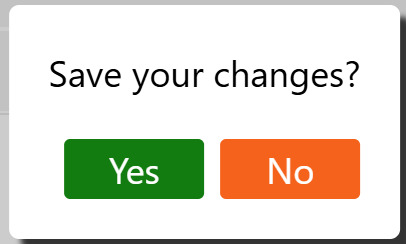
Leaving with unsaved changes asks first. No throws the changes away.
Step 10. Check it in Preview
See the product as your staff will, before anyone rings it up.
Go to Setup, then Products, then Preview.
Click through to the category.
Click the tile to see its modifier screen.
A product saved without a color or icon appears as a plain blue rectangle among its neighbors. It sells, but staff take longer to find it.
If the product is missing from a location, check Sell It on that location's row.
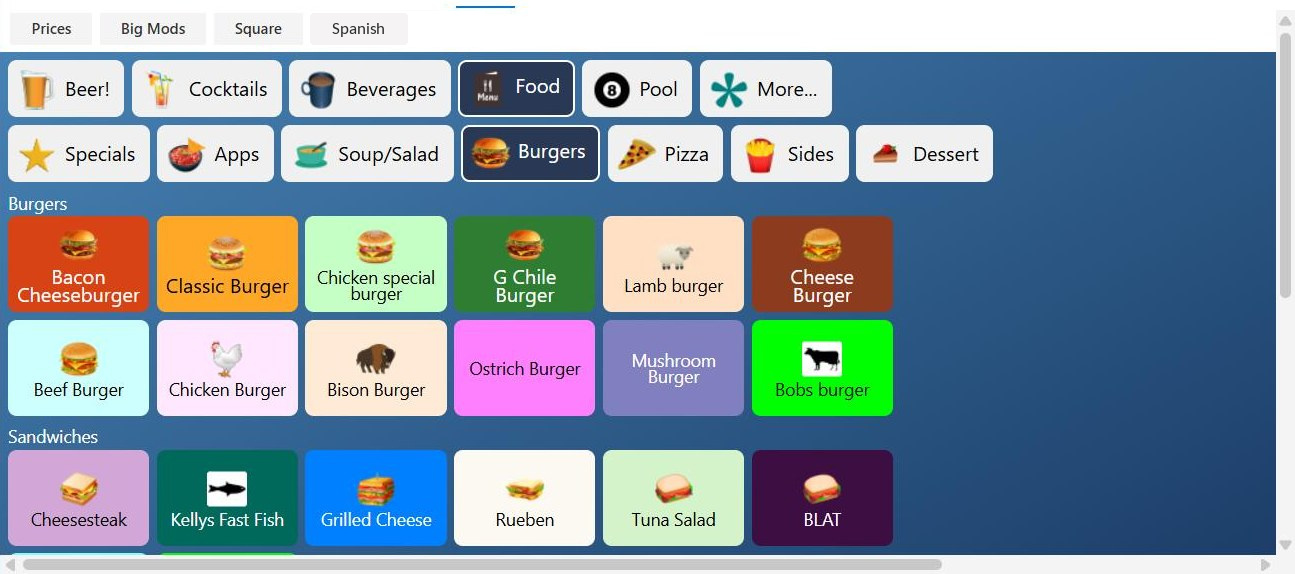
New products on the POS layout.
What else is on a product record
Everything above is Product Info, the first of seven sections. Scroll past the Notes box and the other six are collapsed grey bars beneath it. Click a bar to open it; only one is open at a time, and a heading marked with an asterisk already holds something.
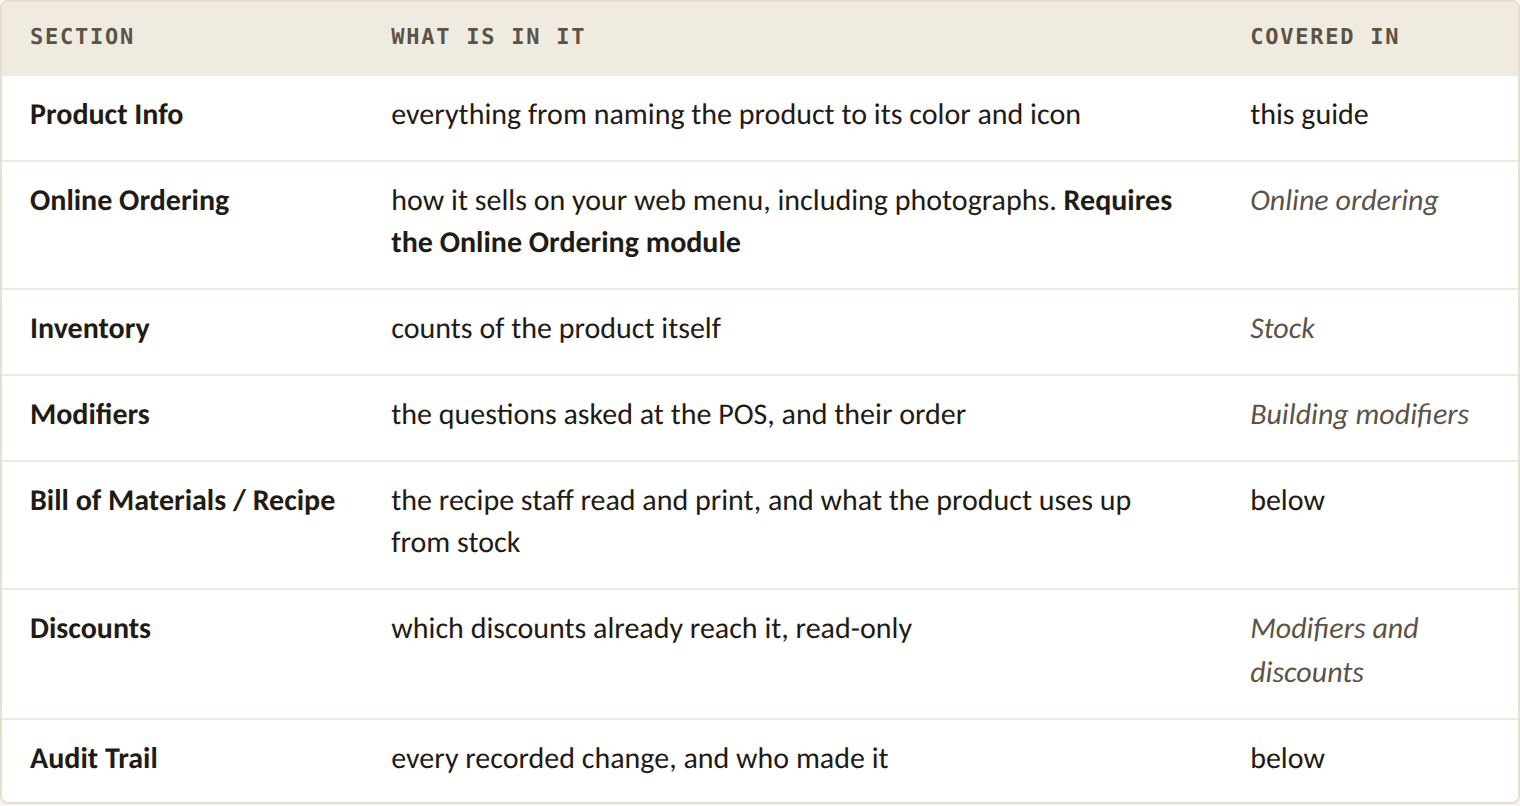
One of these needs a module you may not have. Online Ordering needs the Online Ordering module, and setting it up is covered in that guide rather than here.
Bill of Materials / Recipe
One section, two jobs, and the name tells you which of them you have. With the BOM module installed the bar reads Bill of Materials / Recipe. Without it, the bar reads Recipe, and the recipe is all it does. Every merchant gets the recipe. The bill of materials is the part that needs the module.
A recipe here is a list of lines, added one at a time. Open the bar and click New. Each line is one of three kinds, and the dialog asks which before it asks anything else.
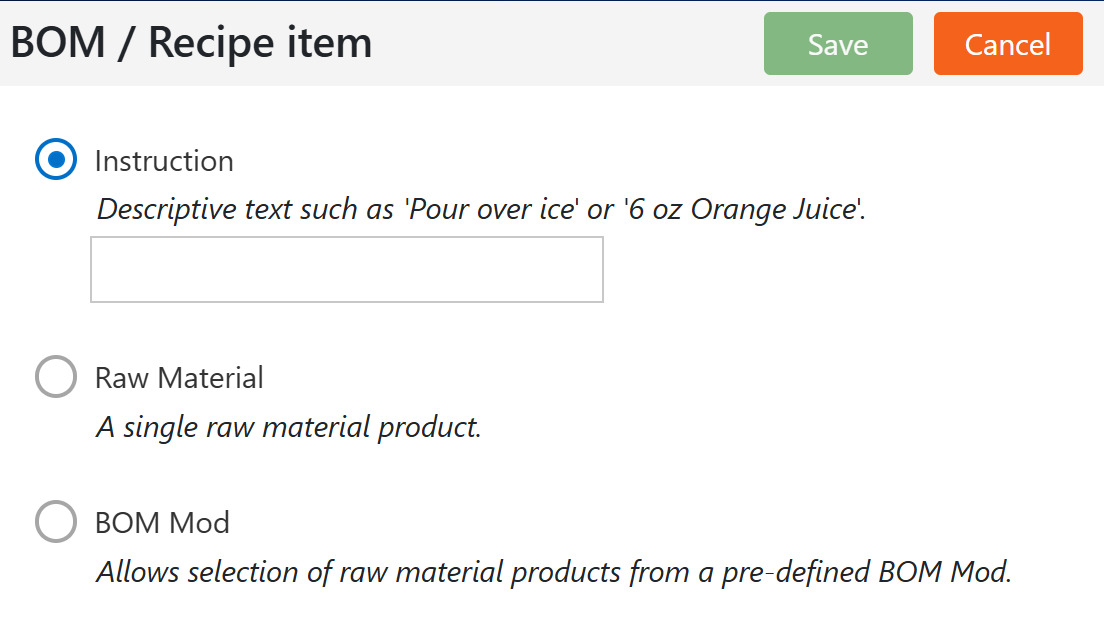
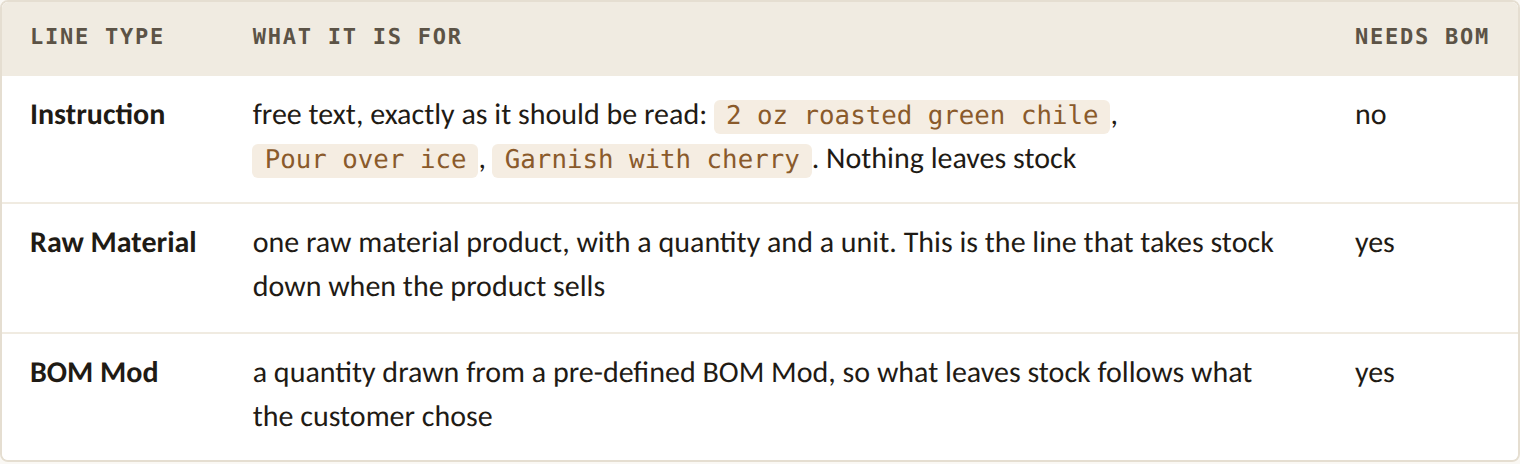
Every recipe line is one of three kinds.
Watch out: a recipe is not a private note
Instruction lines are written for staff to read, and on a bar or kitchen printer they come out on paper in a room where guests can be standing. Cost, supplier and margin belong in the Notes box on Product Info, which stays in the office.
Type the line and click Save. Each line is written on its own, as you save it. It is in the recipe whether or not you go on to save the product. Use Sort to put the lines in the order they should be read, and Delete to remove the selected one. The lines stack up in the order you will read them back.
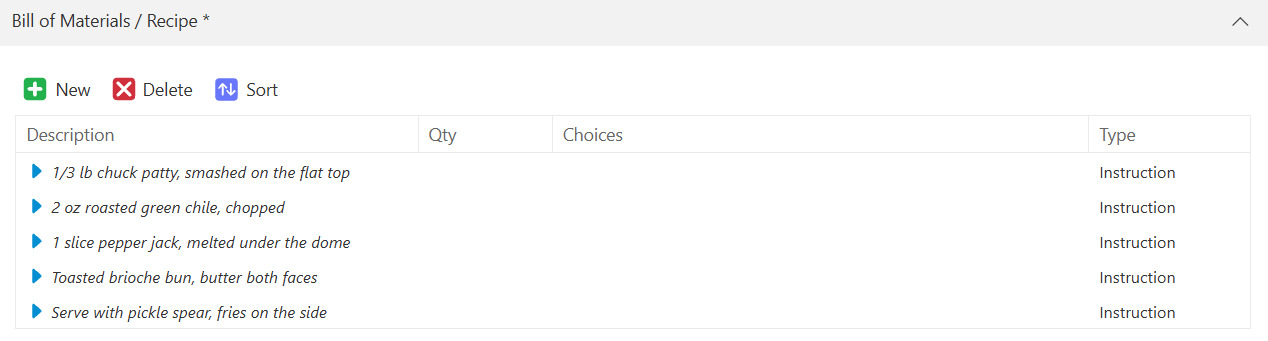
Five instruction lines a line cook can follow, each one saved on its own.
A recipe built from instruction lines reaches the floor in two ways.
On screen. Bartenders and servers open it from the modifier screen at the POS, so a drink can be poured from the ticket without anyone leaving the order or fetching a binder.
On the printer. If bar orders are switched on and the product is ticked for Bar in Print to, the recipe prints with the order the moment it is placed.
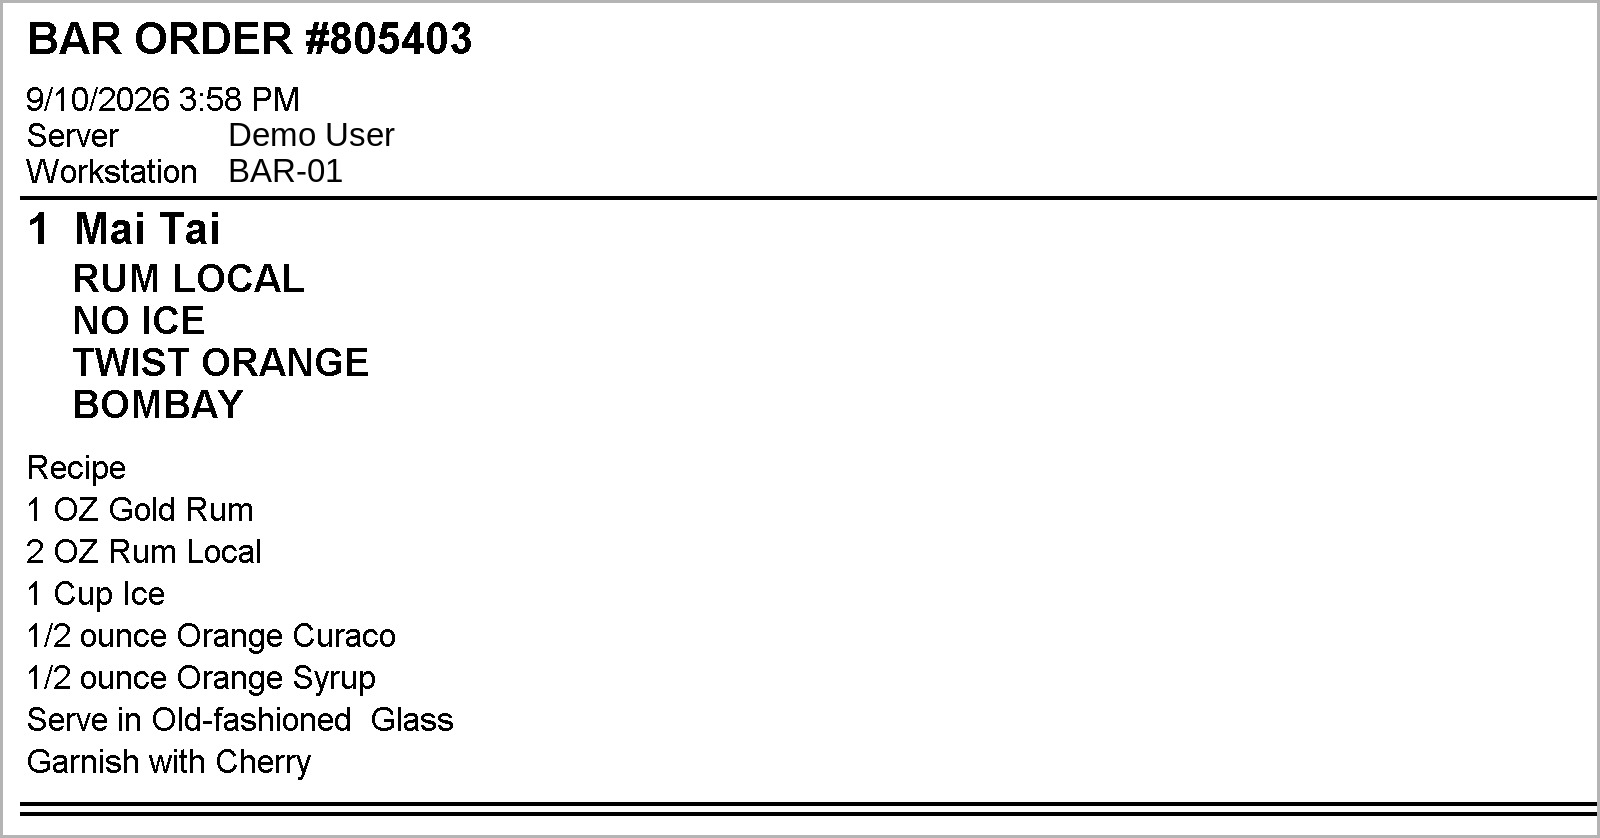
On a bar order the choices print first, then the recipe.
The bill of materials is not the same as the simple counting above. Simple inventory counts the thing you sell: bottles, cans, shirts. A bill of materials tracks what a product uses up when it sells, by volume or weight of its ingredients, which is what Raw Material and BOM Mod lines are. A cooked-to-order burger has nothing to count as an each, and that is exactly what a bill of materials is for. Setting up raw materials is covered in Stock.
Audit Trail
This is where you find out who changed a product, and when. Open the Audit Trail bar at the foot of the record. Entries run newest first, going back to the day the product was created, in three columns: when, who, and what changed.
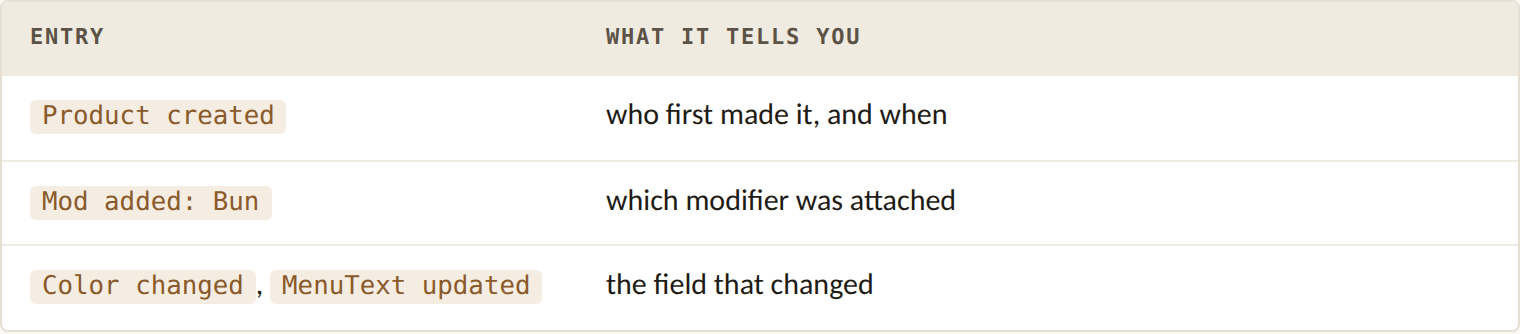
Start here when someone asks who altered a product. Not every field is recorded. If the change you are chasing does not appear, that does not mean nobody made it, only that the system did not log that particular field.
Audit Trail is not the same as History. They answer different questions, and the two are easy to confuse:
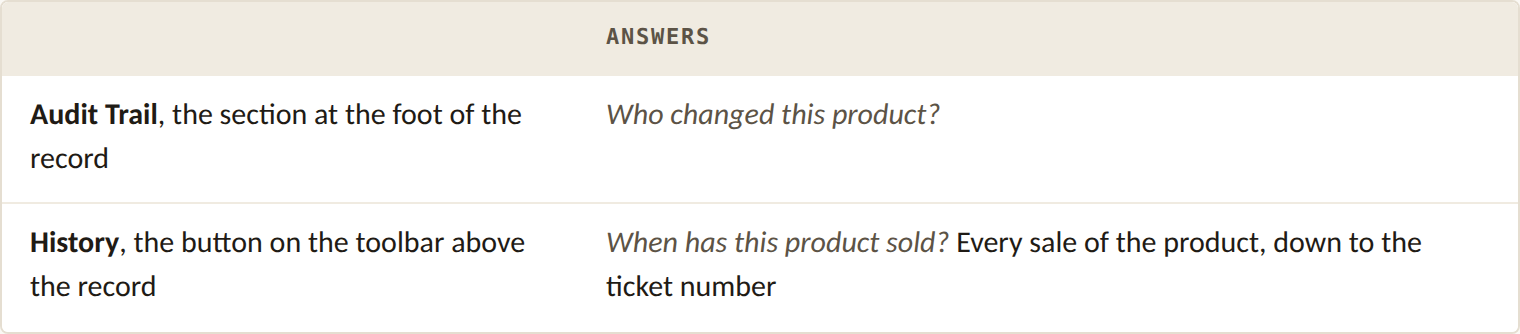
Sales history is not covered in this guide.
Reference
Background on the choices above. None of it is needed to build a product.
Class and Category
Class is for your accounts. Financial reporting groups by it, so pick what your bookkeeper would pick. The box offers the classes your account already uses, and you can type a new one straight in.
Keep the list short. Create a class only for something you want to see as its own line in reporting. It is tempting to make one per menu section, but that is what Category is for.
Category is for your staff. It decides where the tile appears in the POS, and it is a tree mirroring your whole menu, so you pick the exact spot.
Group puts like products into labeled bands within a category, so the POS shows Local, Regional, National rather than forty unsorted beer buttons. The box on the product is only a number because the names live on the category.
Why Cost matters
Cost is what the product costs the business: the plate, the bottle, the shirt. You type it in per location. The system never calculates it and never warns you it is empty. Every margin figure in your reporting depends on it.
Tax in Price
Tick Tax in Price to make a product come to a round number. Price it 1.00 and the customer pays exactly 1.00, with the tax worked backwards out of it.
The product is still taxed. The tax is still calculated, still collected, and still appears in your tax reporting. The only thing that changes is what the customer sees.
Why Copy is usually right
Copy brings every modifier attached to the original. Copy a burger that already asks for a bun, a temperature, a side and toppings, and the new burger asks all four without you attaching anything.
Save the copy and it appears in the product list of every modifier the original used.
Troubleshooting
Tap a problem to see the cause and the fix.
Cannot find the Categories tab
It is in the second row of tabs, below Products / Modifiers / Online Ordering.
Clicked New and got a new category
That was the New above the left panel. The product one is above the right panel.
Copy is grey
Select a product row in the right panel first. A category on the left is not enough.
The new product is not in the category I had selected
New never inherits it. Set Category in Step 3, Set Class, Category and Group.
Save is grey on a new product
One of the four required fields is empty: Description, Tile label, Class, Category.
Chose a category and the red warning stayed
It clears on your next action. Click into another field.
Asked Save your changes? when leaving
You have changes you have not saved. Yes keeps them, No throws them away.
Product rings up free
Price defaults to 0.00 on every location row.
100% margin, or food cost reads zero
Cost is still 0.00. Set it per location.
Product is not taxed
Tax % defaults to 0. If the list offers only 0, that location's rates were never set up.
Food not reaching the kitchen
Print defaults to Do not print, per location.
A price field is grey
That is a location you are not assigned to.
Product missing from one location
Check Sell It on that location's row.
POS still shows the old name after a rename
Tile label did not follow. Click the refresh arrow, then shorten it.
Typed a hex color and nothing changed
Press Tab. Enter does not commit it.
Tax rate looks wrong after using the little arrows
Use the drop-down list instead; the arrows change the display without applying.
New tile looks plain
Set Color and Icon, then check Preview.
A column is missing from the price grid
Scroll the grid sideways. Countdown, Inventory and Shortcut are off the right edge.
Need to know who changed a product
Open Audit Trail at the foot of the record. Not every field is logged.
Still stuck?
If a step did not work the way this page describes, call BREW POS support on 1-800-676-9874.
Next: Building modifiers, the questions the system asks about a product.
About this guide
BREW POS Admin: merchant how-to guide
Applies to: BREW POS Admin, master branch, 4 September 2026 snapshot.
Last reviewed: 16 September 2026 - Owner: Eddy
Updated 16 September 2026 · BREW POS Admin, 4 September 2026 snapshot · Admin
BrewPOS How to use
Support 1-800-676-9874
Email [email protected]
© 2026 BREW POS. All rights reserved.
Privacy Policy | Terms and Conditions