Setting up modifiers
A modifier is a question the system asks when an item is rung up. Anything on it? Which bun? How do you want it cooked?
Everything to do with modifiers lives under Setup → Modifiers, on three tabs, and this guide covers all three:
Product Modifiers, where you build a question and attach it to the products that ask it. That is most of the work, and it is the first eleven steps here.
'Generic' Modifiers, the buttons that work across your whole menu rather than being attached product by product: No Onion, Extra Guacamole, Nut Allergy.
Mod Prices, the fast way to change many choice prices at once.
Building the products themselves is covered in Making a product.
Contents
Before you start
How a modifier is built
Step 1. Open a new modifier
Step 2. Name it
Step 3. Set Select
Step 4. Save, and the Choices panel appears
Step 5. Add the first choice
Step 6. Add the rest of the choices
Step 7. Price a choice
Step 8. Optional: switch a choice off at one location
Step 9. Attach it to a product
Step 10. Set the order the questions are asked in
Step 11. Check it in Preview
'Generic' Modifiers: the buttons that work everywhere
Mod Prices: changing many prices at once
Reference
Troubleshooting
About this guide
Before you start
This guide is written for whoever builds the menu, usually an owner or a manager. It assumes you already use BREW POS Admin day to day, so it explains what is particular to building a modifier rather than how the system works in general.
You need Modifiers access. Everything up to attaching it to a product is under Setup → Modifiers. If Setup is missing from the menu on the left, or Setup opens with no Modifiers tab, you do not have it. Ask whoever manages staff records.
You need to be assigned to the locations you are pricing. Every choice carries a row per location, and a row for a location you are not assigned to is grey and read-only. You can still build the modifier, but you cannot price it or switch it on and off at those sites.
You need the product to exist already. A modifier is attached to a product, so build the product first if it is not there yet. See Making a product.
Write the full list of choices down before you open the screen, and make it the complete list.
The blue arrow at the left of any grid row opens that record, and nothing on screen tells you so. There is no Edit button anywhere in the system.
How a modifier is built
The screen reveals itself in three stages, and nothing explains this.
Name the modifier and Save. The Choices panel appears.
Add the first choice and save it. The Products panel appears.
Attach the modifier to the products that use it.
On a brand new modifier there is nowhere to add choices. That is not a fault. Save first.
Step 1. Open a new modifier
At the bottom of the dark menu on the left, click Setup.
Along the top, click the Modifiers tab.
In the second row of tabs, Product Modifiers is already selected.
Click New (Figure 1).
Figure 1 picks up from the Modifiers tab; Setup itself is at the very bottom of the dark menu.
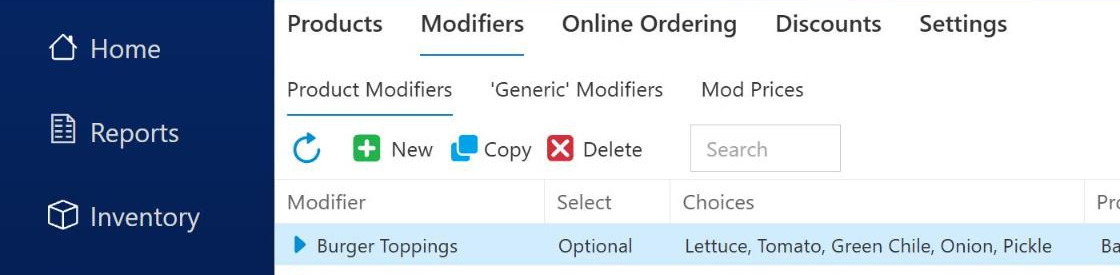
Figure 1. The Modifiers tab, Product Modifiers, and the New button
Watch out: Delete removes the modifier from every product at once
Delete, at the right of that toolbar, does not just take the modifier off the product you are thinking about. It removes the question from every product that asks it, and it cannot be undone. Getting it back means building it and attaching it again.
It asks you to confirm first, so a stray click on its own will not remove anything.
An empty record opens, headed Modifier (new) (Figure 2). There is no Choices panel and no Products panel. Both arrive later.
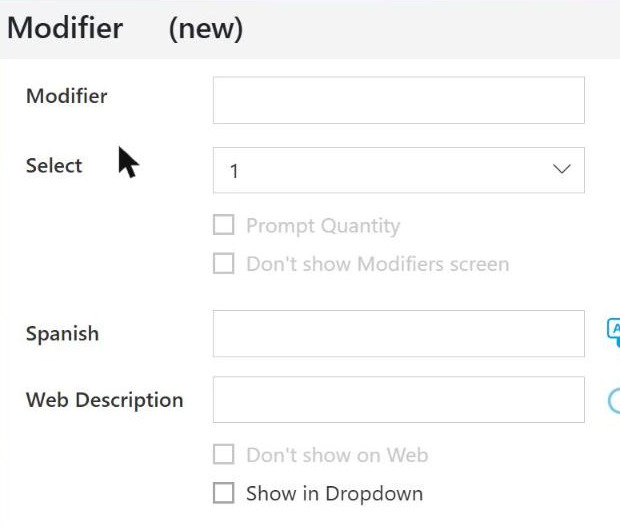
Figure 2. A new modifier, before the first save
Copy is the other way in. If a modifier close to what you want already exists, select its row in the list and click Copy. A copy brings across the choices and the Select setting but not the products, so it opens attached to nothing, which is what you want. Rename it, read its choices and delete any that do not belong, then pick this guide up at attaching it to a product.
Step 2. Name it
If your account has no online ordering, the Web Description box, Don't show on Web and Show in Dropdown are not on the screen at all. Skip the Web Description instruction below; everything else in this guide is the same.
Click the Modifier box and type the name your staff will see: Burger Toppings.
Click anywhere away from the box.
Click Web Description and replace what is in it with words a customer would read: Choose your toppings.
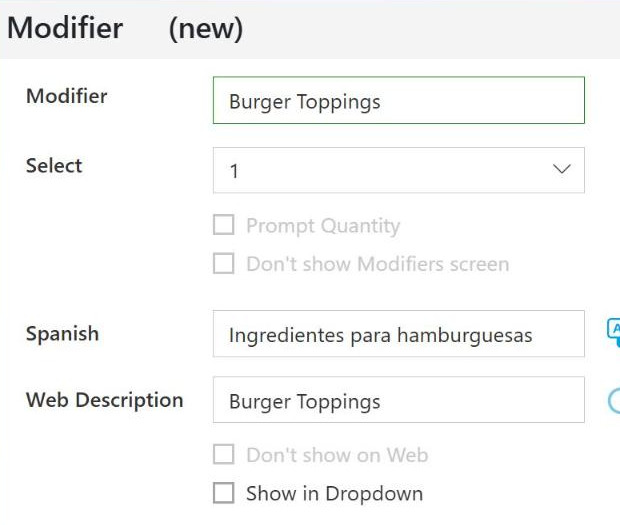
Figure 3. After the name is typed and you click away: the alternate language box translated, and Web Description filled with a copy of the name
Two boxes fill themselves in when you click away from the name box (Figure 3). The alternate language box, labelled with whichever language your account is set to, gets a machine translation. Web Description gets a copy of the name.
Both only ever fill an empty box. That is why you rewrite the Web Description after naming the modifier rather than before: type it first and naming the modifier overwrites it.
The name is for your staff. The Web Description is what appears on your online menu.
The circular arrow beside Web Description copies the name back over it, which is how you undo a rewrite you did not want.
Step 3. Set Select
Select decides how many choices the customer has to make, and it is the setting to get right first, because it controls which of the four tick boxes below it you can use.
Click the Select box. It offers Optional, then the numbers 1 to 12. The list scrolls (Figure 4).
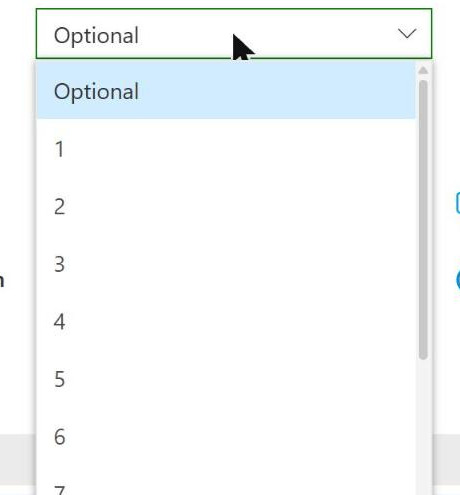
Figure 4. Select offers Optional, then the numbers. The list scrolls past 7 to 12
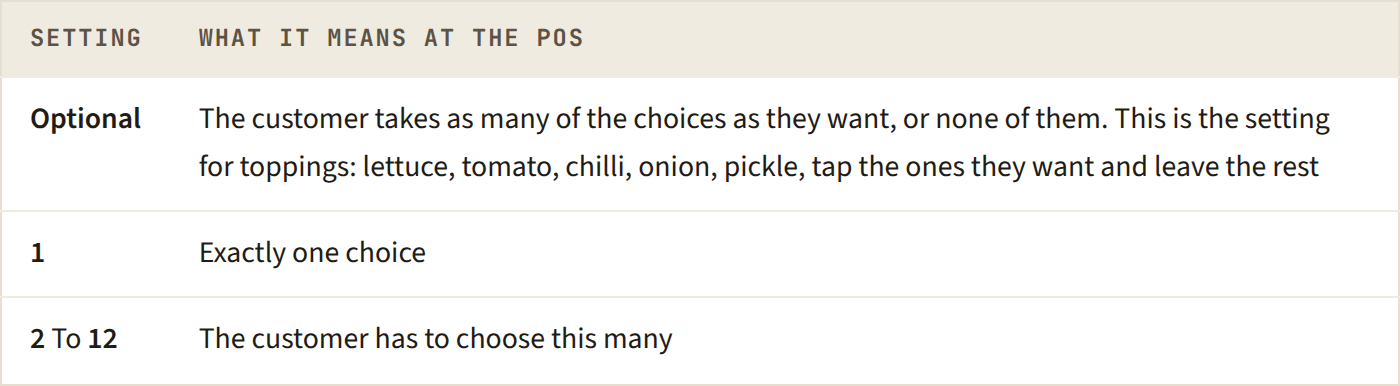
What Select does at the POS. Optional is the setting this guide uses.
It opens on 1. Toppings are a pick-as-many-as-you-like question, so change it to Optional.
Select controls the four tick boxes
Which tick boxes you can use depends entirely on Select, not on whether the modifier has any choices yet (Figure 5).
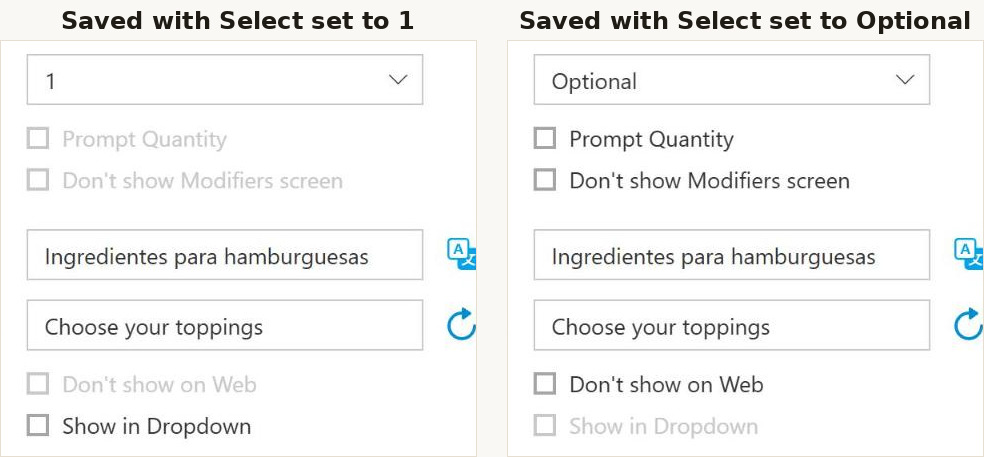
Figure 5. The four tick boxes on a saved modifier, at Select 1 and at Select Optional
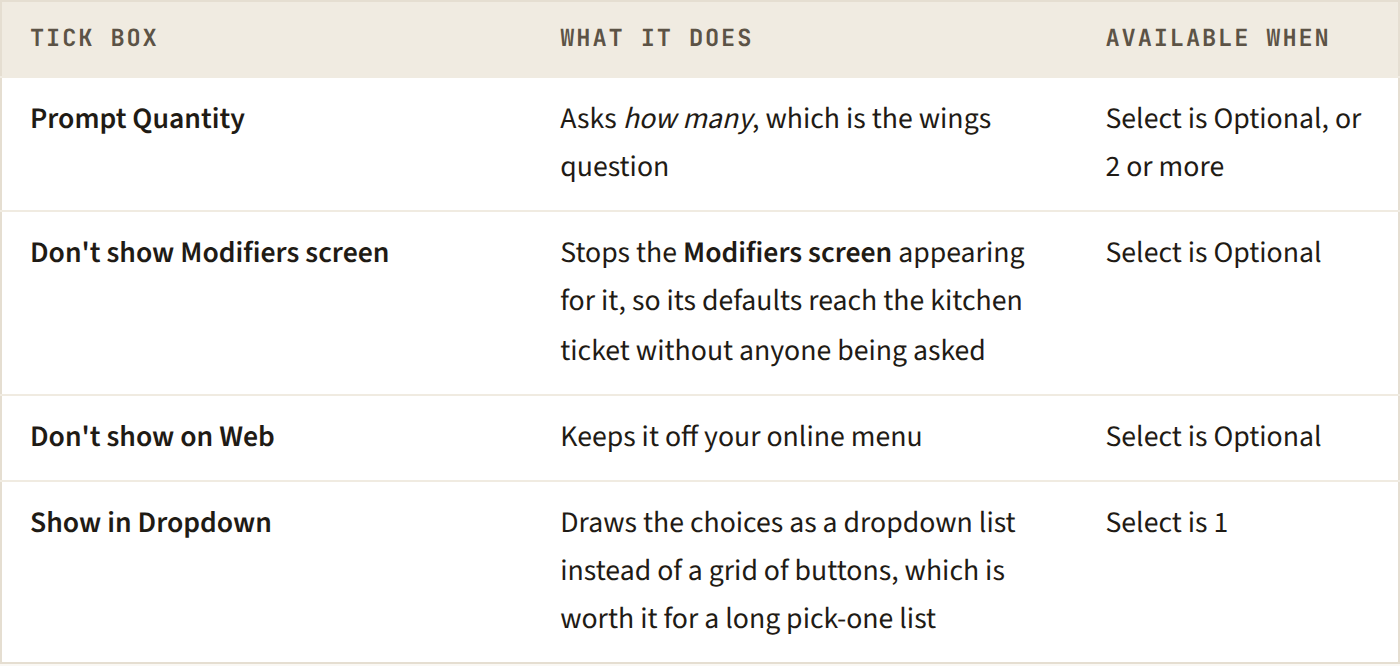
Which tick boxes you can use depends entirely on Select, not on whether the modifier has any choices yet.
A dropdown is a pick-one control, so it is offered only where exactly one choice is required, and you cannot hide a question the customer is obliged to answer.
That is why Show in Dropdown is grey for the rest of this guide. Toppings sit at Optional, so it is never available here. It belongs to pick-one questions such as a bun or a cooking temperature, and the place to reach for it is a long list of choices that would otherwise fill the screen with buttons.
So if a tick box you want is grey, change Select. Nothing else will wake it up.
The greying only settles once you save. Change Select and the tick boxes keep the state they had a moment ago, which is why a box can look available when the table above says it should not be. Save, reopen the modifier, and the boxes will be right.
Step 4. Save, and the Choices panel appears
Click Save.
The header changes from (new) to the modifier's name, Save goes pale to show the record is clean, and the Choices panel appears below it with four buttons and the message Add Choices to the Mod (Figure 6).
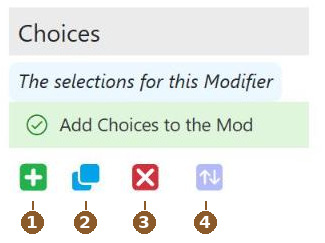
Figure 6. After the first save, the Choices panel appears. The buttons under it are 1 add, 2 copy, 3 delete and 4 sort
The four buttons carry no text labels, so there is nothing on the screen telling you which is which. They are numbered in Figure 6: 1 add, the green plus; 2 copy, the two stacked blue squares; 3 delete, the red X; and 4 sort, the blue up and down arrows. Hovering over any of them brings up a tooltip.
Step 5. Add the first choice
Click the green +. A choice record opens, headed Mod Choice (new) with the modifier's name beside it (Figure 7).
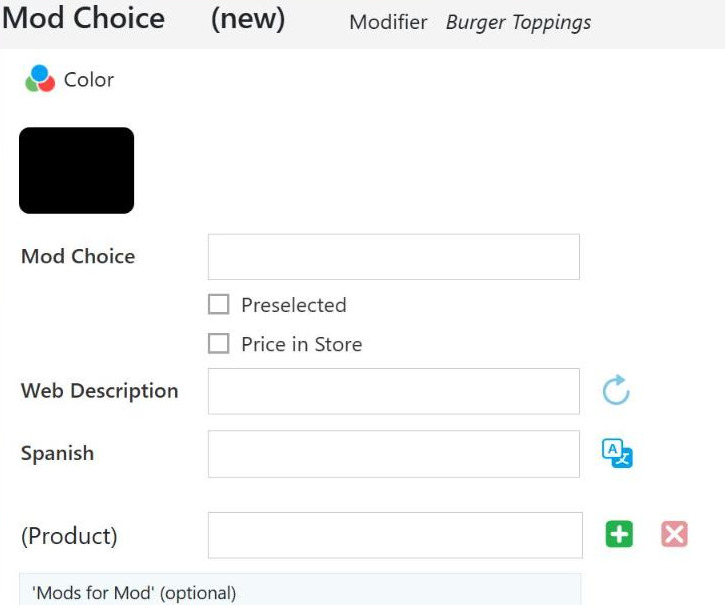
Figure 7. The choice record
Click Mod Choice and type the choice name: Lettuce.
Click away. The Web Description and the alternate language box fill themselves in, exactly as they did on the modifier.
Click Save.
You are returned to the modifier, with Lettuce in the Choices list.
What the rest of the choice record does
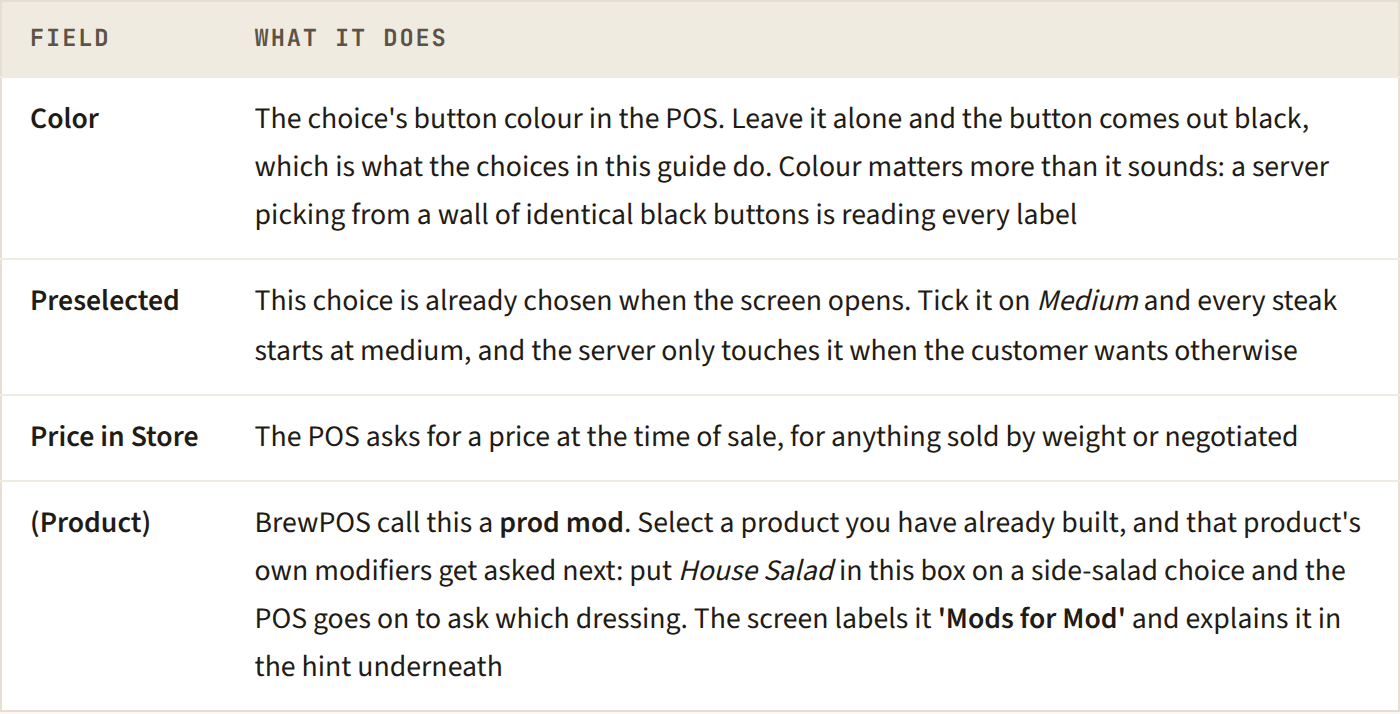
The rest of the choice record. Colour matters more than it sounds.
The grid at the bottom of the record is covered in pricing a choice and switching a choice off at one location. A choice that costs nothing extra and is on sale everywhere, like Lettuce, needs nothing from it.
Step 6. Add the rest of the choices
Click the green + again for each remaining choice, exactly as you did for the first one. Burger Toppings ends with five: Lettuce, Tomato, Green Chile, Onion and Pickle (Figure 8).
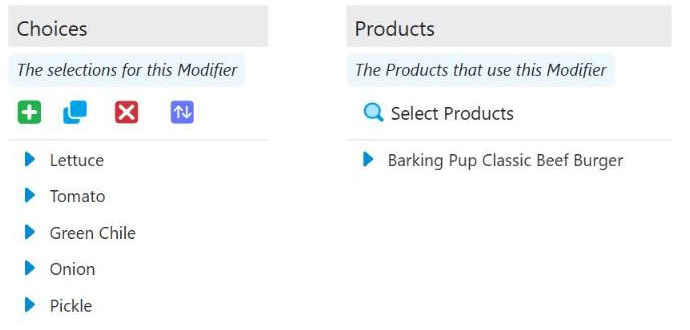
Figure 8. The five choices, with the Products panel beside them
The three small buttons
Copy, button 2 in Figure 6, the two stacked blue squares. It duplicates the selected choice, which is quick when a run of choices differs only in price.
Sort, button 4, the blue up and down arrows. It reorders the choices, and the order here is the order the buttons appear in the POS, so put the ones your staff press most at the top. It opens a plain list with Move Up and Move Down: click a choice, move it, then click OK in the header bar.
Delete, button 3, the red X. It removes the selected choice, and it asks "Delete the Modifier Choice?" first, so a stray click on its own will not remove anything.
Watch out: deleting a choice cannot be undone
Confirm that question and the choice is gone from every product the modifier is on, and getting it back means building it again.
To stop offering something for a season, untick Sell It instead. See switching a choice off at one location.
Saying no is built in universal modifiers, not on each modifier
No Lettuce, No Onion, No Tomato: none of these belongs here. They are 'No' Buttons, built once on the 'Generic' Modifiers tab and then available right across the menu, on every product, without being attached to anything. The demonstration account already carries Lettuce, Onion and Tomato among them.
Building a No Onion choice inside every modifier that has an onion in it is the work that tab exists to save you. So when a server needs to take something off, that is where it comes from, not from here.
There is one exception. Where Select is 1 the customer has to pick something, so the "none" option has to exist as a choice on the modifier itself: a pick-one bun question needs No Bun on it, or a customer who wants neither cannot be served without a workaround. The same goes for a side, a sauce, or anything else the customer is obliged to answer.
At Optional, which is where Burger Toppings sits, you need nothing at all. The customer can simply take none of them.
Step 7. Price a choice
In the Choices list, click the blue arrow beside the choice to open it. The grid at the bottom of the record gives you one row per location and six columns: Sell It, Web, Addl, Half, Double and Triple (Figure 9).
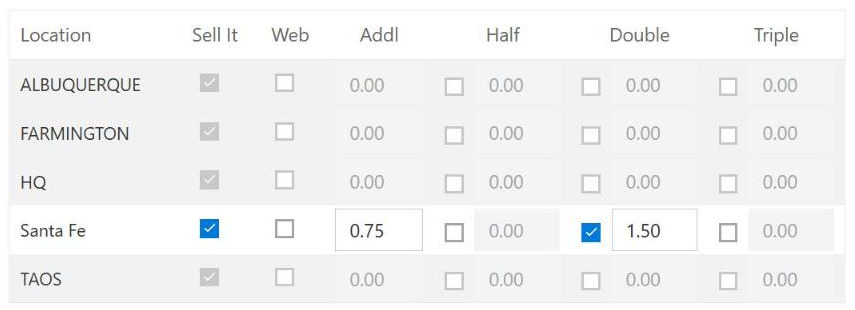
Figure 9. Green Chile, priced at Santa Fe with a Double
Find your location's row.
Click the Addl box on that row and type the extra charge: 0.75.
Click Save.
Addl is the extra charge, per location. Leave it at zero for choices that are included in the price.
Optional: Half, Double and Triple are for choices ordered by the portion, such as extra cheese or a double helping of chile. Each has a tick box and a price box beside it. In Figure 9, Green Chile has Double ticked at 1.50, so a double portion can be charged.
Tick the box before you try to type the price. The price box beside Double stays grey until Double is ticked. Untick it and the box greys again. A dead price field almost always means the box beside it is not ticked.
A price box also greys when both Sell It and Web are unticked, because a choice on sale nowhere has nothing to charge for.
Only the locations you are assigned to can be edited. In Figure 9 only Santa Fe's row is live. The other four are grey. If the site you need is grey, ask whoever manages staff records to assign you to it.
Verify by leaving and reopening. Click the blue arrow on the choice again and check the figures are still there. Reopening the record is the only way to tell a saved value from one still sitting on screen.
Step 8. Optional: switch a choice off at one location
Sell It and Web are per location, and they are the reason a choice can be missing from one POS.
Watch out: a choice switched off at a location disappears with no warning
Nothing on the modifier tells you. The choice list looks complete, the Choices column in the list shows every choice, and only the location row inside an individual choice record says otherwise.
So a modifier with twelve choices can quite correctly show eight buttons, and the first place to look when a side has vanished from one site is that site's Sell It on the choice itself, not the modifier.
In the Choices list, click the blue arrow beside the choice to open it.
Untick Sell It on the location's row (Figure 10).
Click Save.
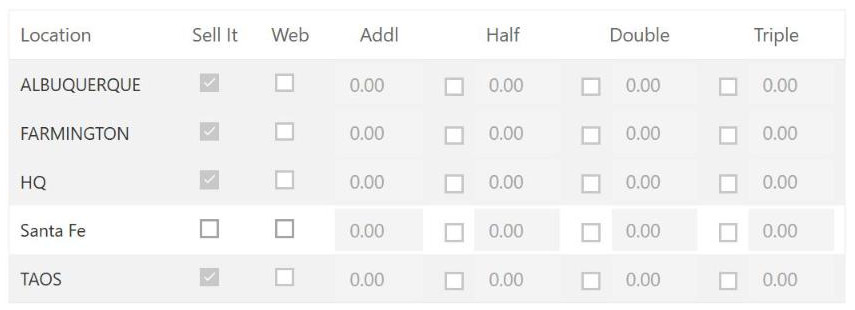
Figure 10. Pickle, switched off at Santa Fe and left on everywhere else
That button no longer appears on that location's POS. The choice still exists, still appears everywhere else, and if Web is still ticked it is still orderable online.
Step 9. Attach it to a product
A modifier does nothing until a product uses it. There are two ways to attach one, and they do the same job from opposite ends.
From the modifier, using the Products panel on this screen. Best when one modifier goes onto many products at once.
From the product, using Select Modifiers in the product's Modifiers section. Best when you are finishing one product and giving it everything it needs.
This guide uses the first.
Click Select Products. Your whole catalogue appears on the left, the products using this modifier on the right.
Narrow the left-hand list. There are three ways: the Search box, and the filter funnels on the Class and Category column headings. Filtering to Food and then Burgers is usually faster than typing.
Click the row you want. Add is grey until a row is selected.
Click Add. The product moves to Selected Products on the right.
Click OK, at the top right of the screen. The product is now listed under Products on the modifier (Figure 11).
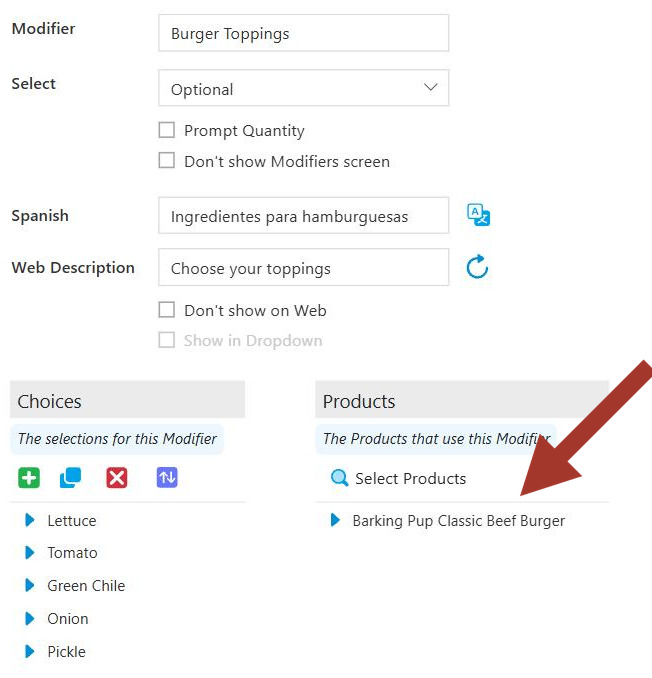
Figure 11. The finished modifier: its choices on the left, and the product it is now attached to on the right. The red arrow marks Select Products, the link you click in step 1
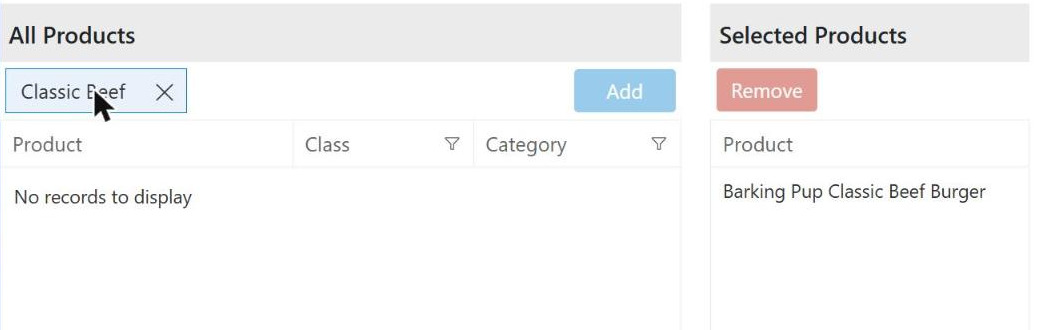
Figure 12. Searching for a product that is already attached: nothing on the left, and there it is on the right
It is a move, not a copy. The product leaves the left-hand list when it goes right, so a product you cannot find on the left is usually already attached. In Figure 12 a search for the burger returns nothing at all on the left, because it is sitting on the right.
Remove takes a product back off. You can select more than one row at a time on either side.
Go back to the modifier list and your new modifier may still show an empty Choices column and an empty Products column. The record is fine; the list is stale. Click the refresh arrow at the top left and both columns fill in. See the list shows my modifier as empty.
Step 10. Set the order the questions are asked in
This is done on the product, not on the modifier, which is why it is easy to miss.
Sorting only does something once a product carries two or more modifiers. The product in Figures 13 and 14 already had four others before Burger Toppings was attached. If yours has only the one you have just built, there is nothing to order yet, and you can come back to this step when you add the next.
Go to Setup → Products → Categories.
Click the category, then the blue arrow on the product's row. If you do not know which category the product is in, use the Products tab beside Categories and search for it there instead.
Scroll past the Notes box. The record has seven collapsed section bars below it: Product Info, Online Ordering, Inventory, Modifiers, Bill of Materials / Recipe, Discounts and Audit Trail.
Click Modifiers to expand it (Figure 13). An asterisk on the bar means the section already holds something.
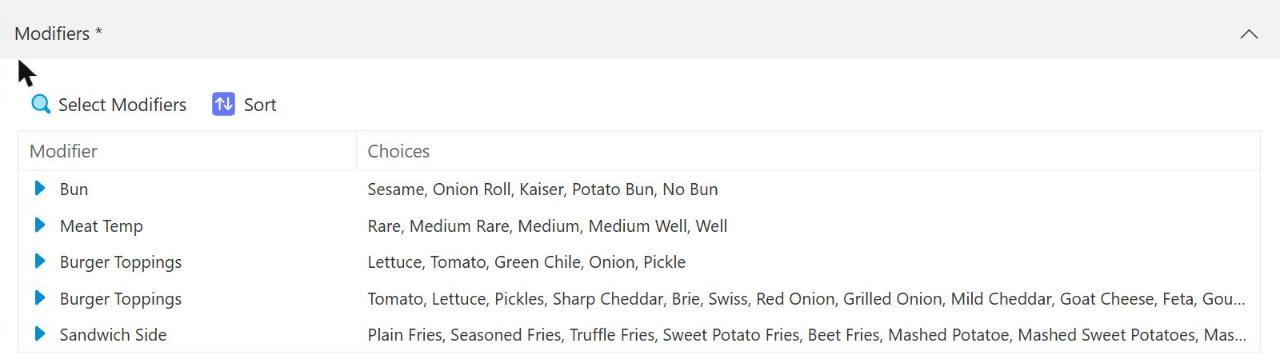
Figure 13. The Modifiers section on a product record
Two controls sit above the list: Select Modifiers, which is the same picker from the other end, and Sort. Below them, every modifier on that product is listed with its choices.
Click Sort. A plain list opens with Move Up and Move Down (Figure 14).
Click the modifier you want to move.
Click Move Up or Move Down until it is where you want it.
Click OK. It is in the header bar at the top right of the screen, beside Cancel, above the part of the screen Figure 14 shows.
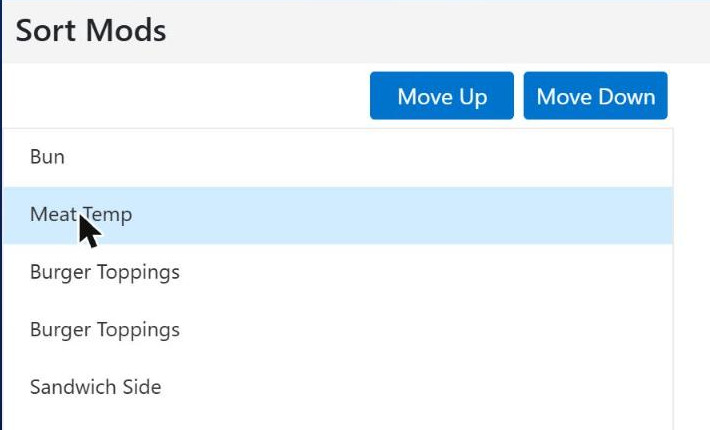
Figure 14. Moving Meat Temp above the toppings
Move Up greys out when the selected modifier is already at the top, and Move Down when it is at the bottom. The selection follows the modifier as it moves, so you can click Move Up repeatedly.
Put them in the order the question actually gets asked. Settle what the item is before dressing it: the bun and how it is cooked come before what goes on top. That is roughly the order the kitchen builds it in, and the order the customer is thinking in.
A server works down that screen in the order you set. Putting a sixteen-button toppings grid first means every order starts with the least important question.
In Figure 14 Meat Temp moves above Burger Toppings, so the burger is specified before it is dressed.
Until you sort a product's modifiers, they come out in whatever order the system happens to hold them. That is usually alphabetical and rarely a sensible service sequence.
OK commits straight away. The sort does not wait for Save, which is why Save stays pale afterwards. Nothing has gone wrong; your change is already in.
Step 11. Check it in Preview
This is the only way to confirm the whole chain worked.
Go to Setup → Products → Preview.
Click the class along the top row: Food.
Click the category in the second row: Burgers. The tiles for that category appear below (Figure 15).
Click the product's tile.
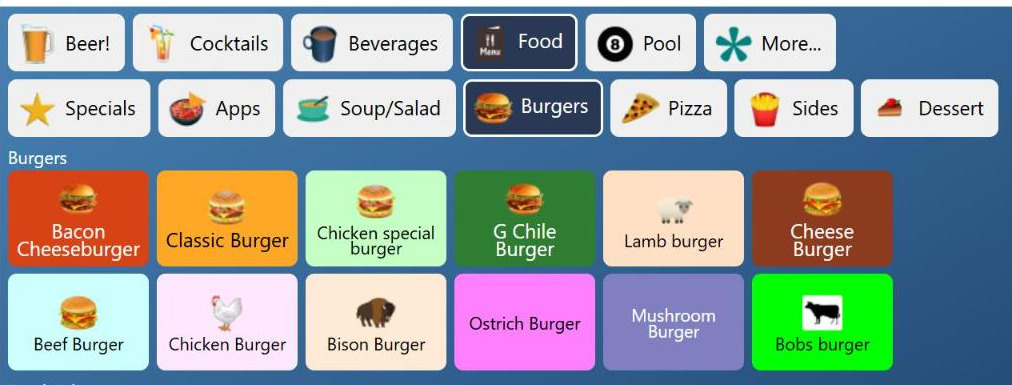
Figure 15. Working down to the product's tile: class, then category, then the tile
The tile label is set separately from the product name, so the tile for the Barking Pup Classic Beef Burger reads Classic Burger. Look for the tile label, not the full product name.
You get the screen your staff will see: every modifier on that product, every choice under it, in the order you set (Figure 16).
Preview draws one location's screen, and Figure 16 is Santa Fe, the site where Pickle was switched off. A choice you switched off somewhere else will still show here.
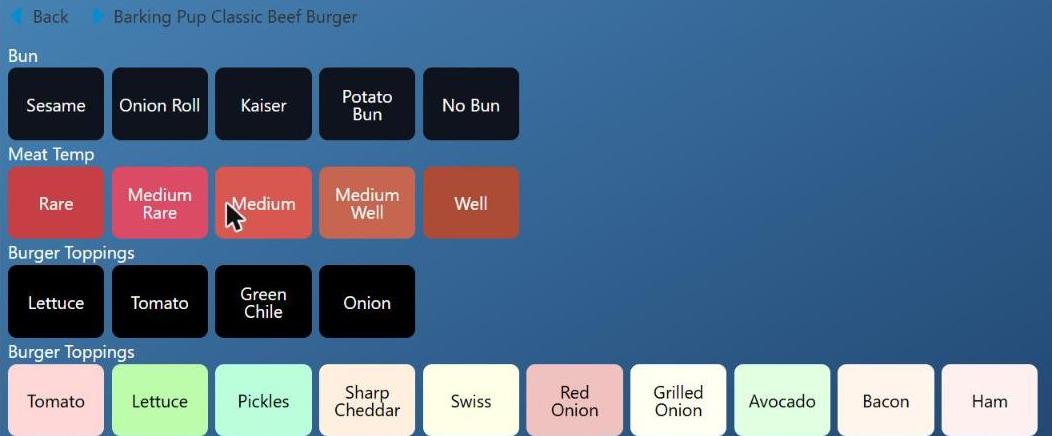
Figure 16. The modifier screen as the POS will show it, with Meat Temp asked before the toppings and Pickle absent from Burger Toppings
'Generic' Modifiers: the buttons that work everywhere
The first eleven steps build a question that belongs to particular products. This tab holds the other kind: buttons available right across the menu, attached to nothing.
Without it, every modifier has to be complete, and No Onion has to be built inside every product that has an onion on it. That is what this tab saves you.
Go to Setup → Modifiers → 'Generic' Modifiers. There are three sets, side by side, each with the system's own description of what it is for (Figure 17).
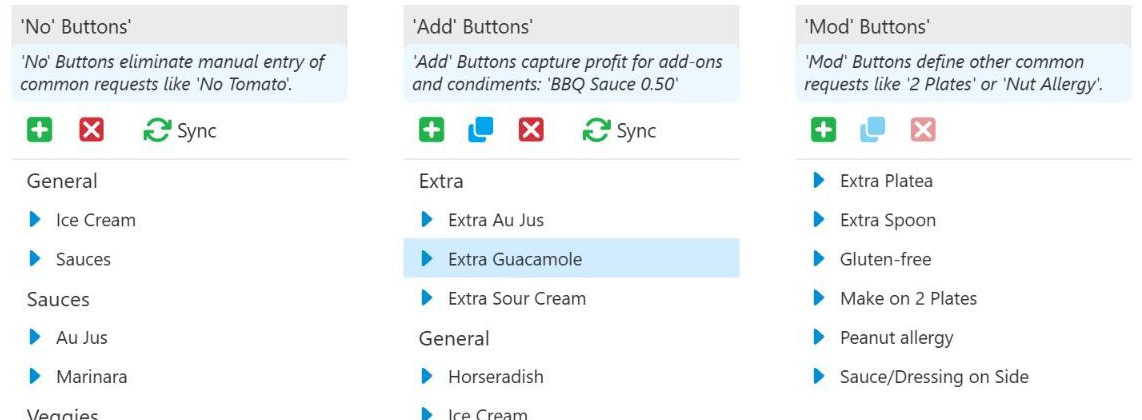
Figure 17. The three sets of generic buttons
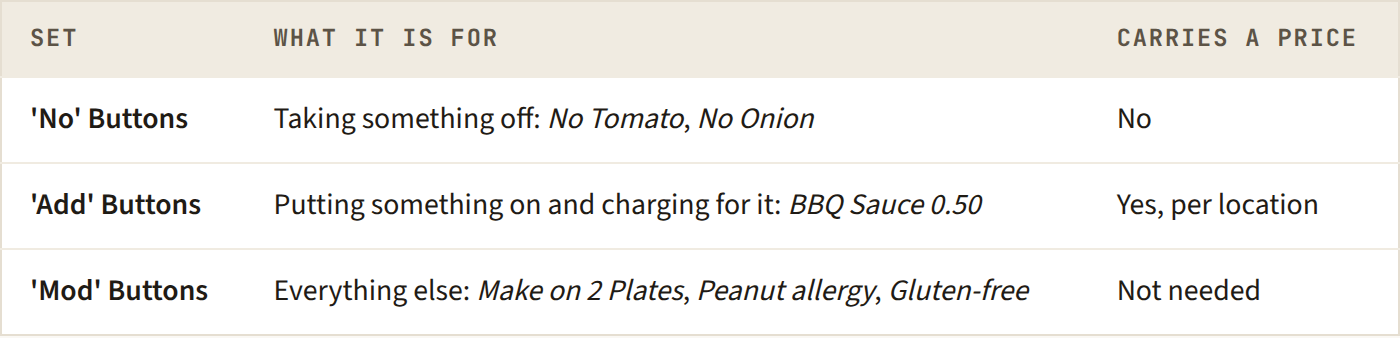
The three sets, and which of them carries a price.
Each set has a green + to add a button, a red X to delete one, and 'Add' and 'Mod' also have a copy button. To open a button, click the blue arrow beside it.
Adding a button
Click the green + above the set you want.
Type the name. This is what your staff see on the button.
Choose a Group. That is the heading the button files under, so a long list stays navigable. This account uses General, Sauces, Veggies and Extra.
On an 'Add' Button, set the price on your location's row of the grid, exactly as in pricing a choice.
Click Save.
A 'No' Button is the simplest record in the system: a name, a group, and the alternate language box (Figure 18). Nothing else, because taking the tomato off costs nothing and applies everywhere.
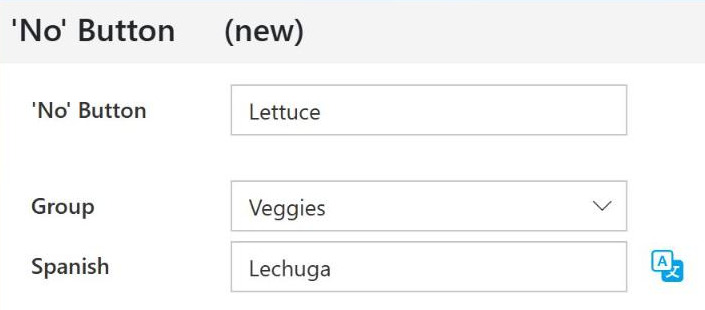
Figure 18. A 'No' Button record
An 'Add' Button is charging for something, so it carries more (Figure 19): a Price in Store box for anything whose price is settled at the time of sale, the same (Product) link that lets the button pull in another product's modifiers, and below them the same per-location price grid a modifier choice has, laid out exactly as Figure 9 shows it.
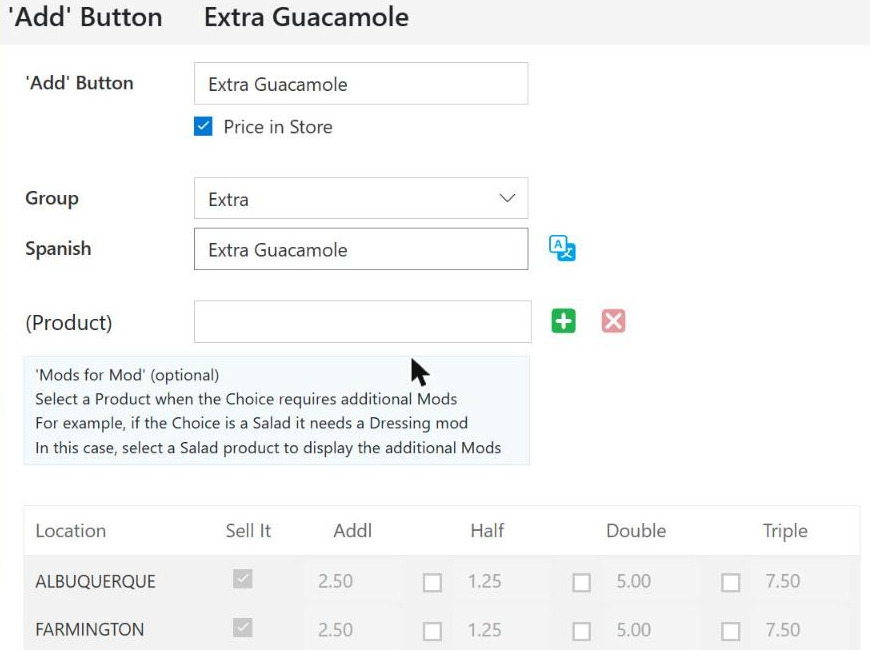
Figure 19. An 'Add' Button record: a name, a Group, and the start of everything a priced button adds
'Add' Buttons are priced, so an extra sauce is charged rather than given away, and it reports as itself rather than disappearing into a line note.
The pricing rules are the ones from pricing a choice: only the locations you are assigned to can be edited, and a portion price box stays grey until its tick box is on.
Sync: filling the gaps between the two lists
Most things you can take off, you can also add. So 'No' Buttons and 'Add' Buttons each have a Sync button that creates the counterparts missing from the other list.
Sync on 'No' Buttons asks "Create new Add Buttons for missing No Buttons?"
Sync on 'Add' Buttons asks "Create new No Buttons for missing Add Buttons?"
Each asks before it does anything, and each only creates what is missing. 'Mod' Buttons have no Sync, because they have no opposite.
The buttons a Sync creates arrive unpriced, so after running it on the 'Add' side, go down the new buttons and price the ones that should charge. An 'Add' Button at zero gives the item away.
Mod Prices: changing many prices at once
The third tab is the modifier equivalent of Setup → Products → Prices. Putting 25 cents on every extra topping means one pass down this grid rather than opening thirty choice records.
Go to Setup → Modifiers → Mod Prices. Pick a modifier from the list on the left and its prices fill the grid on the right (Figure 20).
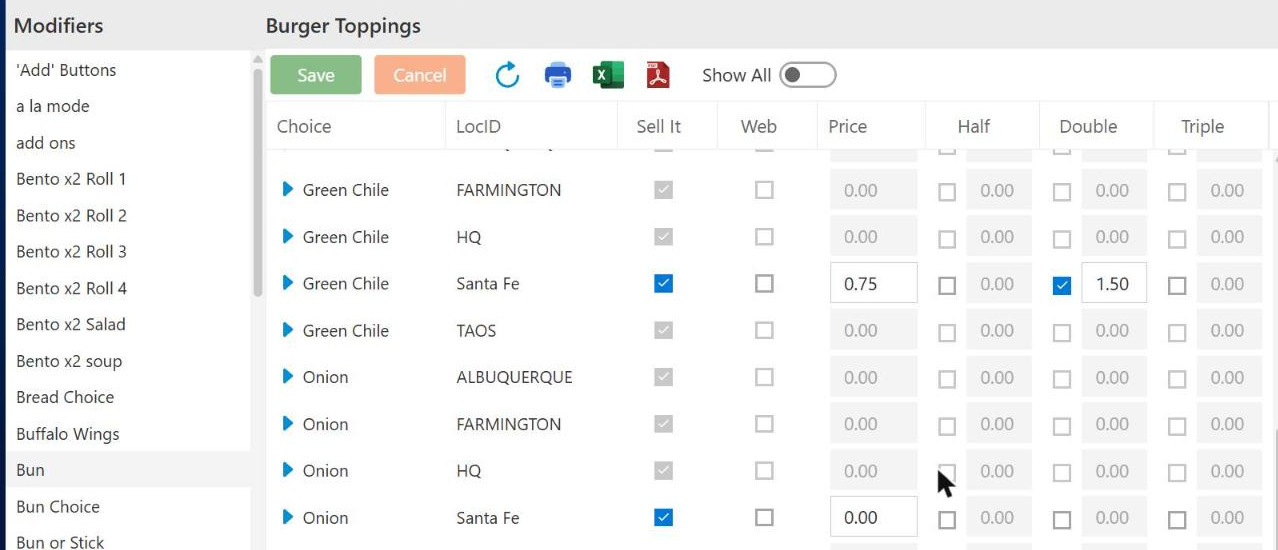
Figure 20. The modifier list on the left, and the left-hand columns of the Mod Prices grid. Half, Double and Triple continue off the right of this crop
The grid gives you a row per choice per location, with Sell It, Price, Half, Double and Triple. Type the new figures and click Save above the grid. Cancel beside it abandons the changes.
Price here is Addl there. The extra charge on a choice is labelled Addl on the choice record and Price in this grid. Same figure, two names.
The rules are the same as everywhere else. Only the locations you are assigned to can be edited, and a portion price box only wakes up when its tick box is on.
A choice only gets a row for the locations it is sold at. Most choices carry five rows, one per site. Pickle carries four, because Sell It is off for it at Santa Fe. A short block of rows is the switch doing its job, not missing data.
The list on the left is every modifier in the account, which makes this tab the quickest way to confirm a modifier exists when you cannot find it elsewhere. 'Add' Buttons sit at the top of that list as an entry of their own, so the generic add-on prices can be changed here too.
Above the grid, alongside Save and Cancel, sit Refresh, a print button, and Excel and PDF export. The Show All switch brings inactive mod choices into the grid.
Reference
Where things live
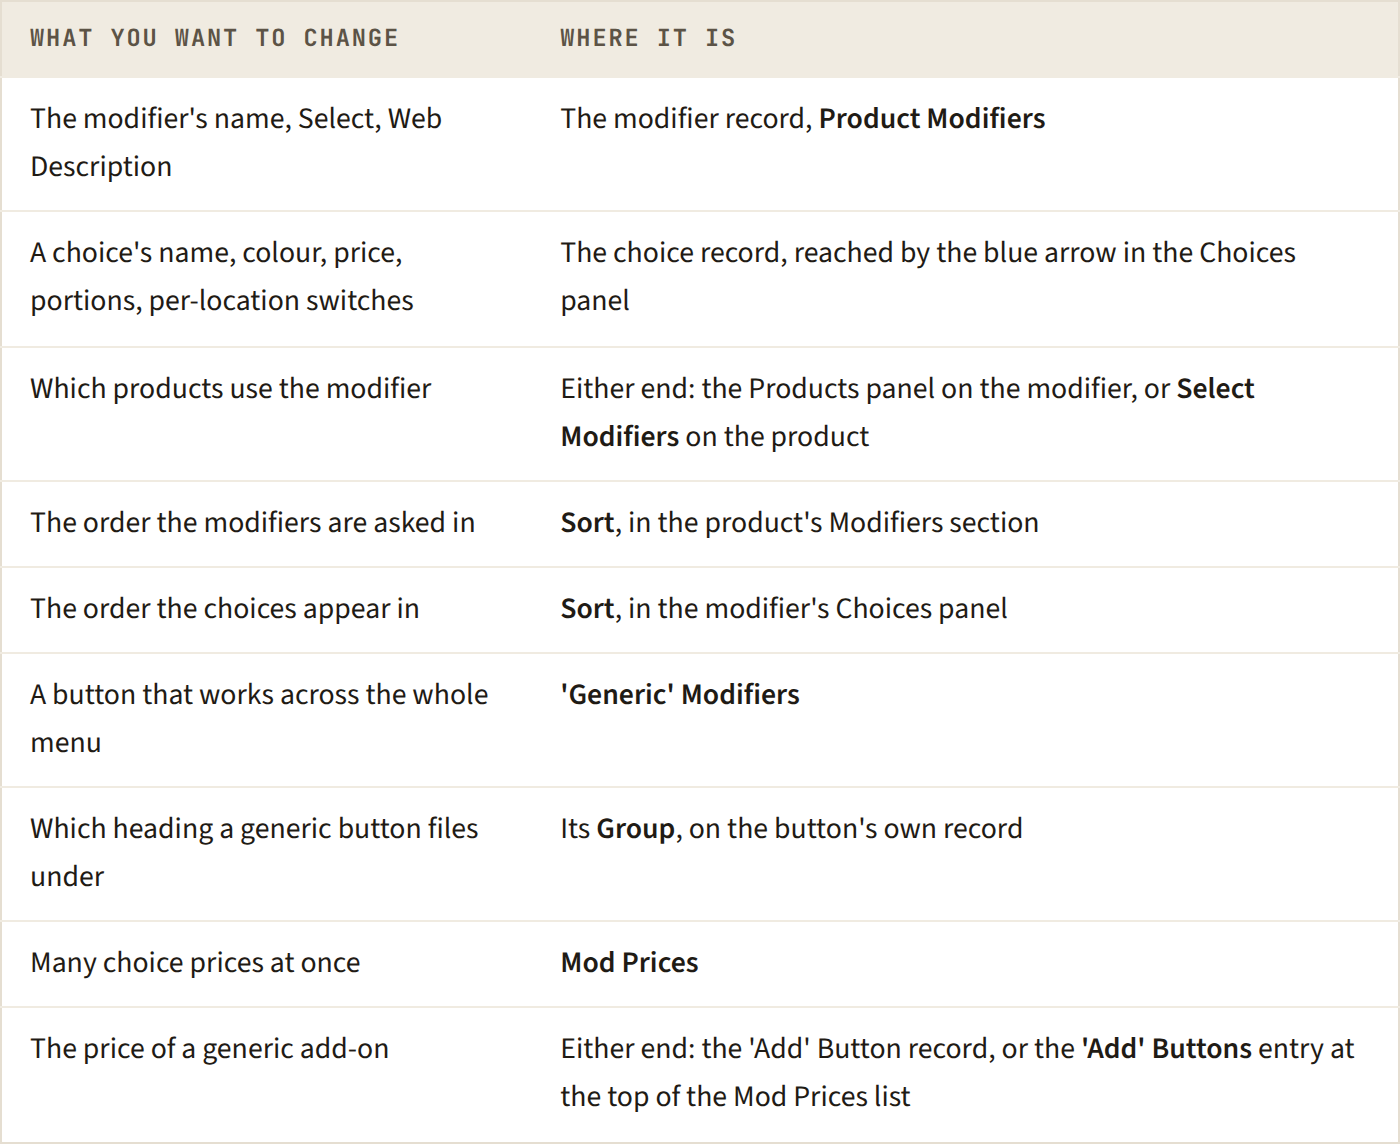
Where to go for each thing you might want to change.
The same thing under two names
The extra charge on a choice is called Addl on the choice record and Price in the Mod Prices grid. In the Audit Trail, a Select of Optional is written as no limit. The (Product) box on a choice record is labelled 'Mods for Mod' in the hint under it, and BrewPOS call it a prod mod.
The Audit Trail
Both the modifier record and each choice record carry an Audit Trail at the bottom, showing the date, the member of staff and what changed. A newly created record reads Mod created or Mod Selection created.
Troubleshooting
There is nowhere to add choices to my new modifier. Save the modifier first. The Choices panel only appears afterwards.
There is no Products panel. Add and save the first choice. The Products panel only appears once the modifier has at least one choice.
The list shows my modifier as empty. The grid does not reload itself after you build a modifier, so Choices and Products can both sit blank on a modifier that has plenty of both. Click the refresh arrow at the top left of the Product Modifiers toolbar. Nothing is lost and nothing needs saving again.
A tick box is grey. Change Select. Prompt Quantity needs Optional or a number of 2 or more, Don't show Modifiers screen and Don't show on Web need Optional, and Show in Dropdown needs 1. Having choices makes no difference.
A tick box looks available when it should not be. The greying does not update until you save. Save, reopen the modifier, and look again.
A portion price box will not take a value. Tick the Half, Double or Triple box beside it first. If ticking it does not wake the box either, check that Sell It or Web is ticked on that row.
The whole row is grey. You are not assigned to that location. Ask whoever manages staff records.
A choice has fewer rows than the others on Mod Prices. It is not sold at every location. The grid only lists the sites where Sell It is on for that choice.
Add is grey on the product picker. Click a row in the left-hand list. Typing in the Search box clears the selection, so search first and then click.
I cannot find a product in the left-hand list. It has probably already been attached. Check the right-hand list.
I attached products and Save went pale. That is expected. OK on the picker saves immediately.
I typed the Web Description and it changed back. It fills itself in from the modifier name, and only while it is empty. Name the modifier first, then rewrite the Web Description.
I can see the modifier on a product but not on the Modifiers tab. Click into the Search box above the list, type anything, then clear it. You can also open the modifier from the product: in the product's Modifiers section, click the blue arrow beside the modifier's name.
The modifiers come up in the wrong order in the POS. Sort them on the product, not on the modifier. See setting the order the questions are asked in.
I cannot find the Modifiers section on the product. Scroll down. The product record has seven collapsed sections and opens on the first.
I cannot find the product's tile in Preview. Look for the tile label rather than the product name. They are set separately and are often different.
The POS shows fewer buttons than the modifier has choices. The missing ones have Sell It unticked on that location's row. Open the choice, find the location, tick it. If Web is still ticked they are online only, which may be exactly what was intended.
Staff are typing requests as notes. A choice is missing. Add it, or, if it is a request that applies right across the menu, add it under 'Generic' Modifiers instead.
A generic button is in the wrong place on the list. Change its Group. That is the heading it files under.
Sync created buttons that are giving things away. A Sync creates its new buttons unpriced. Go down the new 'Add' Buttons and set a price on each one that should charge.
Next: Getting started, signing in and finding your way around.
About this guide
BREW POS Admin: merchant how-to guide
Applies to: BREW POS Admin, master branch, 4 September 2026 snapshot.
Last reviewed: 17 September 2026 · Owner: Eddy
Still stuck?
Call BREW POS support on 1-800-676-9874. Tell them which step you reached and what the screen is showing.
Updated 19 September 2026 · BREW POS Admin, master branch, 4 September 2026 snapshot · Admin
BrewPOS How to use
Support 1-800-676-9874
Email [email protected]
© 2026 BREW POS. All rights reserved.
Privacy Policy | Terms and Conditions