
Setting up online ordering
Online ordering gives each of your locations its own ordering website. Customers pick from a menu you build, pay online, and collect their order when it is ready. This guide takes one location from nothing to a website that is switched on and taking orders: the web menu, the prices customers pay online, what the website says, how much notice the kitchen gets, and the hours you take orders.
It does not cover ordering from the table by QR code, or discounts on web orders. Both live on the same screen and each has its own guide.
Contents
Before you start
This guide is for owners and managers who already use BREW POS Admin.
You need two things before Online Ordering appears as a tab under Setup:
• Online ordering switched on for your business. If there is no Online Ordering tab at all, call BREW POS support on 1-800-676-9874.
• Online access on your own employee record. It is a tick box under Admin Permissions, set by whoever manages staff records. The guide Managing employees shows where it is.
Have these ready before you start:
• A logo as a PNG file with a transparent background. A logo saved on a white square shows as a white box on the website.
• A list of what you want to sell online. Not everything on your POS belongs on a website. Open items, refills and anything that needs a server's judgment usually stay off.
• Your online ordering hours. They do not have to match your opening hours. Many places stop taking web orders half an hour before the kitchen closes.
If you have more than one location, the screen shows a button for each one at the top. Prices, the website's settings and its hours are all set for the location you have selected, so check it before you change anything.
How online ordering fits together
Three things decide what a customer sees, and they are set in different places.
The web menu is the list of categories and products on the website. It is separate from the categories on your POS, and it is shared by all your locations. You build it on the Web Menu tab.
Whether a product is sold online at this location, and at what price. Each location has its own tick and its own web price for every product. You set these on the Web Prices tab, or on the product itself.
Whether the website is open. The Website On/Off switch has to be on, the time has to fall inside the hours you set under Availability, and the location has to be open for business that day. All three, or customers see your "not taking orders" message instead of the menu.
A product only shows on a location's website when it is in a web category and ticked for that location.
Step 1. Make your web categories
Your web categories are the headings a customer scrolls through: Burgers, Soups, Sides. Name them for a customer reading a phone, not for staff working fast. They do not have to match your POS categories.
1. Click Setup in the dark menu on the left, then the Online Ordering tab, then Web Menu.
2. Your web categories are listed on the left, and the products in the selected one on the right (Figure 1).
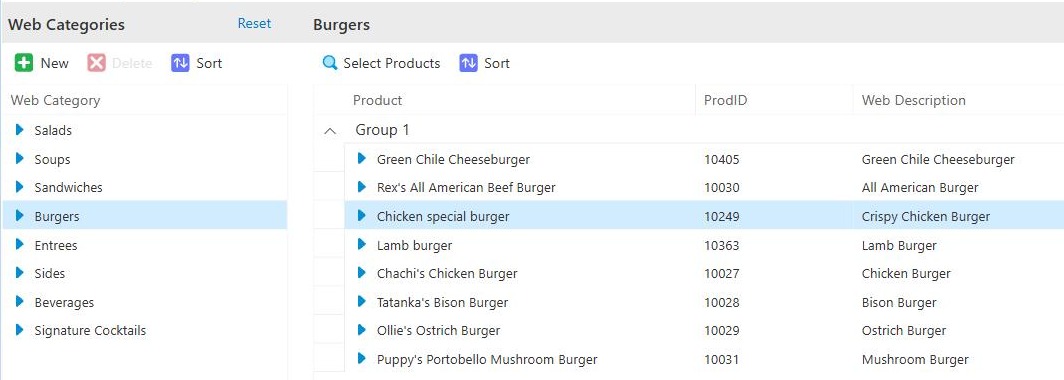
Figure 1. The Web Menu tab. Web categories on the left, the products in Burgers on the right
3. Click New above the list of categories. A blank web category opens.
4. In Web Category, type the heading customers will see, for example Soups.
5. Under Show for, choose Web for the ordering website only, QR for order-at-the-table only, or Both.
6. Under Menu Images, choose where product pictures sit: On the left, On the right, Not shown, or Small Tiles.
7. Optional: in Long Description, write a line that appears under the heading, for example Made from scratch in our kitchen every morning.
8. Optional: the tick boxes on the right set which days the category is offered, with a start and end time for each. All seven days are ticked from midnight to 11:59 PM to begin with. Untick a day to hide the category that day, such as a brunch menu that only runs at weekends.
9. Check it looks like Figure 2, then click Save at the top right. The new category appears in the list.
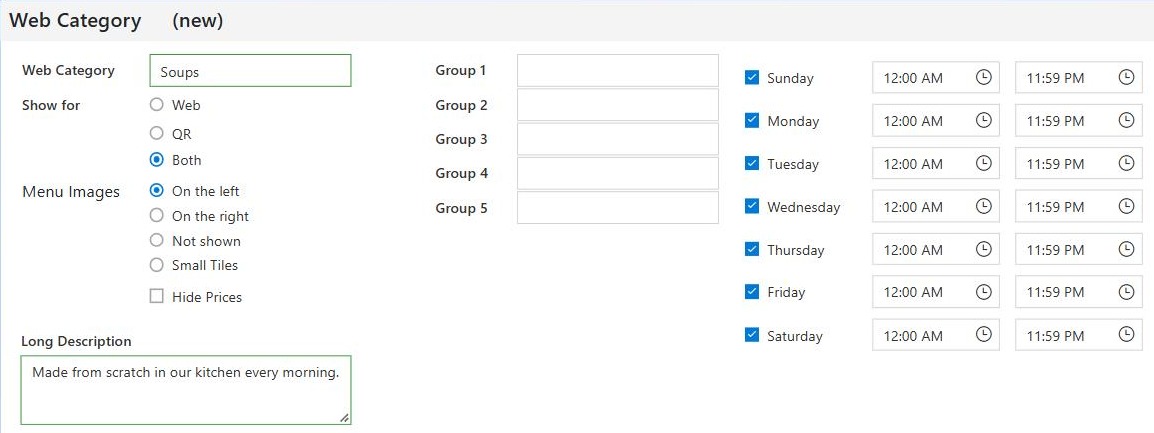
Figure 2. A new web category called Soups, shown on both the website and the table QR menu
Group 1 to Group 5 split a long category into sub-headings, for example Beef and Chicken under Burgers. Leave them empty if the category is short.
To change the order of the categories, click Sort above the list, select a category, and use Move Up and Move Down. Click OK to keep the new order.
Watch out: Reset replaces your whole web menu
The blue Reset link above the categories rebuilds the web menu from scratch. It creates web categories to match your POS categories and sets every web price back to the house price, for every location. The screen asks Reset the Web Menu? first, but there is no undo after Ok. Only use it if you want to throw your web menu away and start again.
Step 2. Put products in each category
1. Click the web category on the left, for example Soups.
2. Click Select Products above the products on the right. A list of your whole product catalog opens on the left, and the products already in this category on the right.
3. Type part of a product's name in Search, for example Soup.
4. Click the product you want. Hold Ctrl and click to pick more than one.
5. Click Add. The products move across to Selected Products (Figure 3).
6. To take a product out of the category, click it under Selected Products and click Remove.
7. Click OK at the top right. The products appear in the category (Figure 4).
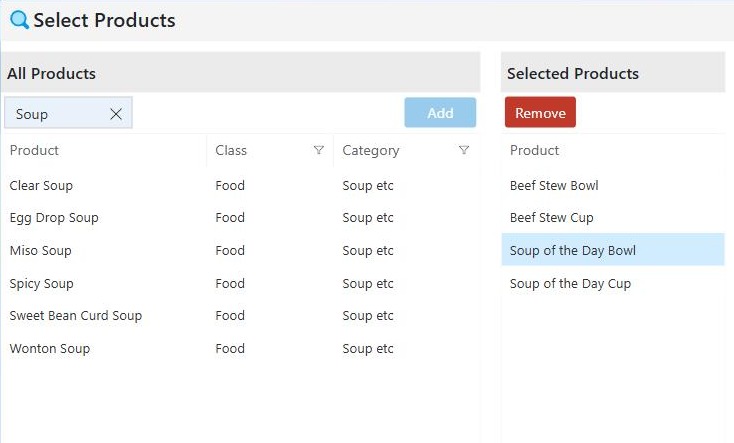
Figure 3. Four soups added to Soups
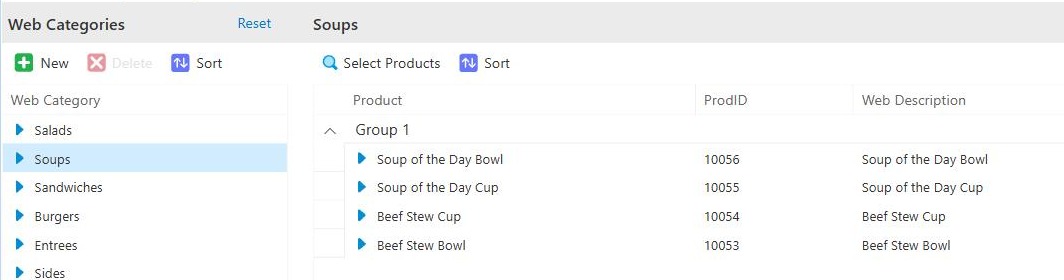
Figure 4. The Soups category with its four products
This is saved as soon as you click OK. There is no separate Save for it.
A product can only be in one web category. If you add a product that is already in another category, it moves to this one and leaves the other.
Put them in order. Customers read down the list and tend to order from the top of it, so put your best sellers and anything you are proud of first. Click Sort above the products, select one, use Move Up or Move Down (Figure 5), then click OK.
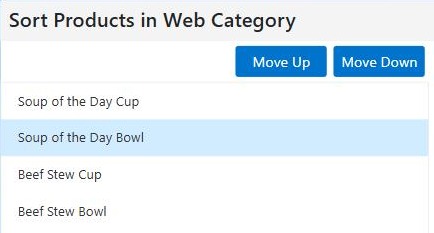
Figure 5. Sorting the products in Soups so cups come before bowls
Once every category is filled, click through each one and read it as a customer would. Nothing stops a product landing in the wrong place, such as a stew filed under Salads.
Step 3. Describe each product for customers
Each product has an Online Ordering section on its own record. That is where the customer-facing name, description and pictures live.
1. On the Web Menu tab, click the blue arrow beside the product. Its product record opens.
2. Click the Online Ordering bar to open that section (Figure 6).
3. In Web Description, type the name customers see. It starts as the product's POS name, which is often shortened for a tile. Chachi's Chicken Burger on the POS can simply be Chicken Burger online. The circular arrow beside it puts the POS name back.
4. In Long Description, say what is in it. This is what sells the dish online, where nobody is standing there to ask. For example: Half-pound beef patty, roasted Hatch green chile and melted cheddar on a toasted bun, with lettuce, tomato and onion.
5. Optional: under Small Image - shown on menu, click New and choose a picture. It is shown 88 pixels square beside the product, so use a square picture. Large Image - shown on product is shown 300 pixels wide when a customer opens the product.
Watch out: a product new to the web menu may have no price
When a product goes onto the web menu for the first time, its web price can be 0.00 and its tick box empty. Always check the Web Price for your location before the website goes on. Checking your web prices shows every price at once, which is the quickest way to catch one.
6. In the table at the bottom, find your location's row.
7. Tick the first box in that row to sell the product online at this location.
8. Type the Web Price.
9. Optional: tick Promotion to feature the product in the promotions section at the top of the website.
10. Click Save at the top right. The product record closes and you are back on the Web Menu tab.
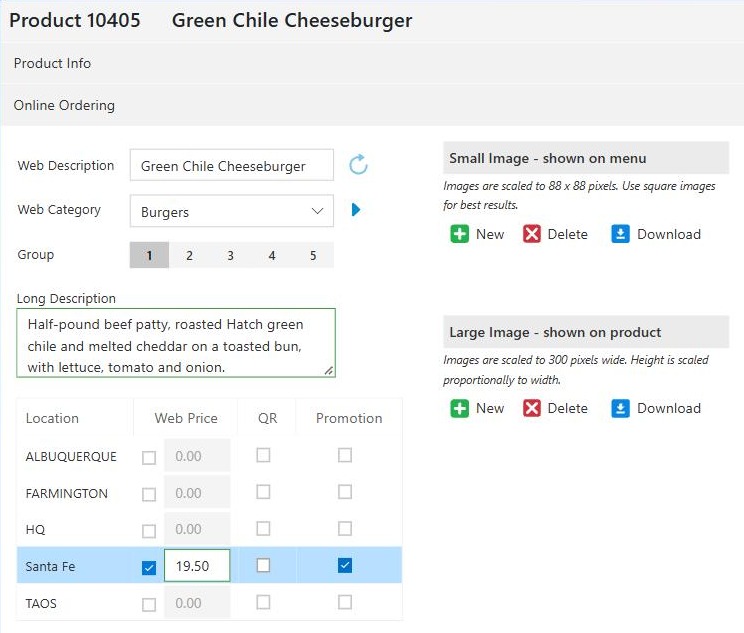
Figure 6. The Online Ordering section of a product, sold online at Santa Fe for 19.50 and featured as a promotion
Web Category on this screen is the same thing you set when you put products in each category. Changing it here moves the product to a different web category.
You can only change the rows for locations you have access to. The others are grayed out.
Step 4. Check your web prices
The Web Prices tab shows every product on your web menu for this location, with its house price and its web price side by side (Figure 7). It is the fastest place to set a lot of web prices at once, and the best place to check them before you go live.
1. On the Online Ordering tab, click Web Prices.
2. Read down the list. Each row has:
• House Price: what the product costs on your POS. You cannot change it here.
• Web Price: a tick box, then the price customers pay online. The tick means "sold online at this location." A row with no tick is grayed out and its price cannot be typed in.
• QR: whether it can be ordered from the table. This is for ordering from the table and is covered in its own guide.
• Promotion: whether it is featured on the website.
3. Tick the box for each product you want to sell online, and type its web price.
4. To make a web price match the house price again, click the circular arrow beside it (Reset to House Price).
5. Rows you have changed turn green, with a pencil at the left. Click Save at the top left to keep them, or Cancel to throw them away.
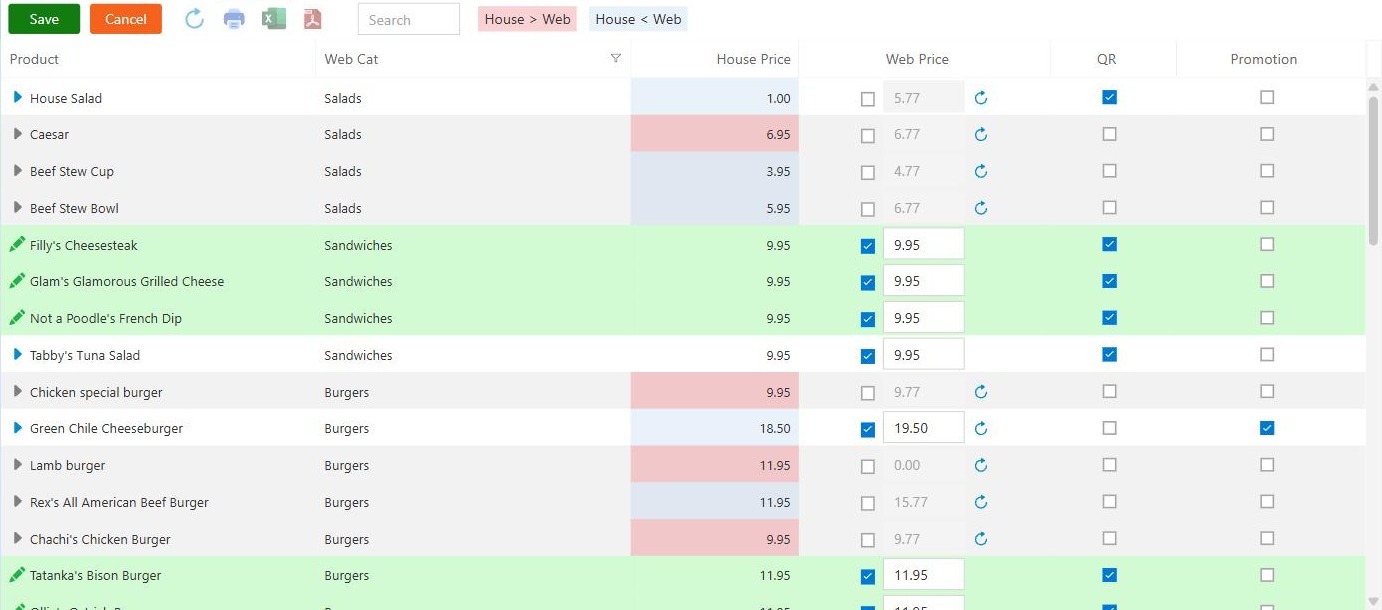
Figure 7. Web Prices part way through an edit. Green rows are changed and not yet saved. The shaded House Price cells show where the web price differs
While you have unsaved changes, the other tabs are grayed out. Save or cancel first.
The colors in House Price show where you charge differently online. The two boxes at the top of the screen are the key:
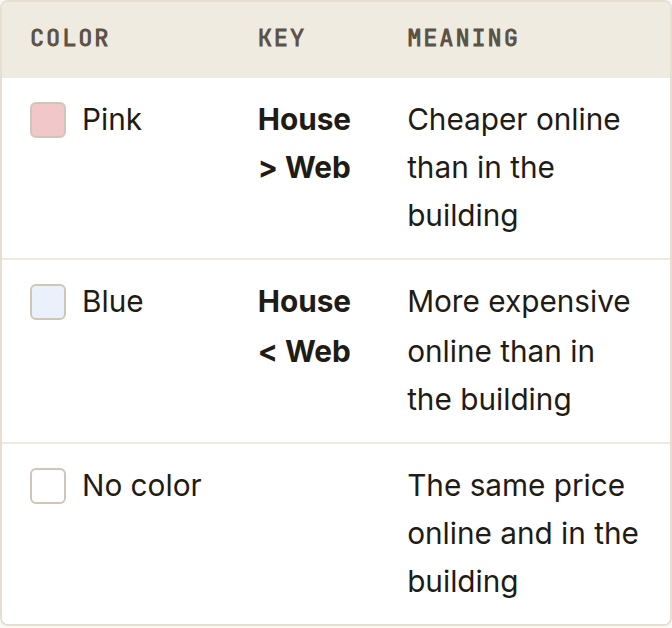
Scan the column for color and you can see your whole online pricing without reading a number. Some places charge a little more online to cover card fees and packaging. Others keep the prices the same so nobody feels cheated. Either is fine, as long as it is a choice.
House > Web and House < Web are only a key. They are not buttons, and clicking them does nothing.
Search narrows the list by product name or number. Print, Excel and PDF print or export the list as it is showing. With more than one location, Location and Product at the top switch between grouping the list by location or by product.
Step 5. Fill in what the website says
1. On the Online Ordering tab, click Configuration. Figure 8 shows the top half of it.
2. Fill in the left-hand column:
• Website Title: your business name as customers know it, for example Barking Pup Brewpub.
• Subtitle: a short line under the title, for example Burgers, brews and green chile in Santa Fe.
• Unavailable message: what customers read when you are not taking orders. See the tip below.
• Send SMS on Sent to Kitchen: tick it to text the customer when their order goes to the kitchen, and type the text underneath, for example Thanks! Your Barking Pup order is in the kitchen.
• Promotions title: the heading over the products you ticked as Promotion, for example Pup's Picks.
3. Choose how the website looks under Appearance:
• Theme: click a color. Pick one your logo shows up well against.
• Font and Categories. Categories sets how customers move between your web categories: Tabs, Dropdown or Continuous.
• Order It Again max: how many items the Order It Again section offers a returning customer. Set it to zero to hide the section. A regular reordering their usual is the easiest sale you will make.
• Button borders, Header gradient and Logo behind menu change the styling. Try them and look at the website.
• Prompt Tips: asks the customer for a tip at checkout.
• Popup Mods: shows a product's modifier choices in a pop-up box.
• Allow Line Item Notes and Allow Ticket Notes: let the customer add a note to one item, or to the whole order. Ticket Notes placeholder is the gray prompt in the note box, for example Allergies or special requests? Tell us here and we'll do our best.
4. Under Web Logo, click New, then Browse..., and choose your logo file. It appears on the screen straight away (Figure 8).
5. Click Save at the top right. Save turns green as soon as you change anything, and pale again once your changes are saved.
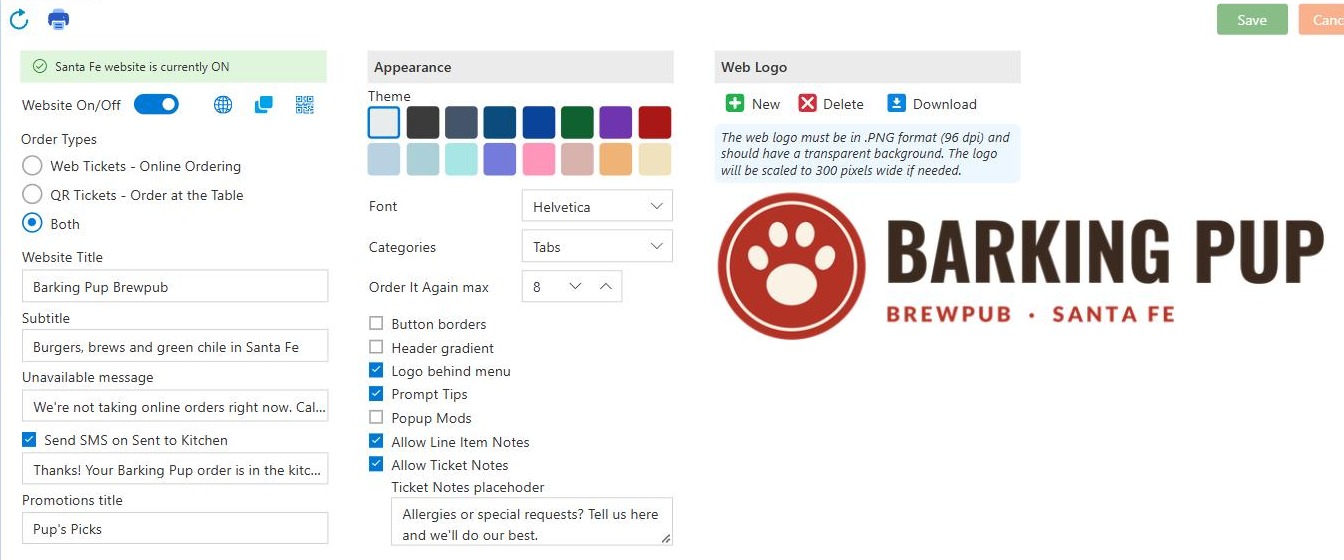
Figure 8. The Configuration tab filled in. The website is switched on at the top left
Write the unavailable message properly. Customers read it at the moment they wanted to give you money. Online ordering is currently unavailable is accurate but tells them nothing. Say what to do instead, such as call you, or when you start taking orders again.
Think before allowing notes. They are useful for allergies and genuine requests. They are also how a kitchen ticket gets extra crispy please on a Saturday night. Allow them if your kitchen can act on them.
The logo must be a PNG with a transparent background. It is shrunk to 300 pixels wide if it is bigger. It saves as soon as you choose it, without the Save button. Delete removes it and Download saves a copy of the one in use.
Step 6. Give the kitchen enough notice
Scroll down the Configuration tab to Web Tickets - Online Ordering (Figure 9).
1. In Lead Time, type how many minutes you need between an order being placed and the customer collecting it. The earliest pickup time a customer can choose is now plus this many minutes. 20 suits most kitchens. Raise it on nights you know will be busy.
2. In Minutes to Prep, type how long the order takes to make. Each web ticket is sent to the kitchen automatically this many minutes before its pickup time. For an order due at 6:30 with 12 minutes to prep, the kitchen gets it at 6:18.
Watch out: Manual Fire means someone has to be watching
With Manual Fire ticked, a web order sits and waits until a member of staff sends it. If nobody is looking, it never reaches the kitchen, and the customer turns up for food that was never made. Only tick it if someone will be responsible for web tickets every hour you take them.
3. Leave Manual Fire unticked for most kitchens. Ticked, web tickets are not sent automatically: staff must review each one and send it themselves.
4. In Order accepted message shown after payment, type what the customer sees once they have paid, for example Thanks for your order! We'll text you when it's ready to pick up.
5. Click Save at the top right. Save goes pale again once the changes are kept.
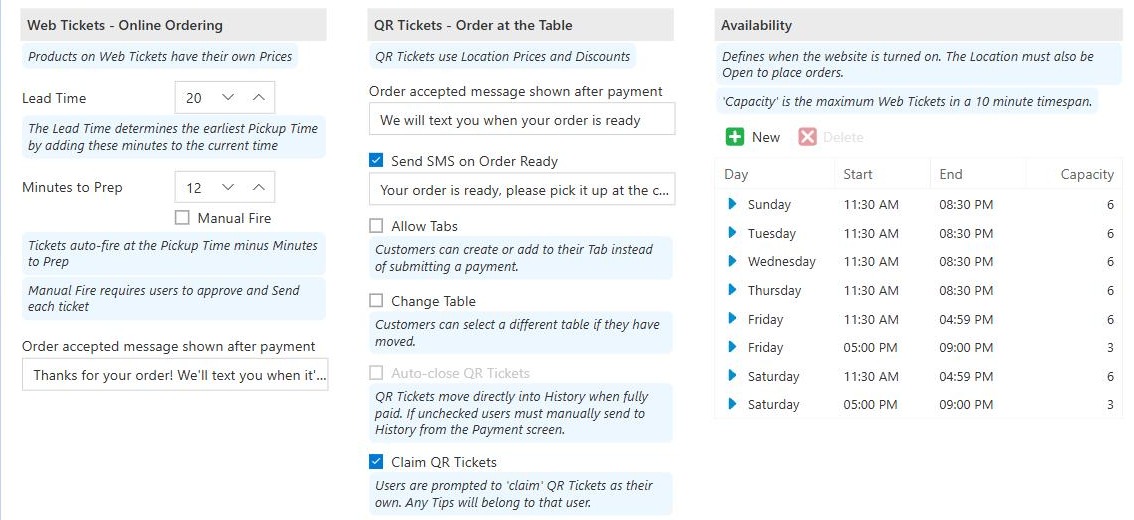
Figure 9. Pickup timing on the left, the QR settings in the middle, and the ordering hours on the right
The middle column, QR Tickets - Order at the Table, is for ordering from the table and is covered in its own guide.
Step 7. Set the hours you take orders
Availability, at the right of the Configuration tab, is the list of times the website takes orders. Outside them, customers see your unavailable message.
Each row is one day and one stretch of time. A day can have more than one row, such as lunch and dinner with different limits.
1. To change a row, click the blue arrow beside it. To add one, click New above the list. A small Availability Time box opens (Figure 10).
2. In Day, pick the day.
3. In Start and End, type the times, for example 11:30 AM and 8:30 PM.
4. In Capacity, type the most web orders the website should take in any ten minutes. A new row starts at 99, which is as good as no limit.
5. Click Ok. The row is saved straight away, without the Save button.
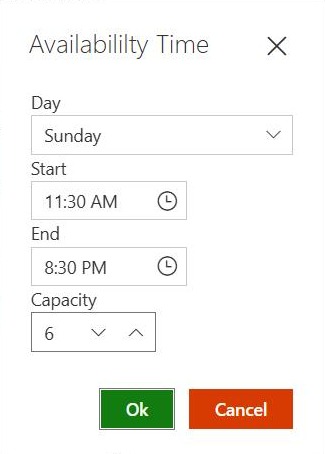
Figure 10. Sunday: web orders from 11:30 AM to 8:30 PM, up to six every ten minutes
Two rows for the same day cannot overlap. Where you split a day, end the first row a minute before the second starts: lunch 11:30 AM to 4:59 PM, dinner 5:00 PM to 9:00 PM. If they overlap, Timespan overlaps with an existing record appears and the row is not saved. If the end is before the start, you see Invalid Timespan.
To remove a row, click it once, click Delete above the list, then Ok.
A day with no rows takes no web orders at all. That is how you close online ordering on the day you are shut.
Use Capacity to protect your busiest hours. In Figure 9, Friday and Saturday dinner take three orders every ten minutes instead of six, because the dining room is full.
Step 8. Switch the website on
1. At the top of the Configuration tab, click the Website On/Off switch. The box above it turns yellow and reads website will be turned ON when you Save (Figure 11).
2. Click Save at the top right. The box turns green and reads website is currently ON.
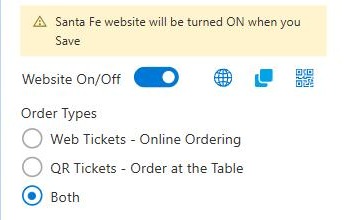
Figure 11. The switch is on, but the website is not live until you click Save
To stop taking web orders for a while, for example when the kitchen is overwhelmed, click the switch off and click Save. Customers see your unavailable message until you switch it back on.
The three icons beside the switch are:
• The globe: opens your ordering website in a new browser tab.
• The overlapping squares: copies the website's address, to paste into your own website, Google Business profile, social media or emails.
• The QR code: makes a Word document of QR codes to print for your tables. See the QR ordering guide.
Step 9. Look at it as a customer
1. Click the globe beside Website On/Off. Your ordering website opens in a new tab.
2. Read what it says.
Outside the hours in Availability, you see your title, address, phone number, subtitle and unavailable message, and nothing else (Figure 12). That is correct. It is also what customers see while the website is switched off.
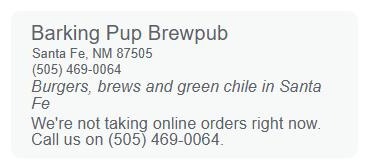
Figure 12. The website outside ordering hours: the unavailable message typed on the Configuration tab
Inside your hours, the website asks for the customer's phone number and texts them a code to prove it is theirs (Figure 13). Then they see your menu.
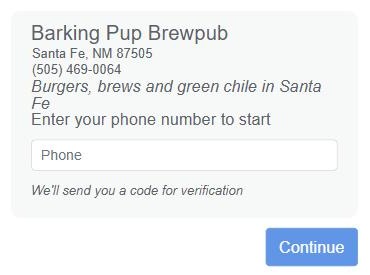
Figure 13. The website during ordering hours: customers start with their phone number
Place a real order yourself before you tell anyone about the website. Use your own phone, during your ordering hours. Order something small, pay for it, and watch three things:
• The order reaches the kitchen at the time you expect, from the timing you set under giving the kitchen enough notice.
• The texts you set up arrive, and read the way you meant.
• The price you paid is the web price you set under checking your web prices.
Then click through every web category on your phone. Most of your customers will order from one.
Reference
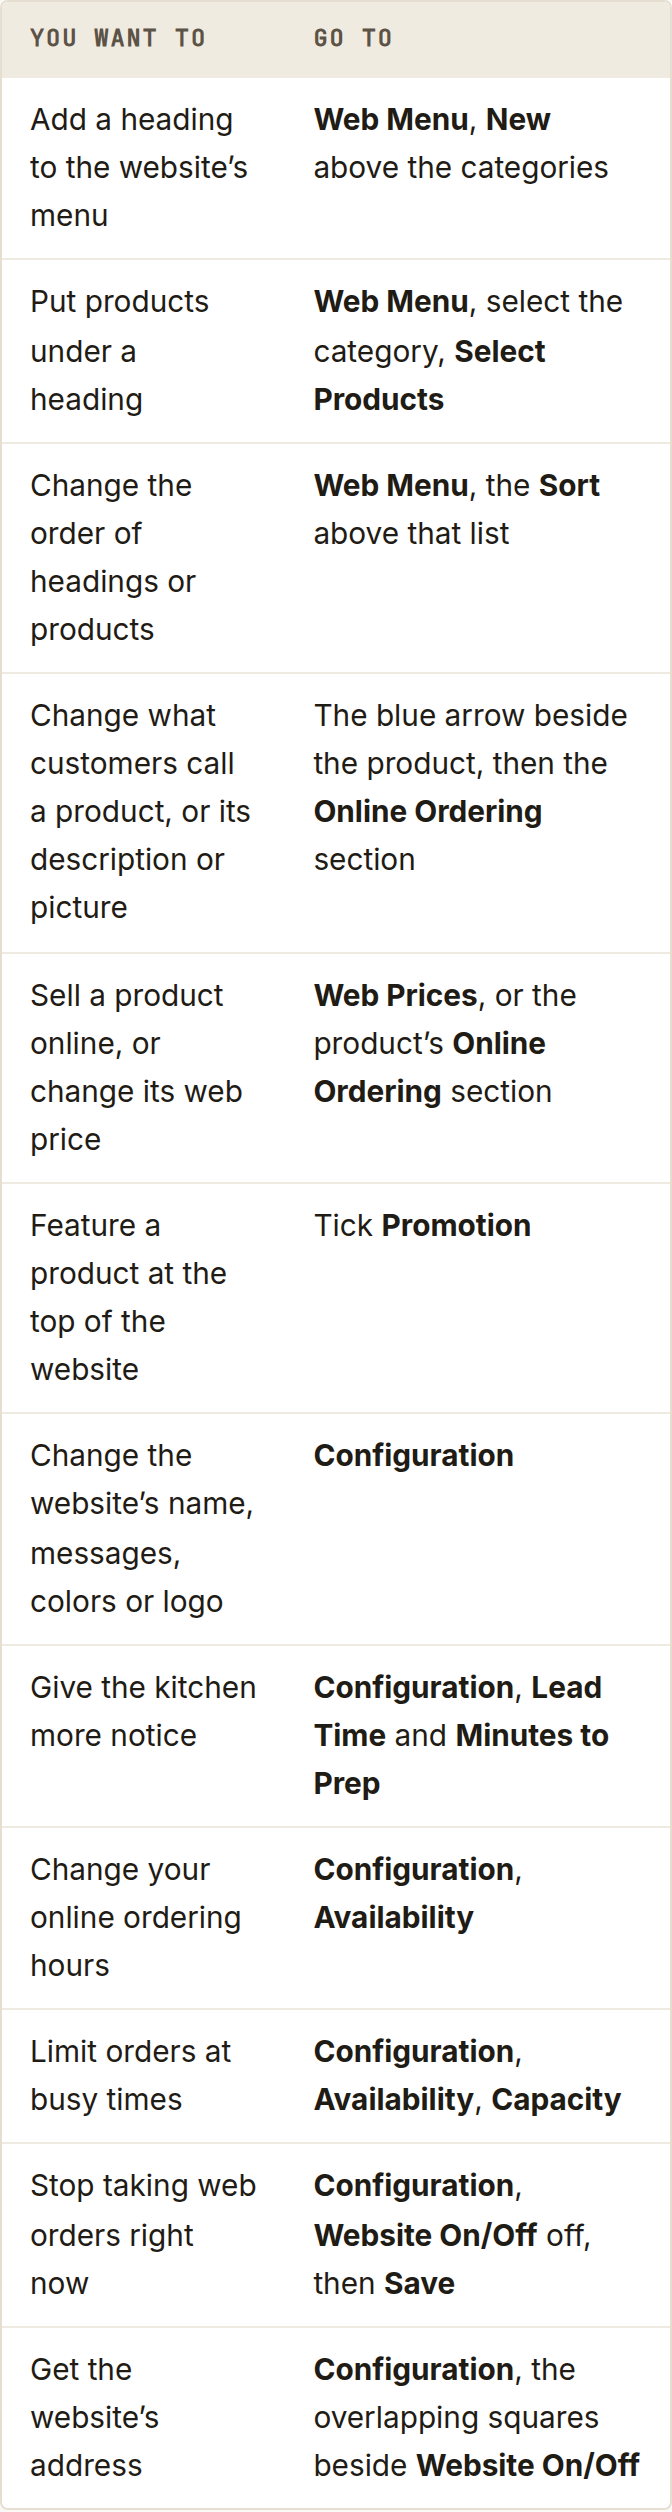
Troubleshooting
There is no Online Ordering tab under Setup. Either online ordering is not switched on for your business (call BREW POS support on 1-800-676-9874), or your employee record does not have Online ticked under Admin Permissions (ask whoever manages staff records).
Customers see the unavailable message when we should be open. Check all three: Website On/Off is on and saved, today has a row under Availability covering this time, and the location is open for business today.
A product is missing from the website. It needs to be in a web category (Web Menu) and ticked for this location (Web Prices). One without the other is not enough.
A product shows the wrong price online. Online orders use the Web Price, not the house price. Check it on Web Prices.
A product shows 0.00 online, or its web price box is grayed out. The box is grayed out until the product is ticked for this location. Tick it, type the price, and click Save.
I can't click Configuration or Web Menu. You have unsaved changes on Web Prices. Click Save or Cancel there first.
Two availability rows will not save. They overlap. End one a minute before the next begins.
The earliest pickup time is later than we expected. Check Lead Time under Configuration. The earliest pickup a customer can choose is now plus that many minutes.
Web orders are not reaching the kitchen. Check Manual Fire. If it is ticked, each web ticket waits for a member of staff to send it.
All my web prices changed back to the house prices. Someone clicked Reset on the Web Menu tab. It cannot be undone, so the prices have to be put back by hand on Web Prices.
The logo shows as a white box. The file does not have a transparent background. Save it again as a PNG with transparency, then Delete the old one and upload the new one.
Customers are not getting texts. Check Send SMS on Sent to Kitchen is ticked and has a message.
Customers can't leave notes. Tick Allow Line Item Notes, Allow Ticket Notes or both, and click Save.
Next: Ordering from the table by QR code.
About this guide
BREW POS Admin: merchant how-to guide
Applies to: BREW POS Admin, master branch, 4 September 2026 snapshot.
Last reviewed: 24 September 2026 · Owner: Eddy
Still stuck?
Call BREW POS support on 1-800-676-9874. Tell them which step you reached and what the screen is showing.
Updated 29 September 2026 · BREW POS Admin, master branch, 4 September 2026 snapshot · Admin
BrewPOS How to use
Support 1-800-676-9874
Email [email protected]
© 2026 BREW POS. All rights reserved.
Privacy Policy | Terms and Conditions