
Setting up discounts
Discounts live in BREW POS Admin under Setup, then Discounts. There are four everyday kinds: a timed discount such as a happy hour, a button staff press at the POS, a staff discount, and a discount for one customer. Each has its own section below. Go straight to the one you need.
Discounts for online orders are on the Web tab and are not covered here.
Before you start
This guide is for owners and managers who set prices. It assumes your products and categories are already built.
You need Discounts access. Open Setup and look along the row of tabs. If there is no Discounts tab, ask whoever manages staff to add it to your employee record.
Choose the right kind of discount
Open Setup, then Discounts. Each kind of discount has its own tab (Figure 1).
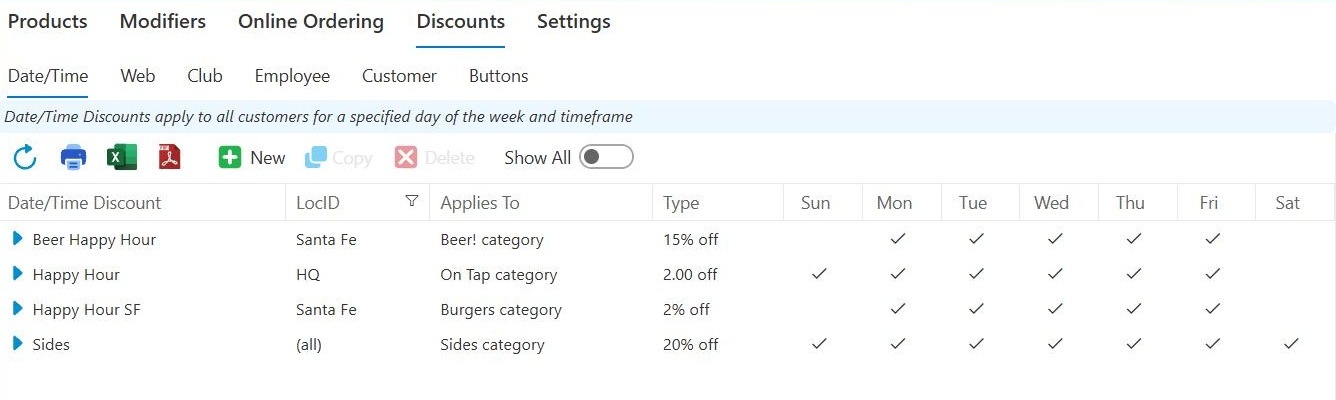
Figure 1. The Discounts screen with the Date/Time tab open. Each tab is a different kind of discount. The column headed LocID shows the location
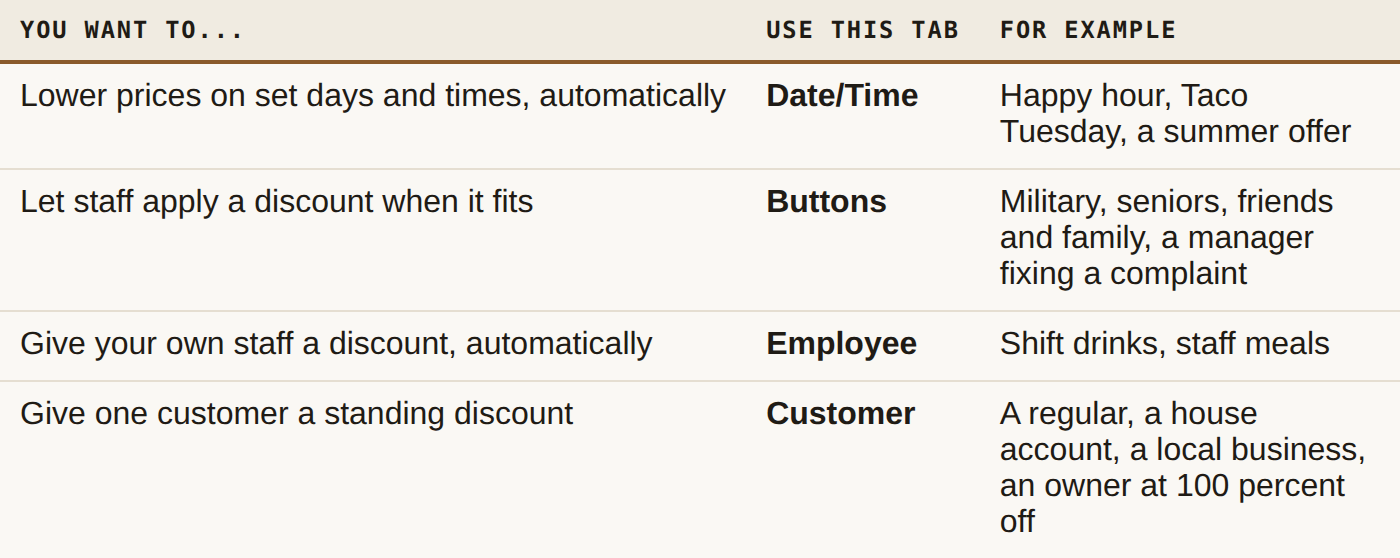
Pick the tab that matches who should get the price. A happy hour built as a button only works when staff remember to press it. Built on Date/Time, it runs on its own.
You may also see Web and Club tabs. Web appears only if you take online orders. Club appears only if you run club memberships.
Set up a happy hour or timed promotion
Use the Date/Time tab for any price that should change by itself on certain days, at certain times. Nobody at the POS has to do anything. These steps build a happy hour: 15 percent off beer, Monday to Friday, 3 to 6.
Start the discount
1. On the Discounts screen, click the Date/Time tab.
2. Click New. An empty discount opens (Figure 2).
3. In Description, type a name you will recognise in the list, such as Beer Happy Hour. Each name on this tab must be different.
4. If you have more than one location, choose one in Location, or leave it on (all) to run it everywhere. Businesses with one location do not see this box.
5. Optional: in Marquee, type a short line such as Beer Happy Hour 3 to 6. The discount works without it, so you can leave it empty.
A new discount opens with every day ticked and with dates running about fifty years ahead, such as 9/19/26 to 9/20/76. That is normal. It means the discount runs until you stop it.
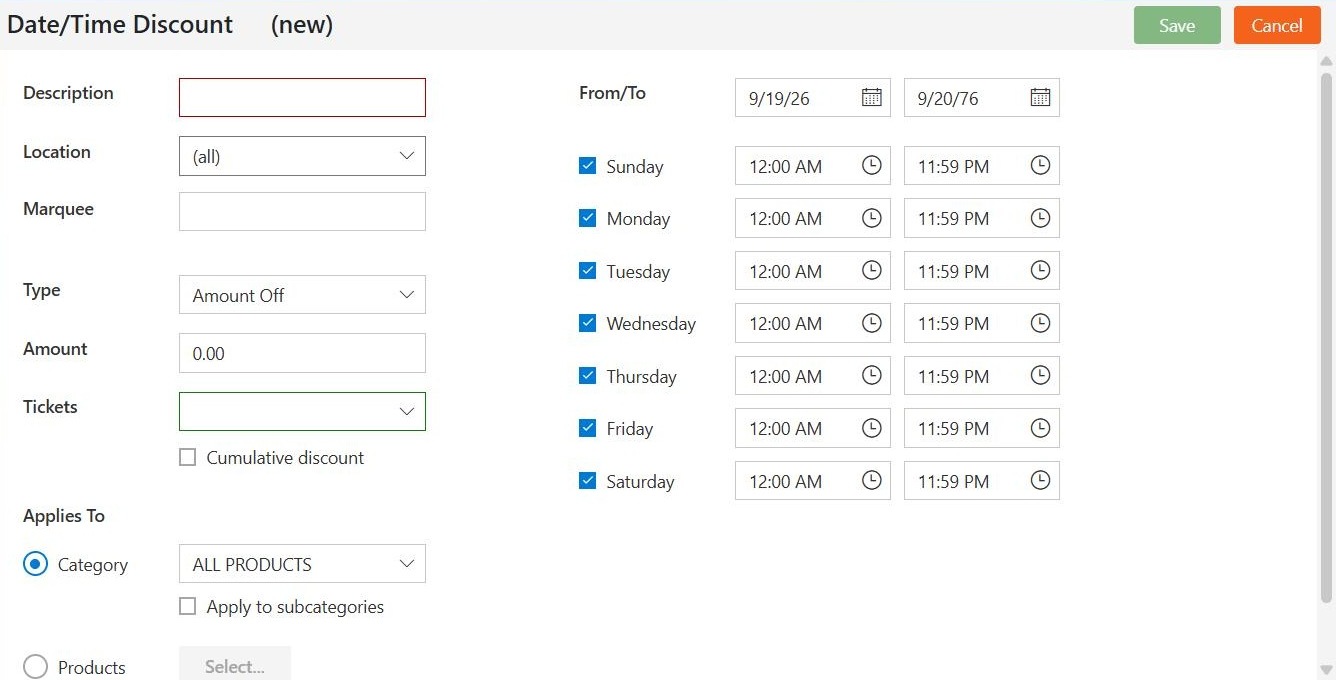
Figure 2. A new Date/Time discount. Description is outlined in red until you type a name
Set the discount
6. In Type, choose how the price changes (Figure 3):
• Percent Off takes a percentage off, such as 15 percent.
• Amount Off takes a dollar amount off, such as 2.00.
• Set Price charges a fixed price, such as 5.00.
7. In Amount, type the number that goes with it. For this happy hour, choose Percent Off and type 15.
Double-check that Type and Amount go together. 20 with Percent Off is 20 percent off, but 20 with Amount Off is twenty dollars off. Nothing on the screen will catch the mix-up for you.
8. If you take online or QR orders, a Tickets box appears. Choose Inhouse & QR to run the offer everywhere, or QR Only to keep it for table orders.
9. Leave Cumulative discount unticked. Ticking it lets this discount add on top of other discounts. See If more than one discount could apply.
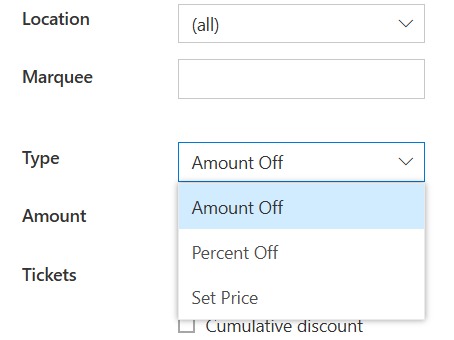
Figure 3. The three choices in the Type box
Choose what it covers
10. Under Applies To, leave Category selected. Open the category box and choose Beer! (Figure 4).
11. Tick Apply to subcategories. The discount now covers everything filed under Beer!: On Tap, Bottles, Imports and Growlers.
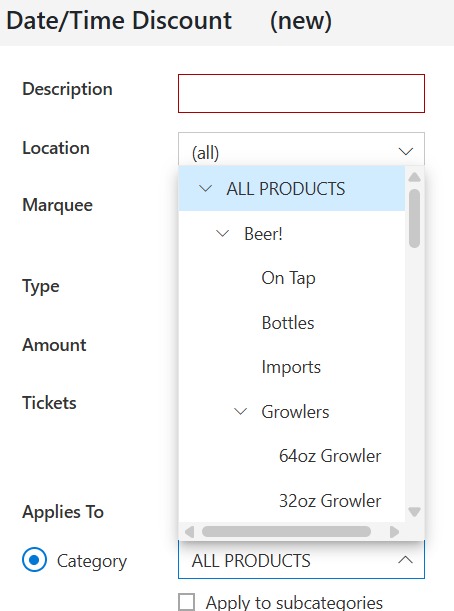
Figure 4. The category list on a Date/Time discount, with Beer! and the four categories under it
Optional: to discount particular products instead of a category, choose Products, then click Select.... Search for each product, click Add, and click OK when you are done (Figure 5). Picking products one by one lets you build a discount that covers exactly the items you want and nothing else.
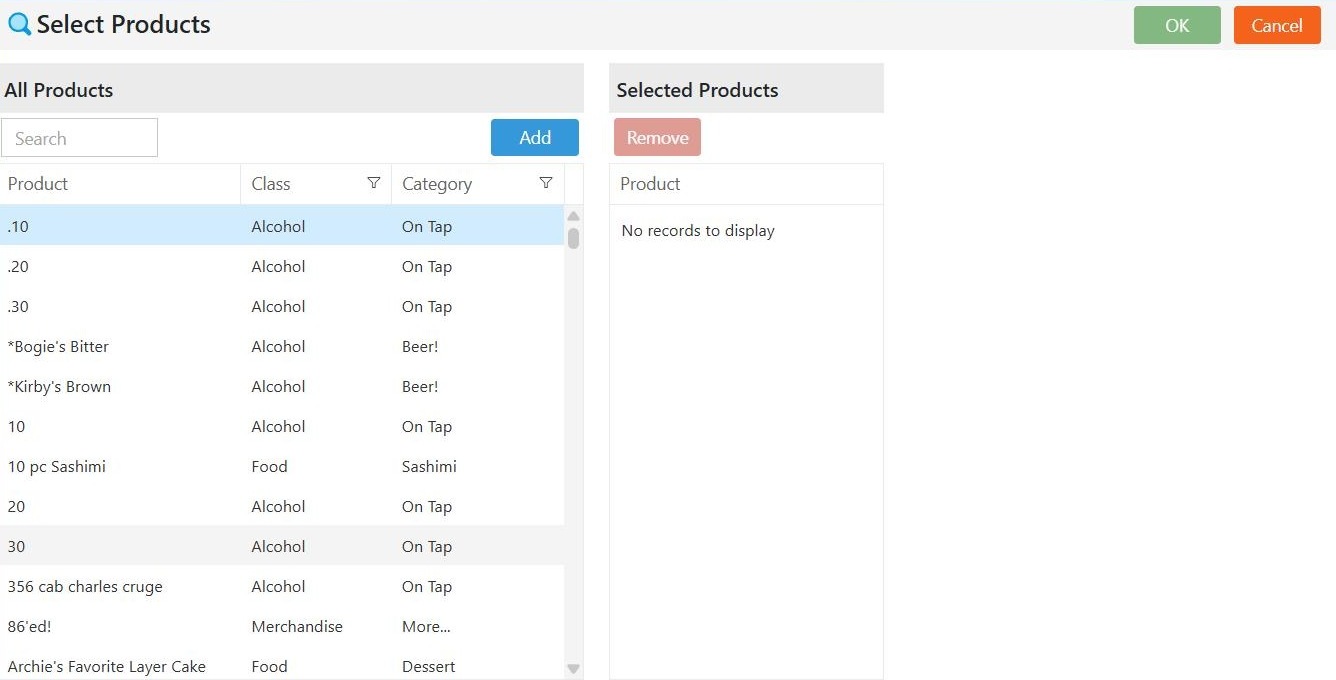
Figure 5. Choosing products. Search on the left, click Add, and the product moves to the right
Choose when it runs
12. Decide how long the offer runs:
• To run it until you stop it, leave From and To as they opened. The end date is years away, so the discount keeps running.
• To run it for a set period, click the small calendar icon beside From and pick the first day, then do the same beside To for the last day (Figure 6). Use the calendar rather than typing: the system misreads typed dates.
Setting dates lets you build an event well ahead: a holiday, a big game, a pool tournament. The discount turns itself on and off on those dates, so nobody has to remember to start or stop it. The days and times in steps 13 and 14 then decide the hours it runs on each of those dates.
On the first and last dates, the Discounts list shows the offer as not running. If you need it on those exact days, ring up an item at the POS that day and make sure the discount comes off.
13. On the right, untick Sunday and Saturday (Figure 7 shows the finished days).
14. In each ticked day, set the start time to 3:00 PM and the end time to 6:00 PM. You can type times straight into these boxes.
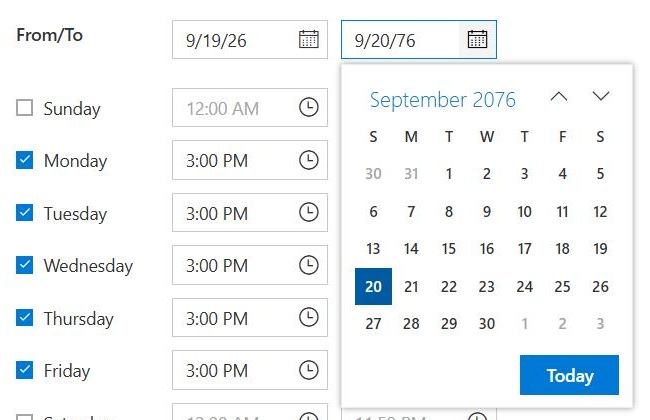
Figure 6. The calendar behind the To box. Click the month at the top to jump between months and years
Save it
15. Compare your screen with Figure 7, then click Save.
The list opens again with your happy hour in it. The list shows the days it runs but not the hours, so open the discount if you need to check its times.
To check it is working, ring up a beer at the POS during happy hour and look at the price.
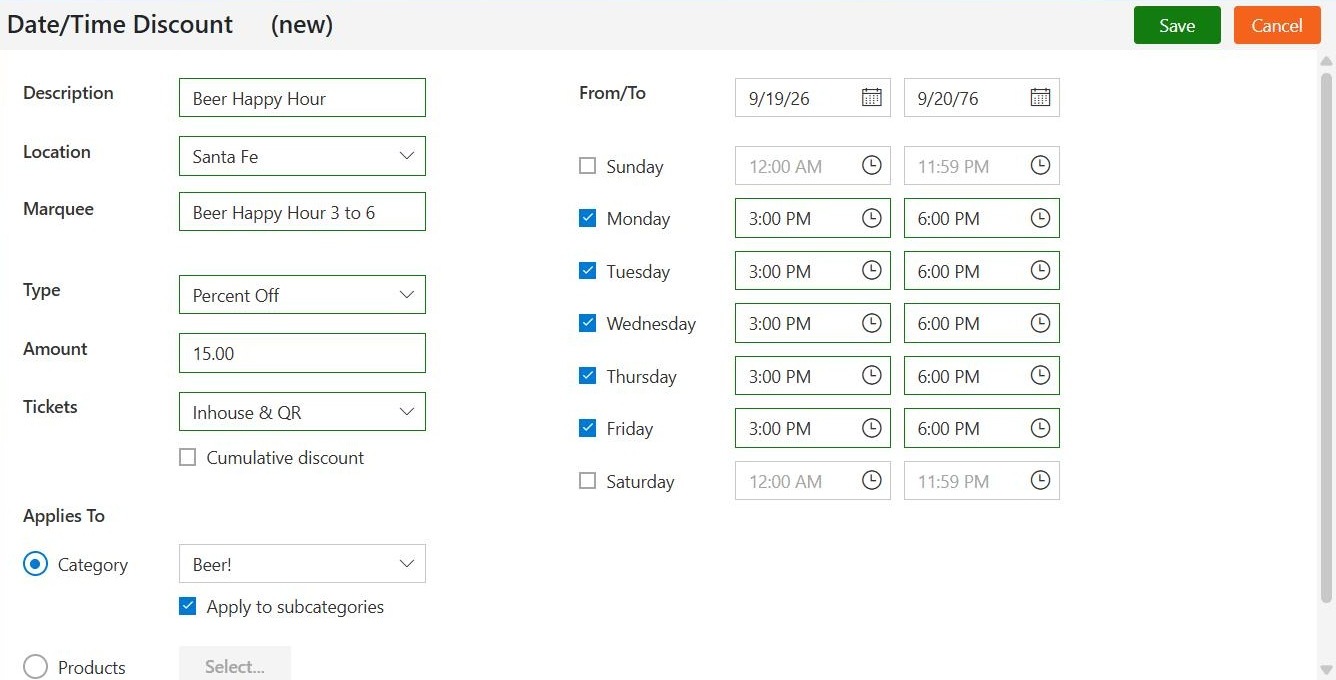
Figure 7. The finished happy hour: 15 percent off Beer! and everything under it, Monday to Friday, 3 to 6, at one location
Build a bigger happy hour from several discounts
One discount gives one kind of deal. A real happy hour often has several: money off the beer, half-price burgers, cheap appetizers. Build each deal as its own Date/Time discount and give them all the same days and times. At the POS they run together, and your guests see one happy hour.
For example, a Monday to Friday happy hour from 3 to 6 might be three discounts:

To build it:
1. Build the first discount with the steps in Set up a happy hour or timed promotion.
2. Click New and build the next one the same way. Change only the name, the Type and Amount, and what it applies to.
3. Tick the same days and type the same start and end times on each one.
4. Repeat for every deal, then ring up one item from each at the POS during happy hour to check the prices.
A few tips make a set like this easier to run:
• Start every name the same way, such as HH Beer and HH Burgers. They then sit together in the list and you can see the whole happy hour at a glance.
• Keep each item in one deal only. If a product is in two of them, the POS charges the lower price, not both. See If more than one discount could apply.
• Change them together. To move happy hour to 4 to 7, open each discount in the set and change its times. One left behind will still run at the old hours.
The same idea works for any event: a game day, a beer release or a holiday weekend. Build one discount for each deal and give them all the same dates, days and times.
If more than one discount could apply
A beer might be in the happy hour and also on a regular's 10 percent discount. When that happens, the POS charges the lower of the two prices. It does not add the discounts together.
The Cumulative discount box changes that. Tick it and the discount can be added on top of others. Only tick it when you mean to stack discounts, and try it on your most discounted item at the POS before you rely on it.
Add a discount button for staff
A discount button sits on the discount screen at the POS. A server or manager chooses when to use it, on one item or on the whole ticket. Use buttons for offers where someone has to check something first: a military ID, a senior, a friend of the owner.
A new button can be used as soon as you save it.
Build the button
These steps build a Friends & Family button: 20 percent off any item. For your own button, swap in your own name and amount.
1. On the Discounts screen, click the Buttons tab, then click New (Figure 8).
2. In Description, type the words staff will see on the button, such as Friends & Family. Use 16 characters at most, counting spaces. Military fits. Military Discount does not, and would be cut short.
3. If you have more than one location, choose one in Location, or leave it on (all).
4. In Type, choose Percent Off. In Amount, type 20.
5. In Ticket, choose whether the button discounts one item or the whole ticket. For this button, choose Line Items.
• Line Items discounts one item. The server selects the item on the ticket, then presses the button, and only that item comes down. Use it for a comped dish that came out wrong, or 20 percent off a T-shirt.
• Order Total discounts the whole ticket, whatever is on it. Use it for 10 percent off the bill for a friend, or 5.00 off a party's check. The Applies To section disappears, since the button covers everything.
• Both puts the choice on the POS, so staff can use the button either way. For military or seniors, this is usually the easiest.
This matters most with Amount Off. 5.00 on Line Items takes 5.00 off the item the server selected. 5.00 on Order Total takes 5.00 off the whole ticket.
Only buttons have this choice. A happy hour, staff discount or customer discount always comes off each item it covers, never the ticket total.
6. Leave Cumulative discount unticked, so this button does not add on top of other discounts.
7. If the discount should only go to someone with a customer record, tick Customer required. The button then only works on a ticket with a customer on it. For most buttons, leave it unticked.
8. If you chose Line Items or Both, leave Applies To on ALL PRODUCTS for a button that works on anything. To limit it, pick a category the same way as for a happy hour.
9. Leave every day ticked for a button that is always available.
10. Compare your screen with Figure 9, then click Save.
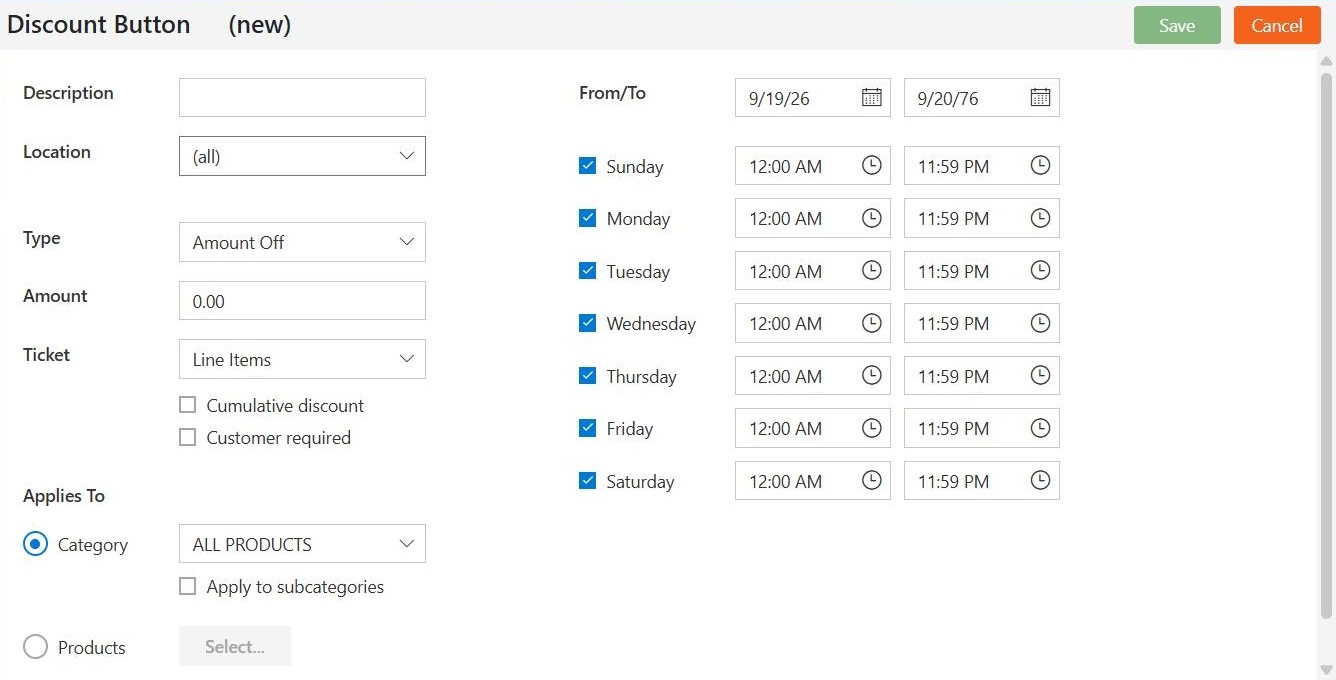
Figure 8. A new discount button. Ticket and Customer required only appear on this tab
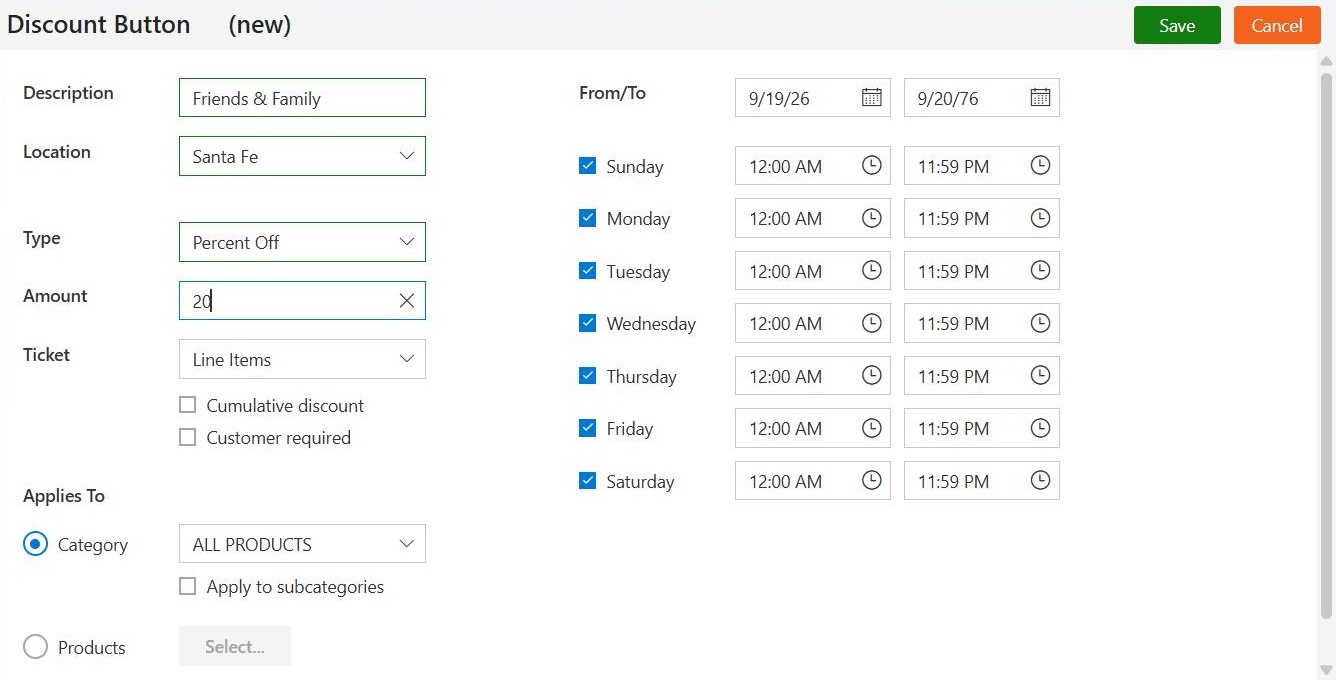
Figure 9. The finished button: 20 percent off one item, at one location
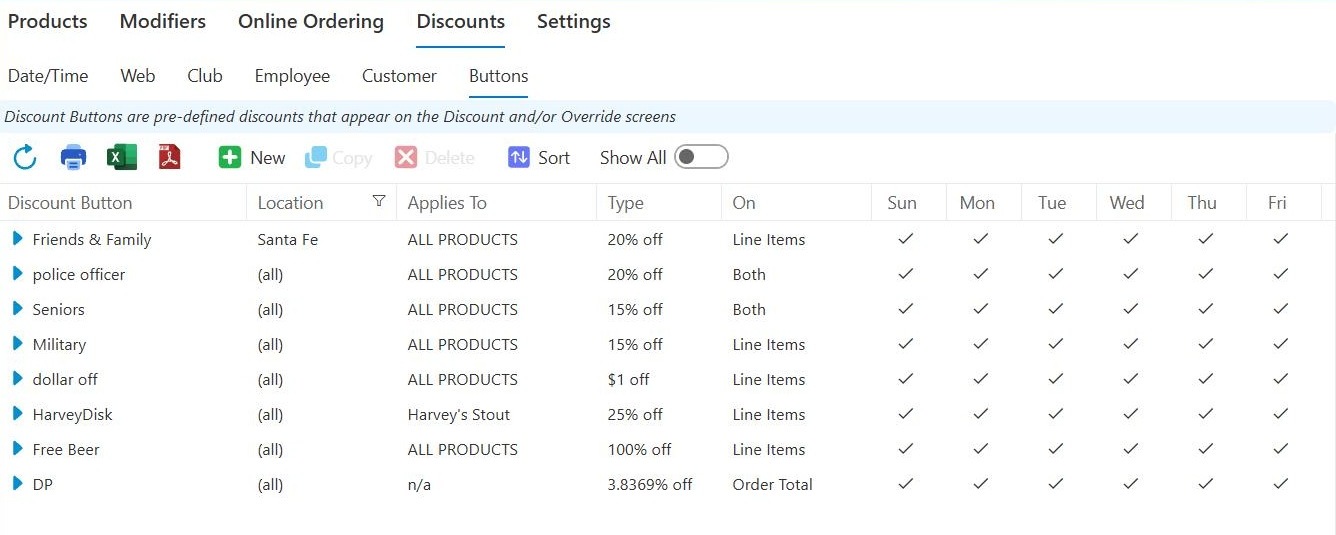
Figure 10. The Buttons list. The On column shows what each button works on
The Buttons list opens with your new button in it, alongside any buttons already set up (Figure 10). Your list will show your own buttons. The On column shows whether each button works on one item, the whole ticket, or both.
Optional: put the buttons in order
Staff see the buttons in the same order as this list. A new button does not always land at the top.
1. On the Buttons tab, click Sort (Figure 11).
2. Click a button, then click Move Up or Move Down.
3. Click OK.
Put the buttons staff use every shift at the top.
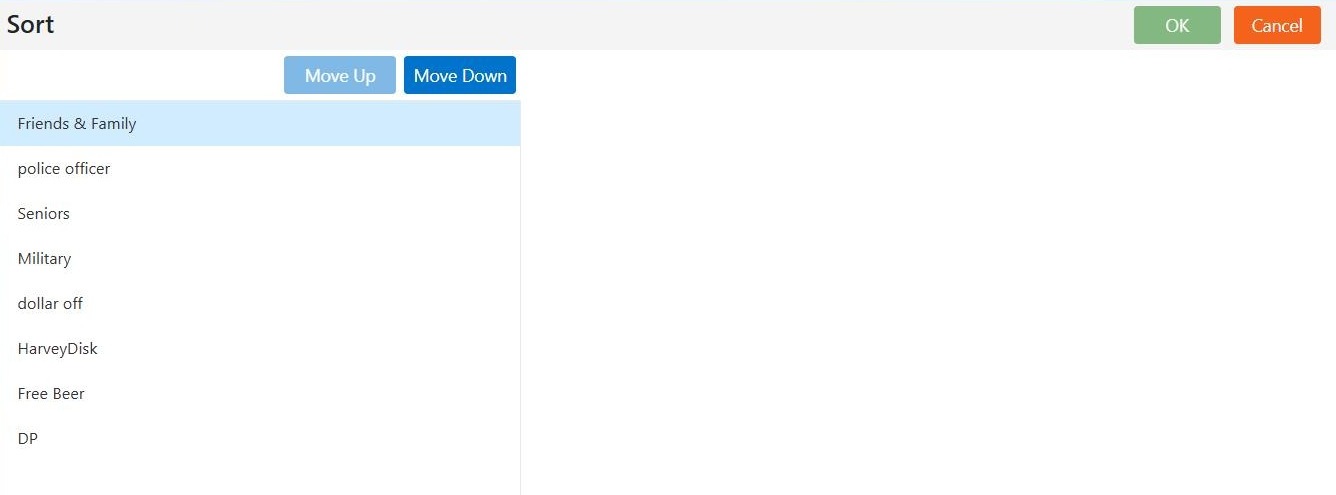
Figure 11. The Sort screen sets the order staff see the buttons in
Decide who can press them
Who can discount is set on each person's employee record, not here. Under Employees, Discounts lets someone discount at all, and Only Discount Buttons limits them to the buttons you built. See the Managing employees guide.
Give your staff a discount
Use the Employee tab for your staff pricing: the shift drink, the staff meal, a discount on merchandise. You set it once and it covers every location.
There is nothing to set up on your staff first. When you add an employee, BREW POS also makes a customer record for them, already marked as an employee. You can see this on any staff member's customer record: Employee is ticked (Figure 12). So once you build the discount below, every employee gets it. You do not need to open their employee record or their customer record.
At the POS, the discount comes off automatically when that staff member's customer record is on the ticket. Nobody has to press a button.
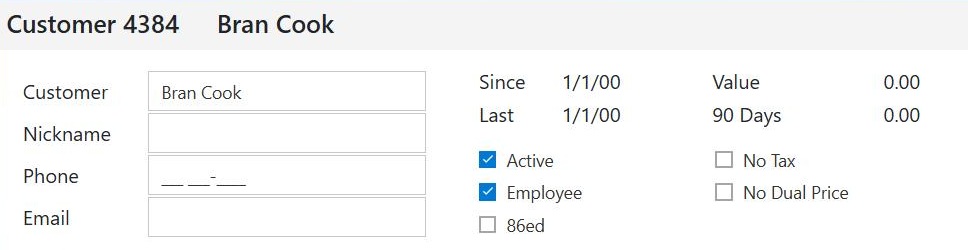
Figure 12. A staff member's customer record, with Employee already ticked
Build the staff discount
1. On the Discounts screen, click the Employee tab, then click New (Figure 13).
2. In Description, type what it covers, such as Staff Drinks. If food and drink get different rates, build one discount for each.
3. In Type, choose Percent Off. In Amount, type 25.
4. Leave Cumulative discount unticked.
5. Under Applies To, choose Beer! and tick Apply to subcategories.
6. Leave the dates and days as they are for a discount that always applies. To limit it to certain days, untick the others. Keep at least one day ticked.
7. Compare your screen with Figure 14, then click Save.
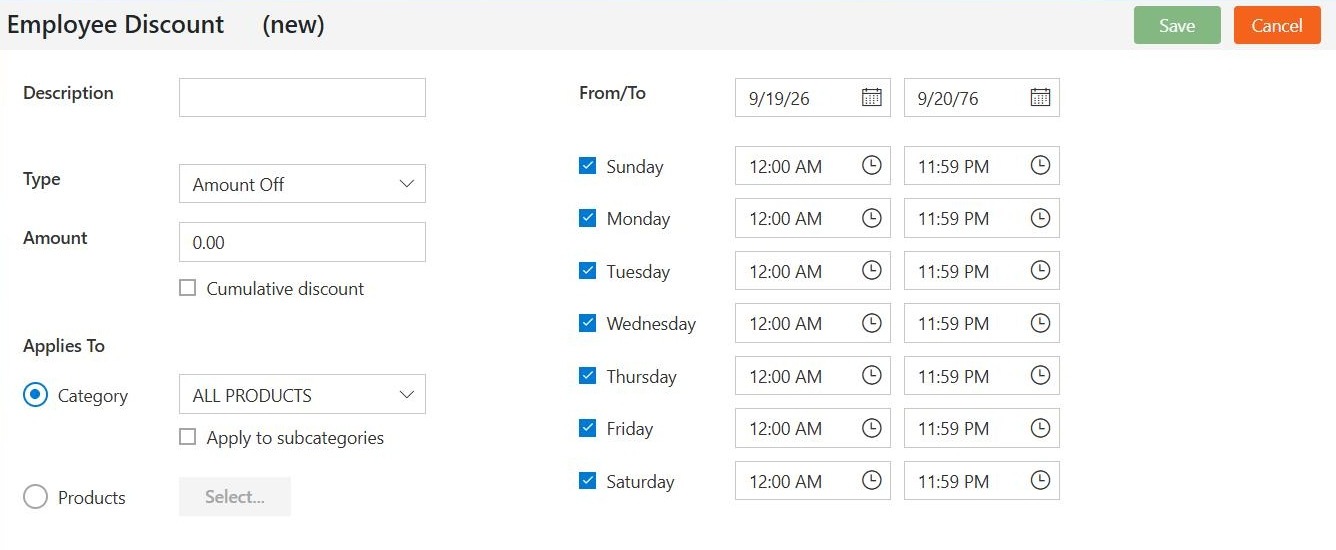
Figure 13. A new staff discount. It has no Location box, because it covers every location
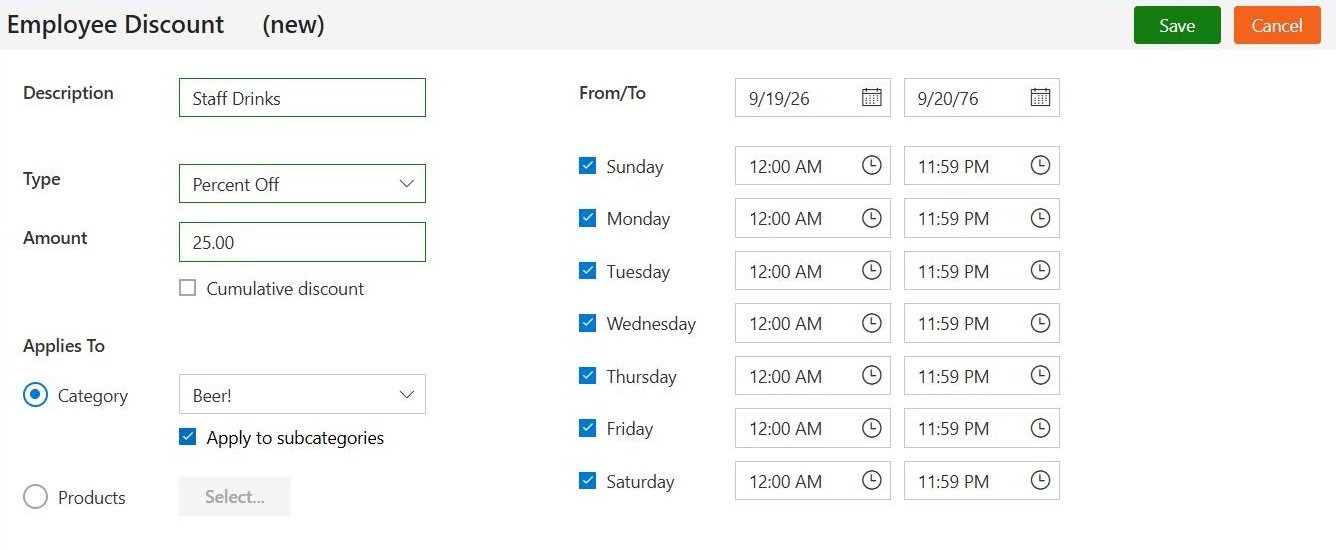
Figure 14. A finished staff discount: 25 percent off Beer! and everything under it, every day
The Employee tab lists each staff discount on its own line (Figure 15).
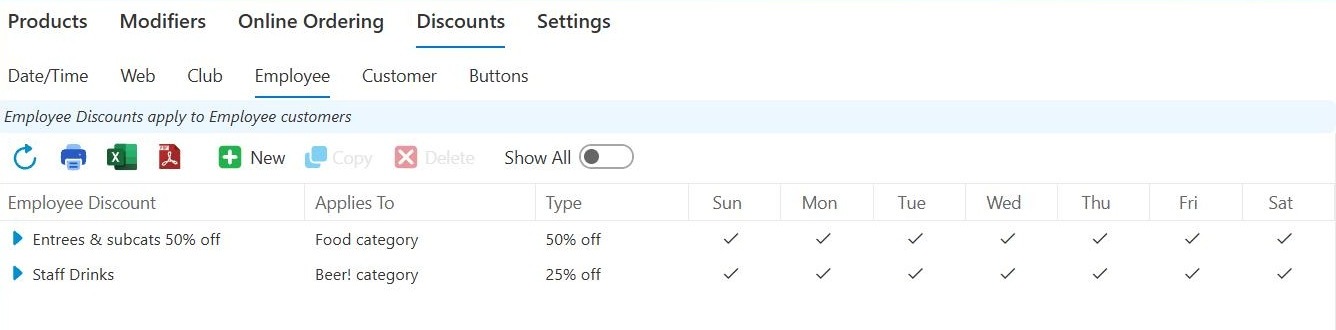
Figure 15. The Employee tab with two staff discounts: half off food, a quarter off beer
Give one customer a discount
Use the Customer tab for a standing rate for one person or business: a regular, a house account, a supplier who eats at the bar, an owner at 100 percent off. The discount applies whenever that customer is on the ticket, at every location.
1. On the Discounts screen, click the Customer tab, then click New (Figure 16).
2. Click the magnifying glass beside Customer.
3. In Search, type part of the customer's name (Figure 17).
If the customer is not in the list, add them under Customers first, then come back.
4. Check you have the right person before you pick them. Once you save, you cannot change the customer on this discount. Click the customer, then click OK. Their name fills the Customer box.
5. In Type, choose Percent Off. In Amount, type 10.
6. Leave Cumulative discount unticked.
7. Leave Applies To on ALL PRODUCTS to give them the rate on everything.
8. Leave the dates and days as they are for a discount that always applies. If you do change the dates, double-check that From comes before To. Nothing on this tab will catch it if they are the wrong way round.
9. Compare your screen with Figure 18, then click Save.
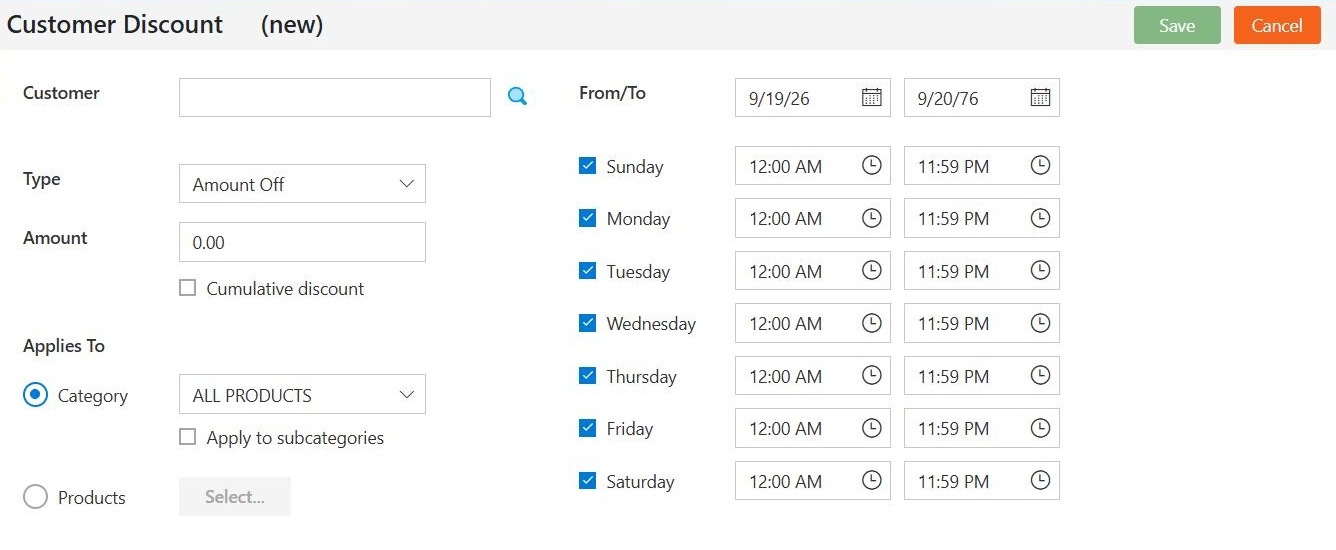
Figure 16. A new customer discount. The customer is picked from a list, not typed

Figure 17. Picking the customer. You only need the name; the other columns can be ignored
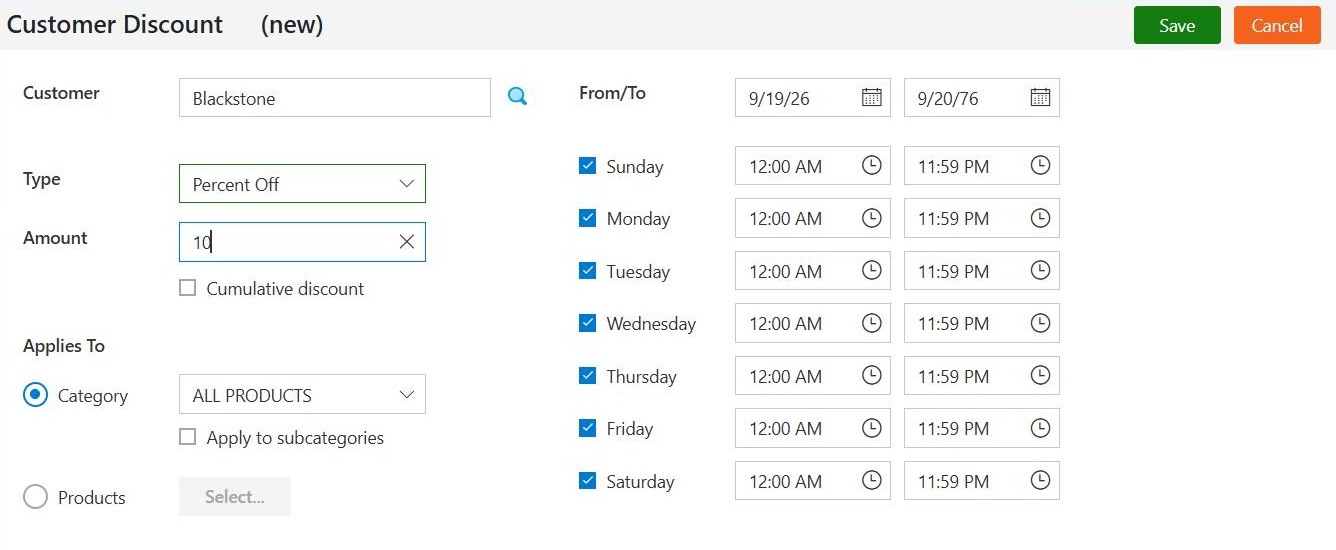
Figure 18. A finished customer discount: 10 percent off everything, for one customer
The Customer tab lists each discount by customer name (Figure 19).
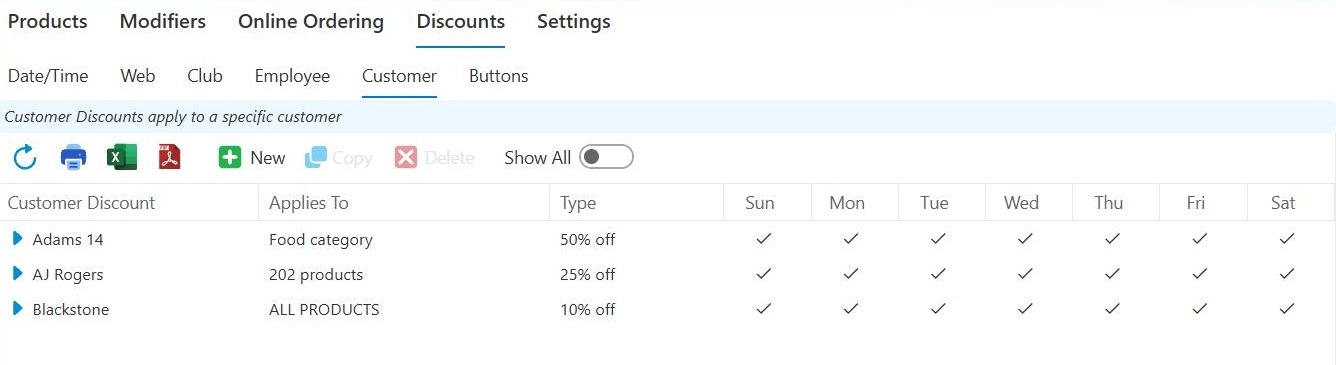
Figure 19. The Customer tab. Applies To shows a category, a number of products, or ALL PRODUCTS
To move a discount to a different customer, click its row, click Copy, pick the new customer, and save. Then delete the old one.
Change, reuse or remove a discount
Change a discount
Click the blue arrow beside it, make your changes, and click Save. If you click Cancel after making changes, the system asks Save your changes?.
Copy a discount
Click its row, then click Copy. The copy opens with (copy) after the name, ready to change. On the Customer tab, the copy opens with no customer, ready for you to pick one.
Delete a discount
A deleted discount is gone for good. If you might want it again, give it an end date instead, and it will drop out of the list on its own.
Click its row, then click Delete. The system asks Delete the Discount?. Click Ok to delete it.
See who changed a discount
Open it and look at the Audit Trail at the bottom (Figure 20). It shows the date, the person, and what they changed.
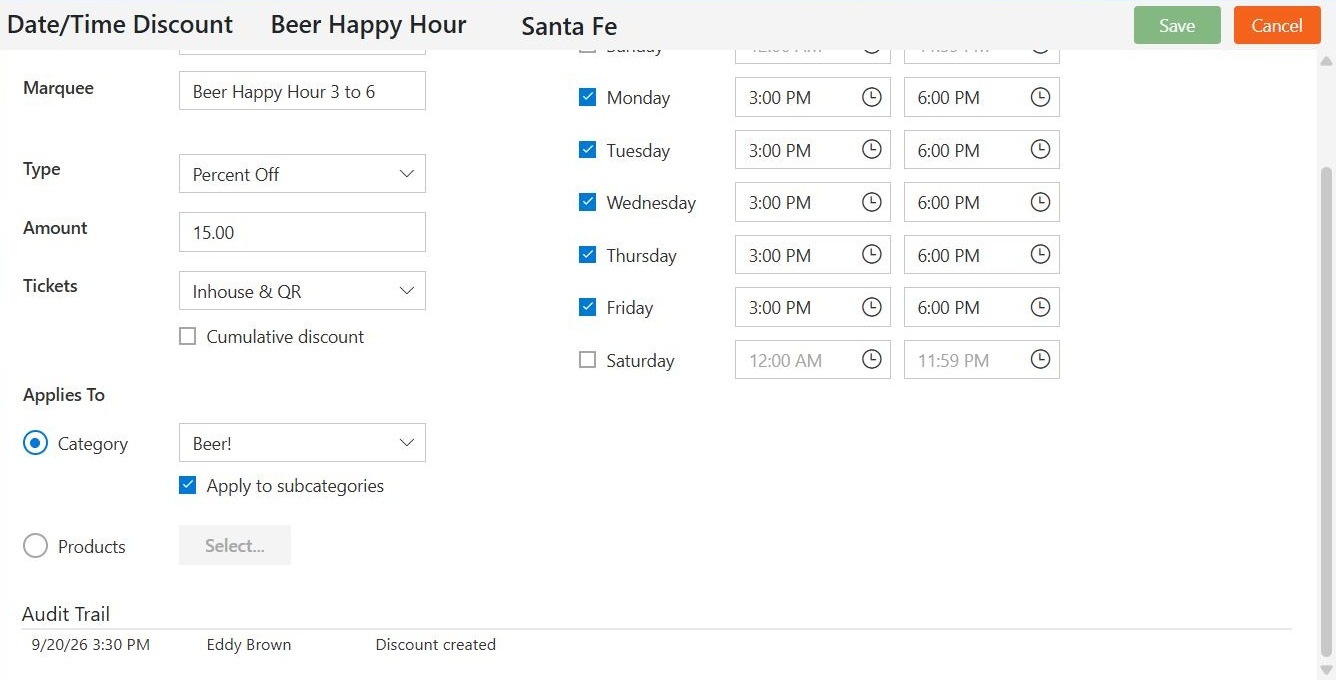
Figure 20. The Audit Trail at the bottom of a saved discount
Where did my discount go
A discount disappears from its list when it is not running today. Nothing is deleted. This happens when:
its To date is today or earlier
its From date is today or later
none of its days are ticked
To find it, turn on Show All. Every discount comes back, and the ones not running today have a grey arrow instead of a blue one (Figure 21). Show All stays on until you turn it off.
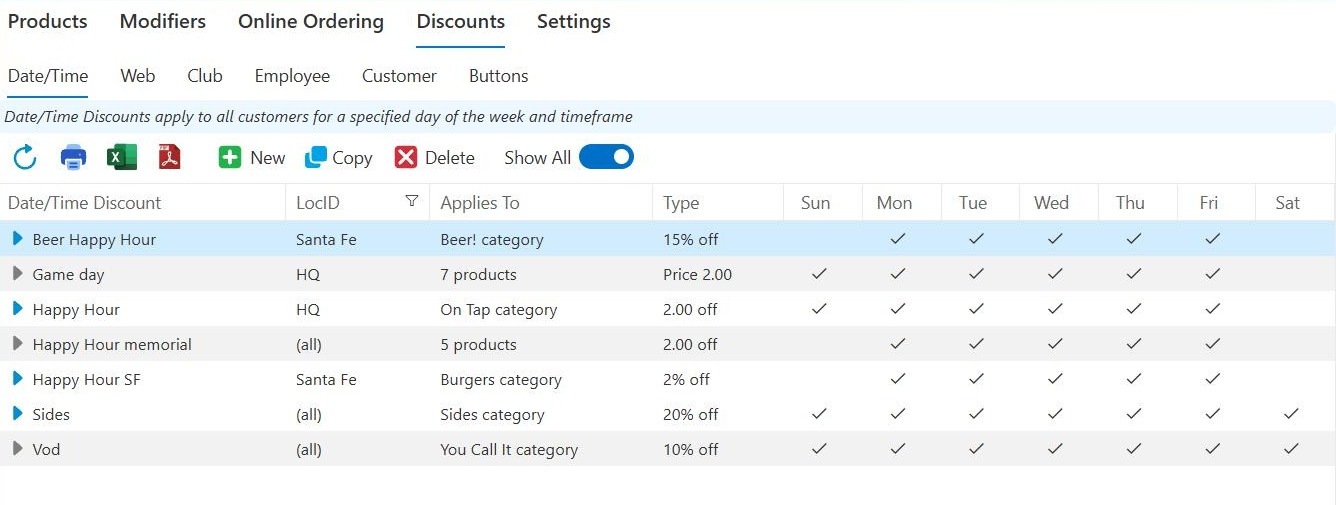
Figure 21. Show All is on. The discounts with grey arrows are not running today
To bring back last year's promotion, turn on Show All, open it, give it new dates with the calendar, and save. That is quicker than building it again.
Customer discounts never disappear this way. The Customer tab always shows every discount.
If something goes wrong
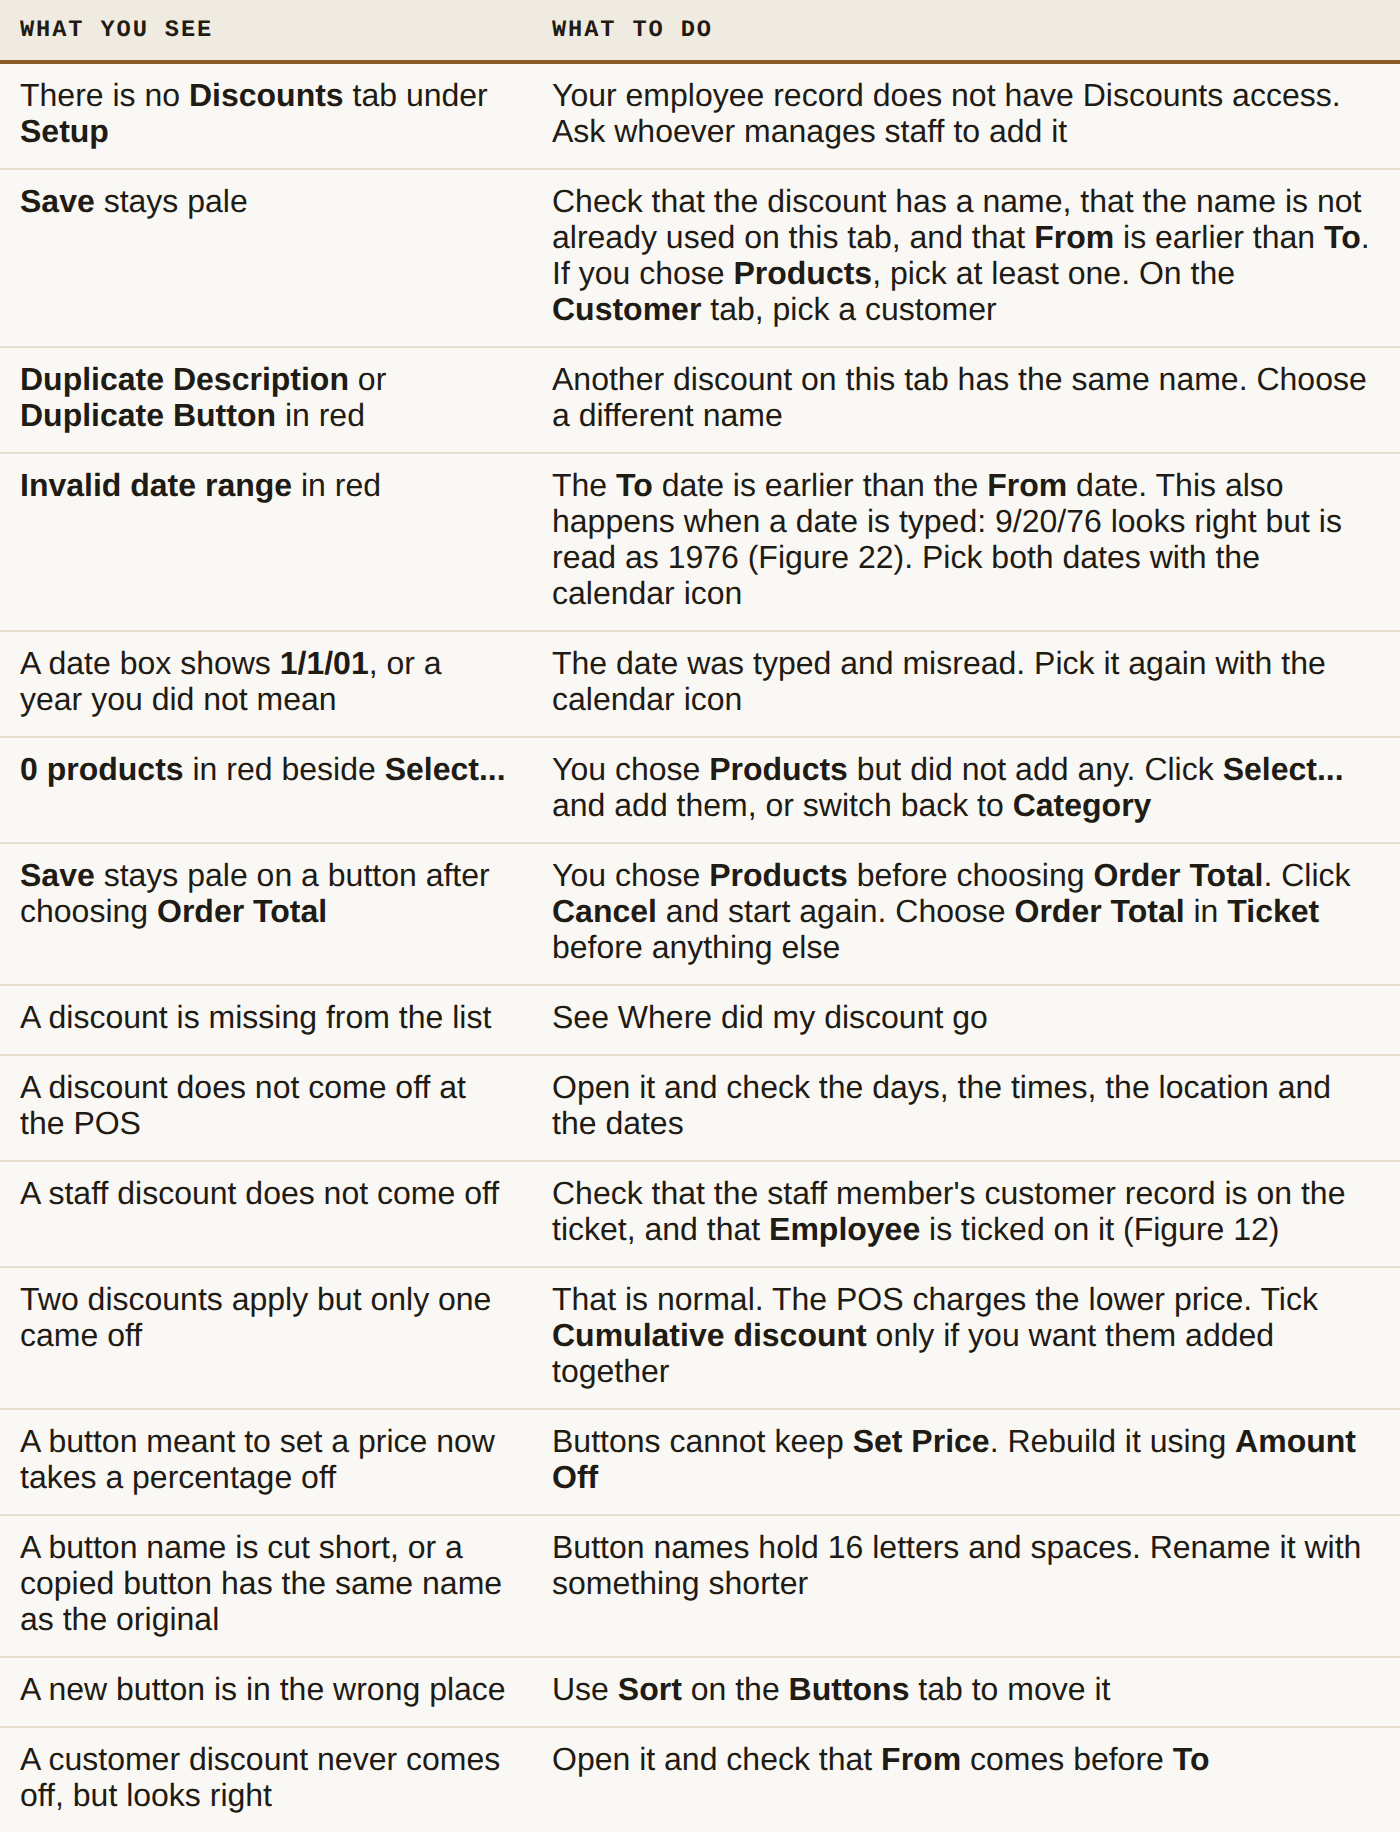
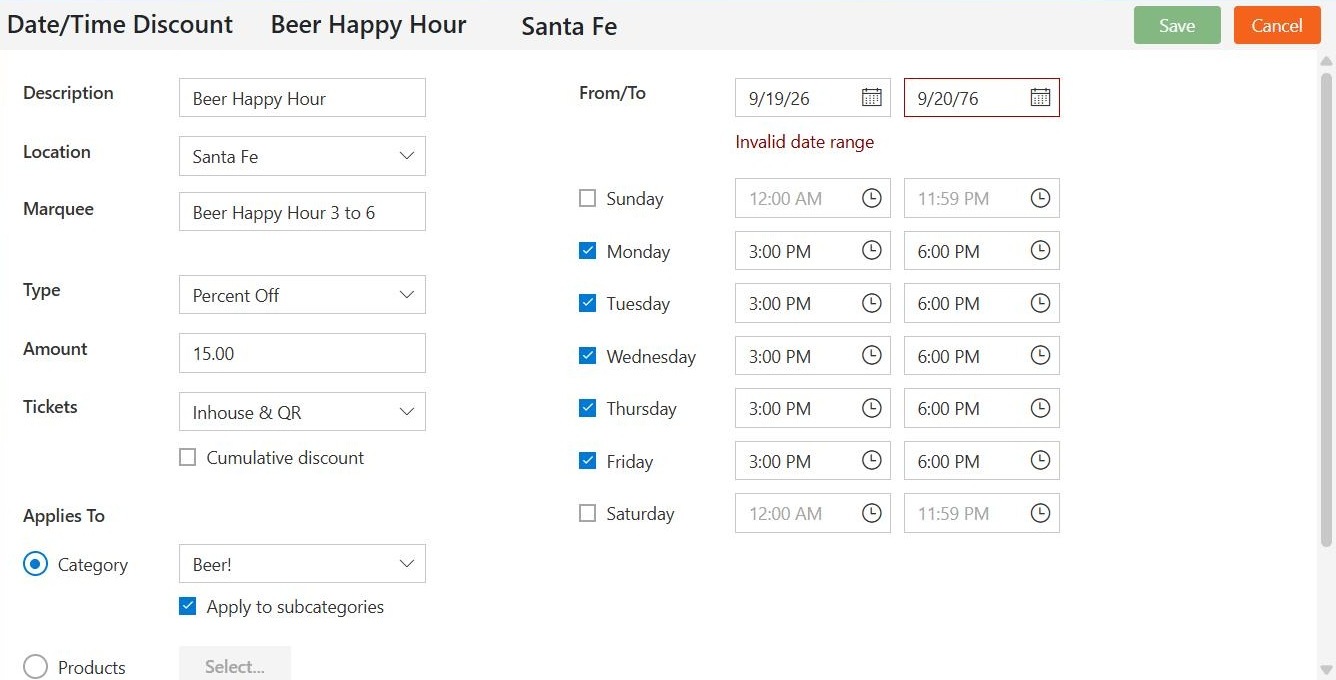
Figure 22. 9/20/76 was typed into To. It looks right, but the system read it as 1976, so Invalid date range appears and Save goes pale
Reference
What each kind of discount asks for, at a glance:
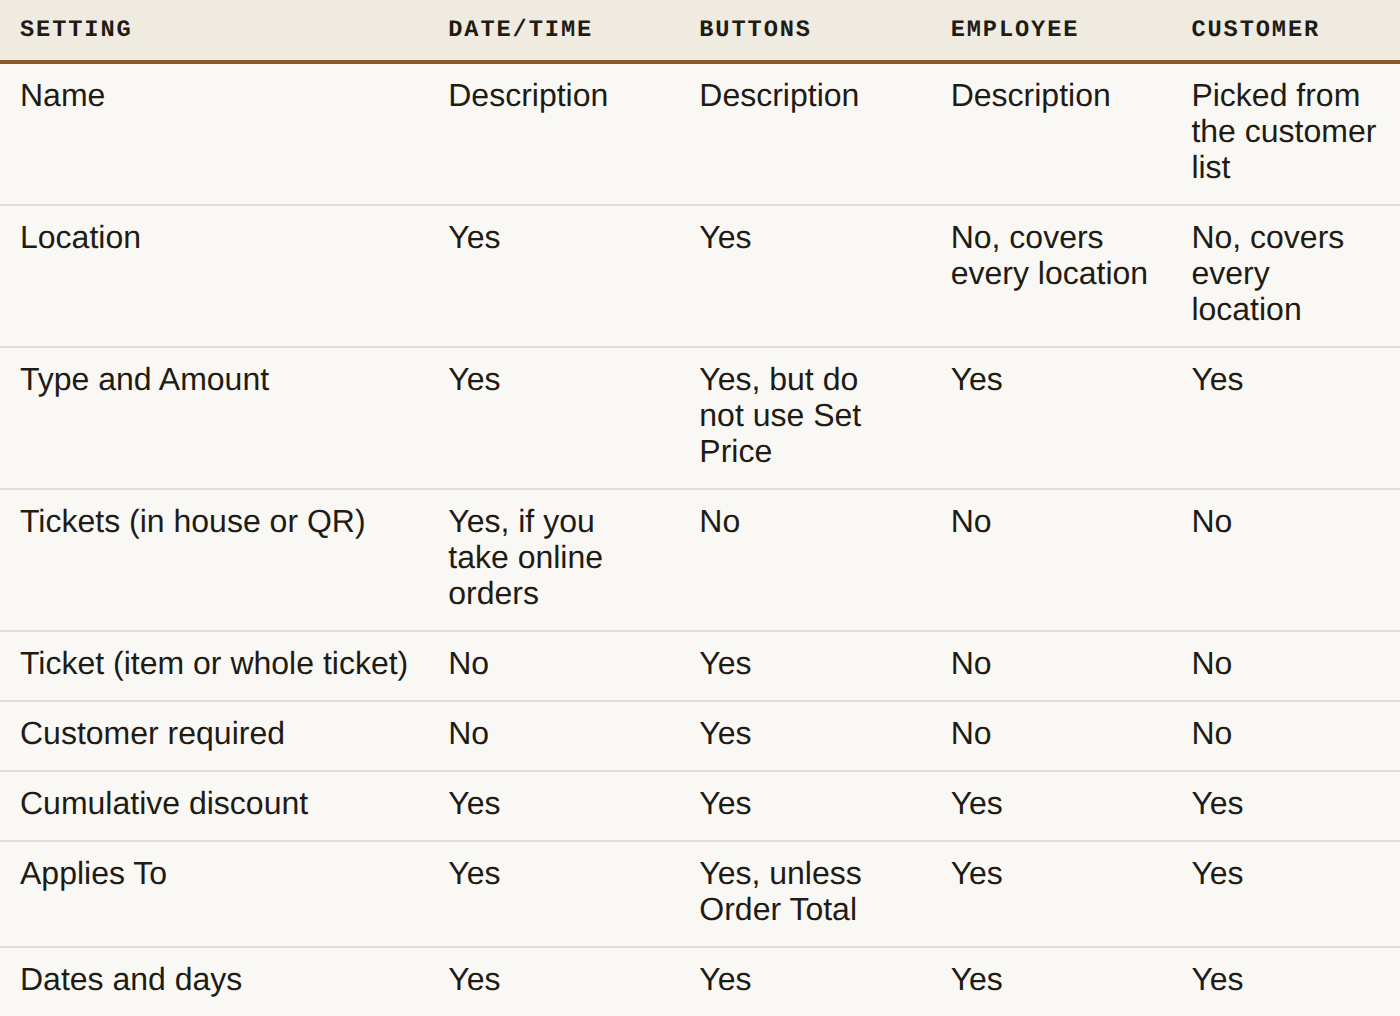
The icons at the left of each toolbar refresh the list, print it, and save it as an Excel or PDF file.
About this guide
BREW POS Admin: merchant how-to guide
Applies to: BREW POS Admin, master branch, 4 September 2026 snapshot.
Last reviewed: 21 September 2026 · Owner: Eddy
Still stuck?
Call BREW POS support on 1-800-676-9874. Tell them which step you reached and what the screen is showing.
Updated 29 September 2026 · BREW POS Admin, master branch, 4 September 2026 snapshot · Admin
BrewPOS How to use
Support 1-800-676-9874
Email [email protected]
© 2026 BREW POS. All rights reserved.
Privacy Policy | Terms and Conditions